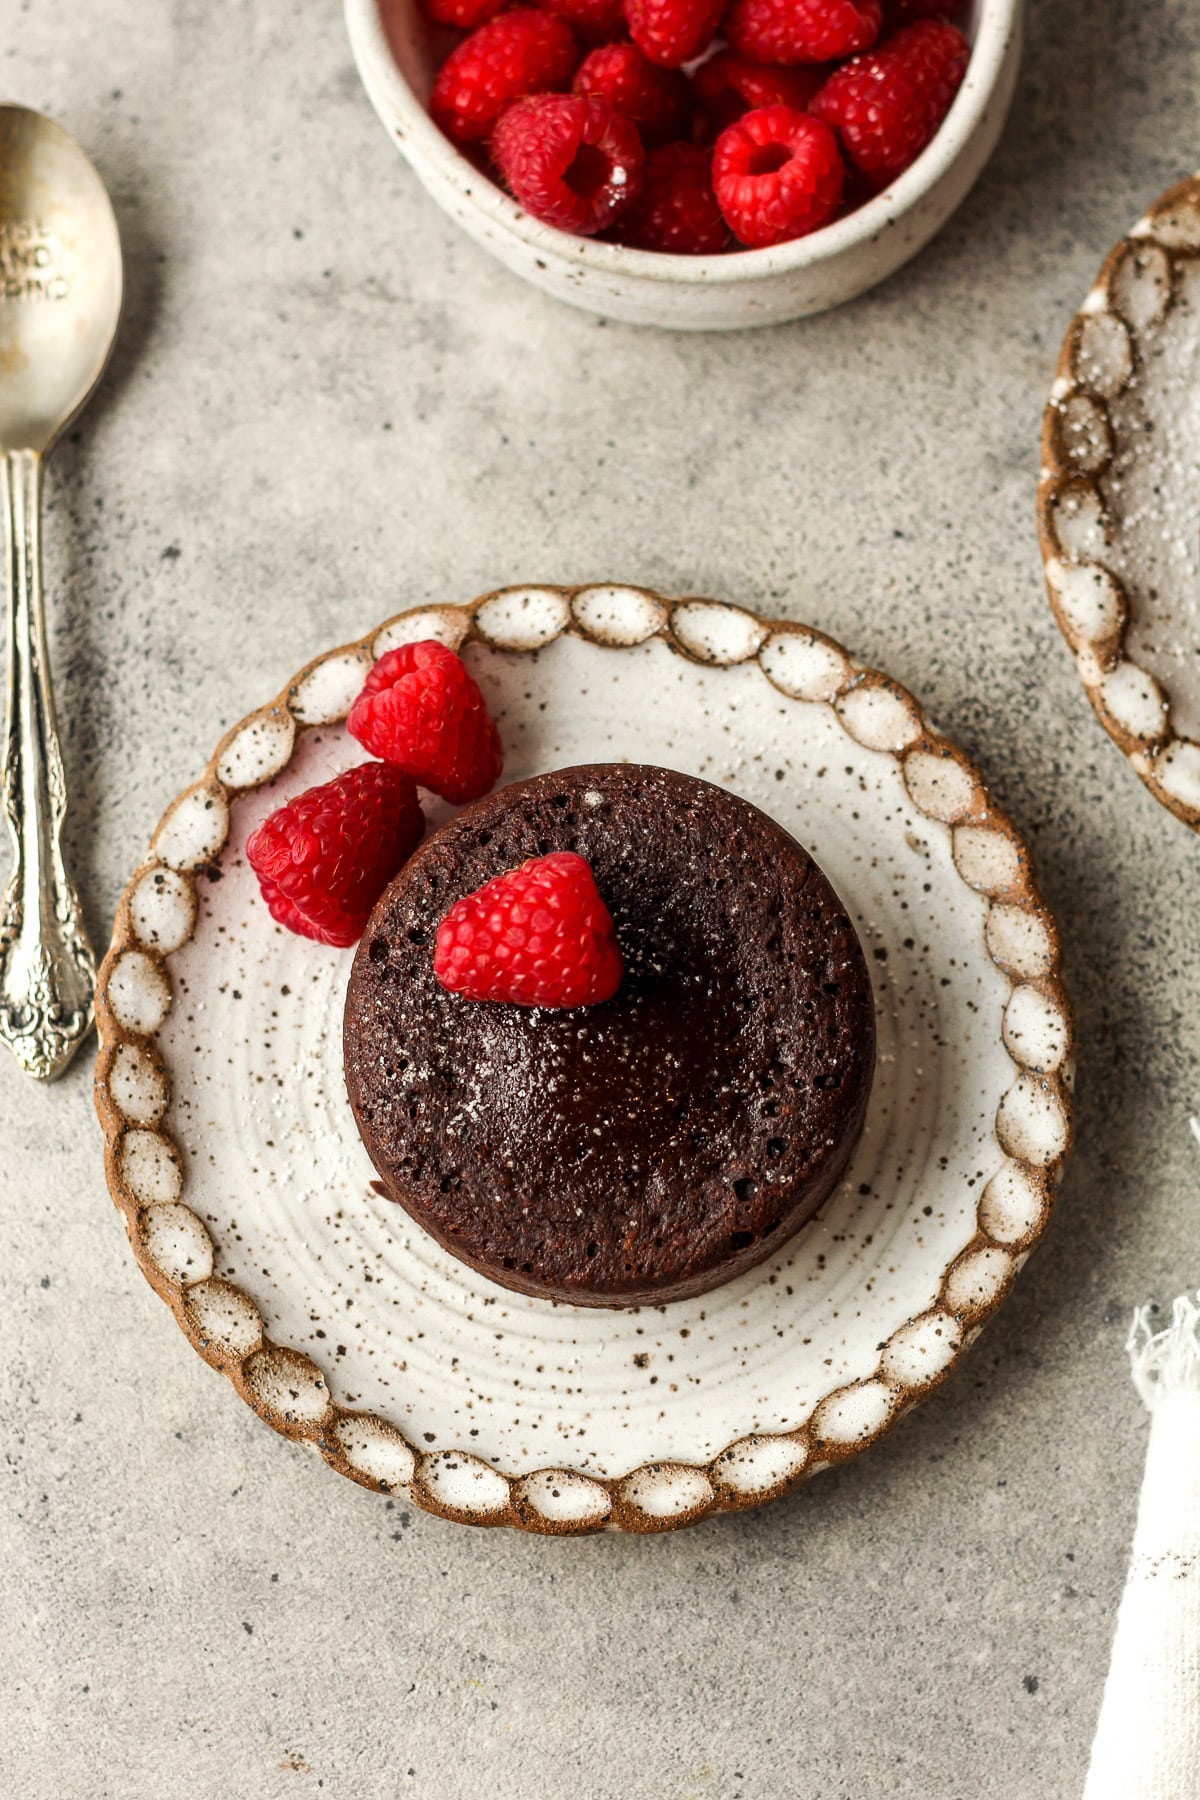
Mini Lava Cakes
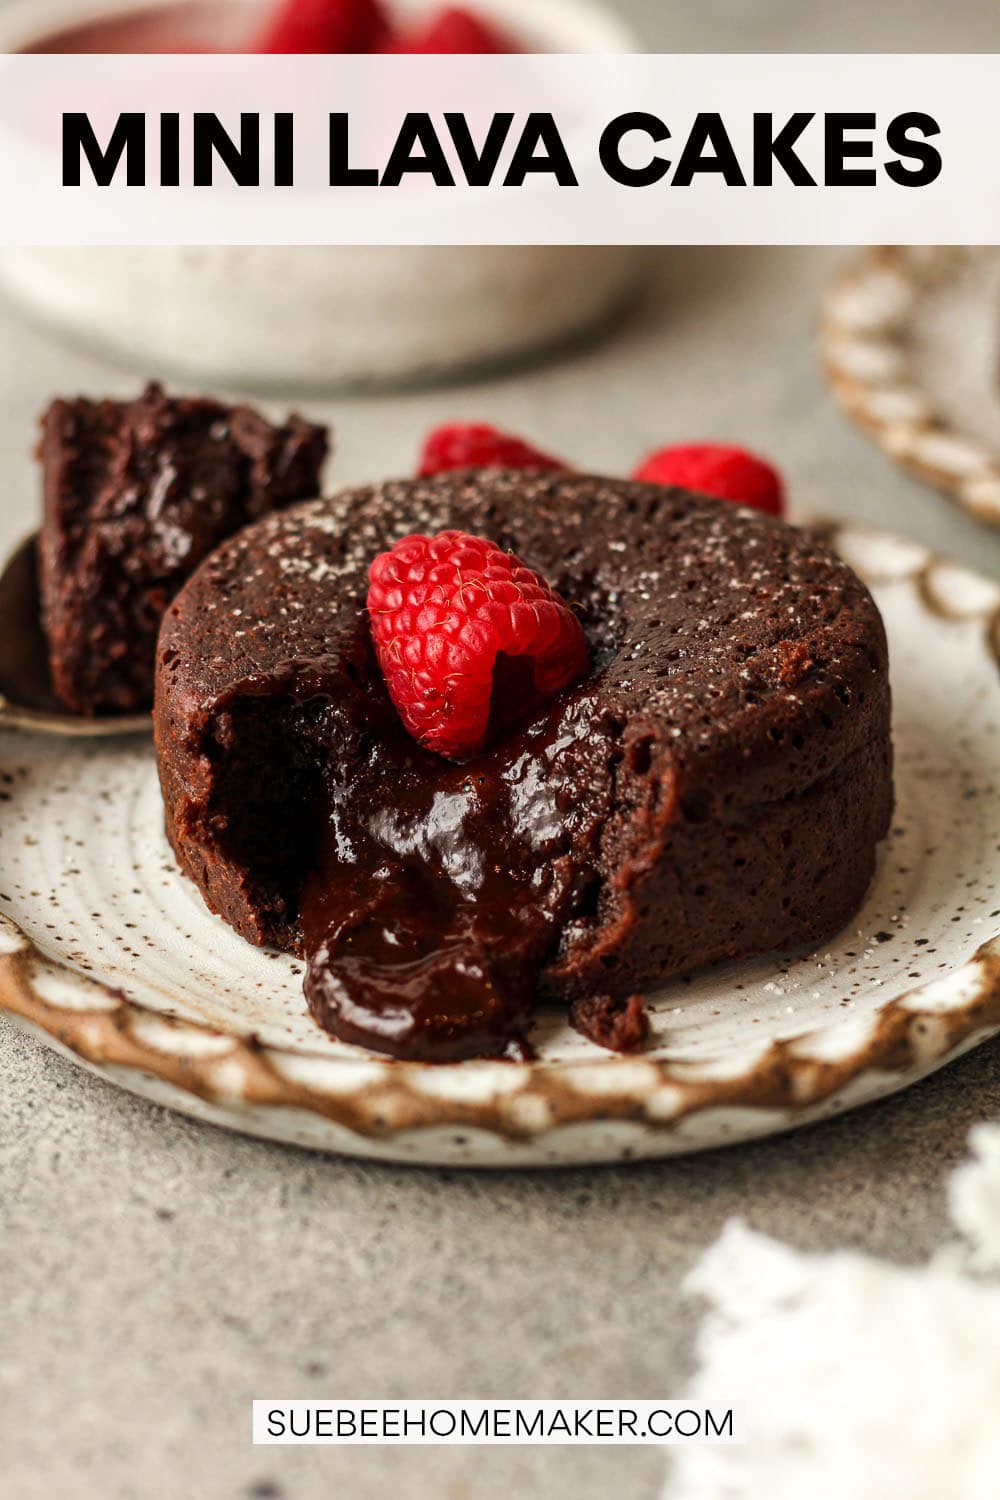
These Mini Lava Cakes are rich, indulgent, and perfectly portioned, with warm molten centers that flow with every bite. This small batch recipe is incredibly simple to make and makes the best dessert for small dinner parties or date night!
Happy Mother’s Day!
That’s right, youngest son Zach Ringsdorf has hacked into the blog today to bring y’all an all-time “cool mom” recipe. Throughout our childhood, the boys of the household were seldom left unsatisfied when it came to the culinary delights crafted by our mother. She is the best after all – well, almost the best. There was one dish that the boys craved more than anything.
There was one particular dish that etched itself into our memories, surpassing the delight of Chewy French Bread, flavorful Spanish Seafood Paella, and even our mother’s homemade ice cream. It was the illustrious Molten Lava Cake from Chili’s.
Do you remember the game Hungry Hungry Hippos? Well, imagine the Ringsdorf family gathered around a piping-hot, gooey, and irresistibly melty Lava Cake at our local Chili’s—reminiscent of those hungry hippos in action.
The first time our mother served us her homemade rendition of this divine dessert, it was a true jaw-dropping moment for my brother Josh and me. Just the day before, she might have been urging me to savor her favorite summertime snack—a ripe raw tomato enjoyed like an apple. And now, she astounded us with the richest, messiest, and most indulgent treat she had ever whipped up. That moment will forever be ingrained in my memory.
It held immense significance for us, as we knew our mother’s true passion lay in perfecting her risotto recipes. Yet, she selflessly took on the role of a local Chili’s chef, recreating their lava cake for her beloved boys. From that moment on, the Molten Lava Cake became an extraordinary indulgence reserved for unique occasions— not just birthdays, but rather unexpected triumphs. Whether it was the transition from fourth to fifth grade, a hard-fought soccer game in the pouring rain, or successfully enduring a dentist appointment without needing any restraint, these small victories became precious moments we celebrated together, always underscored by our mother’s unwavering love. Whether it came in the form of the Molten Lava Cake, the cherished Special Plate, or a new Webkinz, her gestures made every occasion remarkable. Happy Mother’s Day, Mom!
Today, I’d like to dedicate this exquisite recipe to all the wonderful mothers out there, with a special shoutout to my incredible mother, SueBee. Prepare to treat yourself to the ultimate indulgence with our irresistible Mini Lava Cakes. You’ll experience the sheer decadence of its velvety, oozing chocolate center and flawlessly crisp exterior.
Why We Love This Recipe:
- That molten center moment – Cutting into one and watching warm chocolate ooze out feels a little magical every single time.
- Big flavor, small package – Rich, intense chocolate in a petite dessert means you get maximum indulgence without overdoing it.
- Perfect with toppings – Ice cream, whipped cream, berries, powdered sugar are all toppings that play well with everyone.
- Chocolate lover’s dream – Deep, gooey, unapologetic chocolate in every bite. The perfect dessert for any occasion.
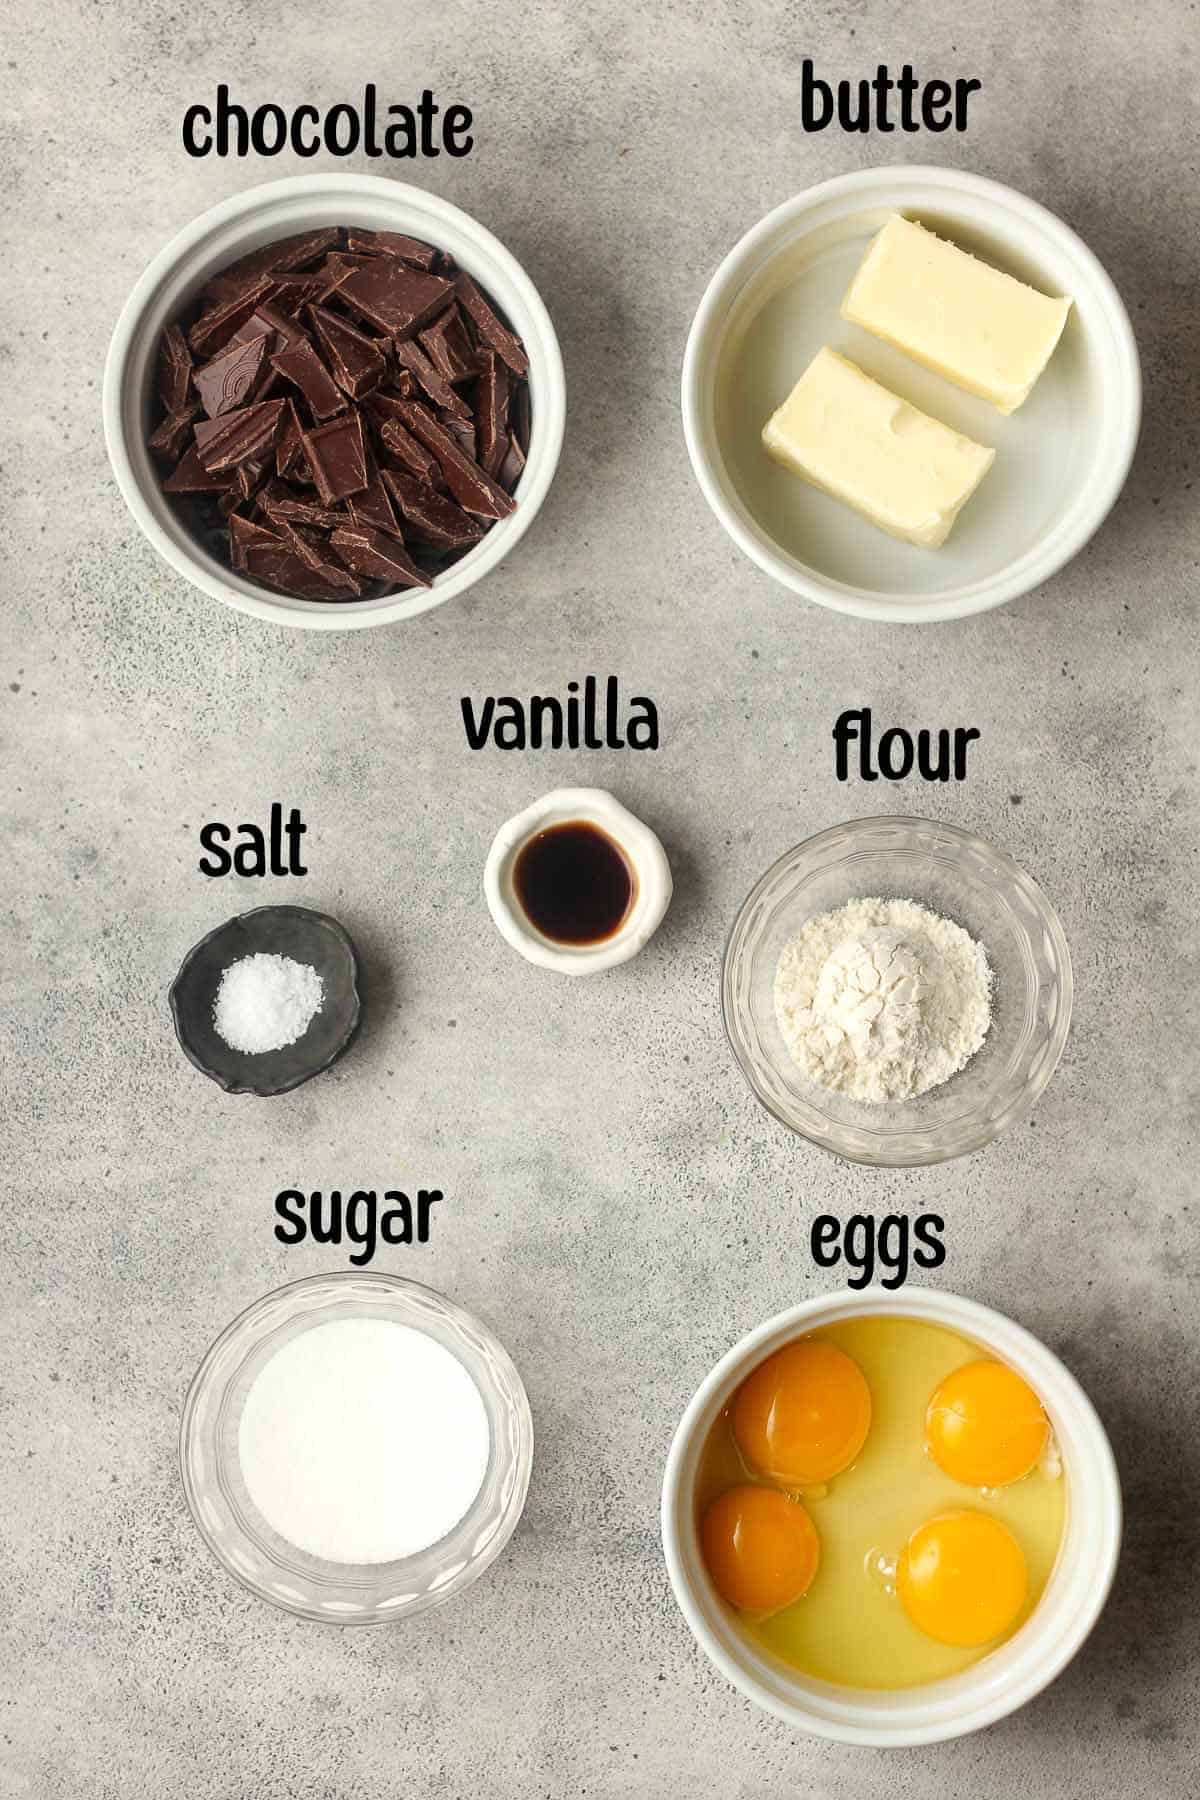
Ingredients Used:
- Chocolate
- Butter
- Eggs
- Sugar
- Vanilla Extract
- Flour
- Salt
How to make Mini Lava Cakes:
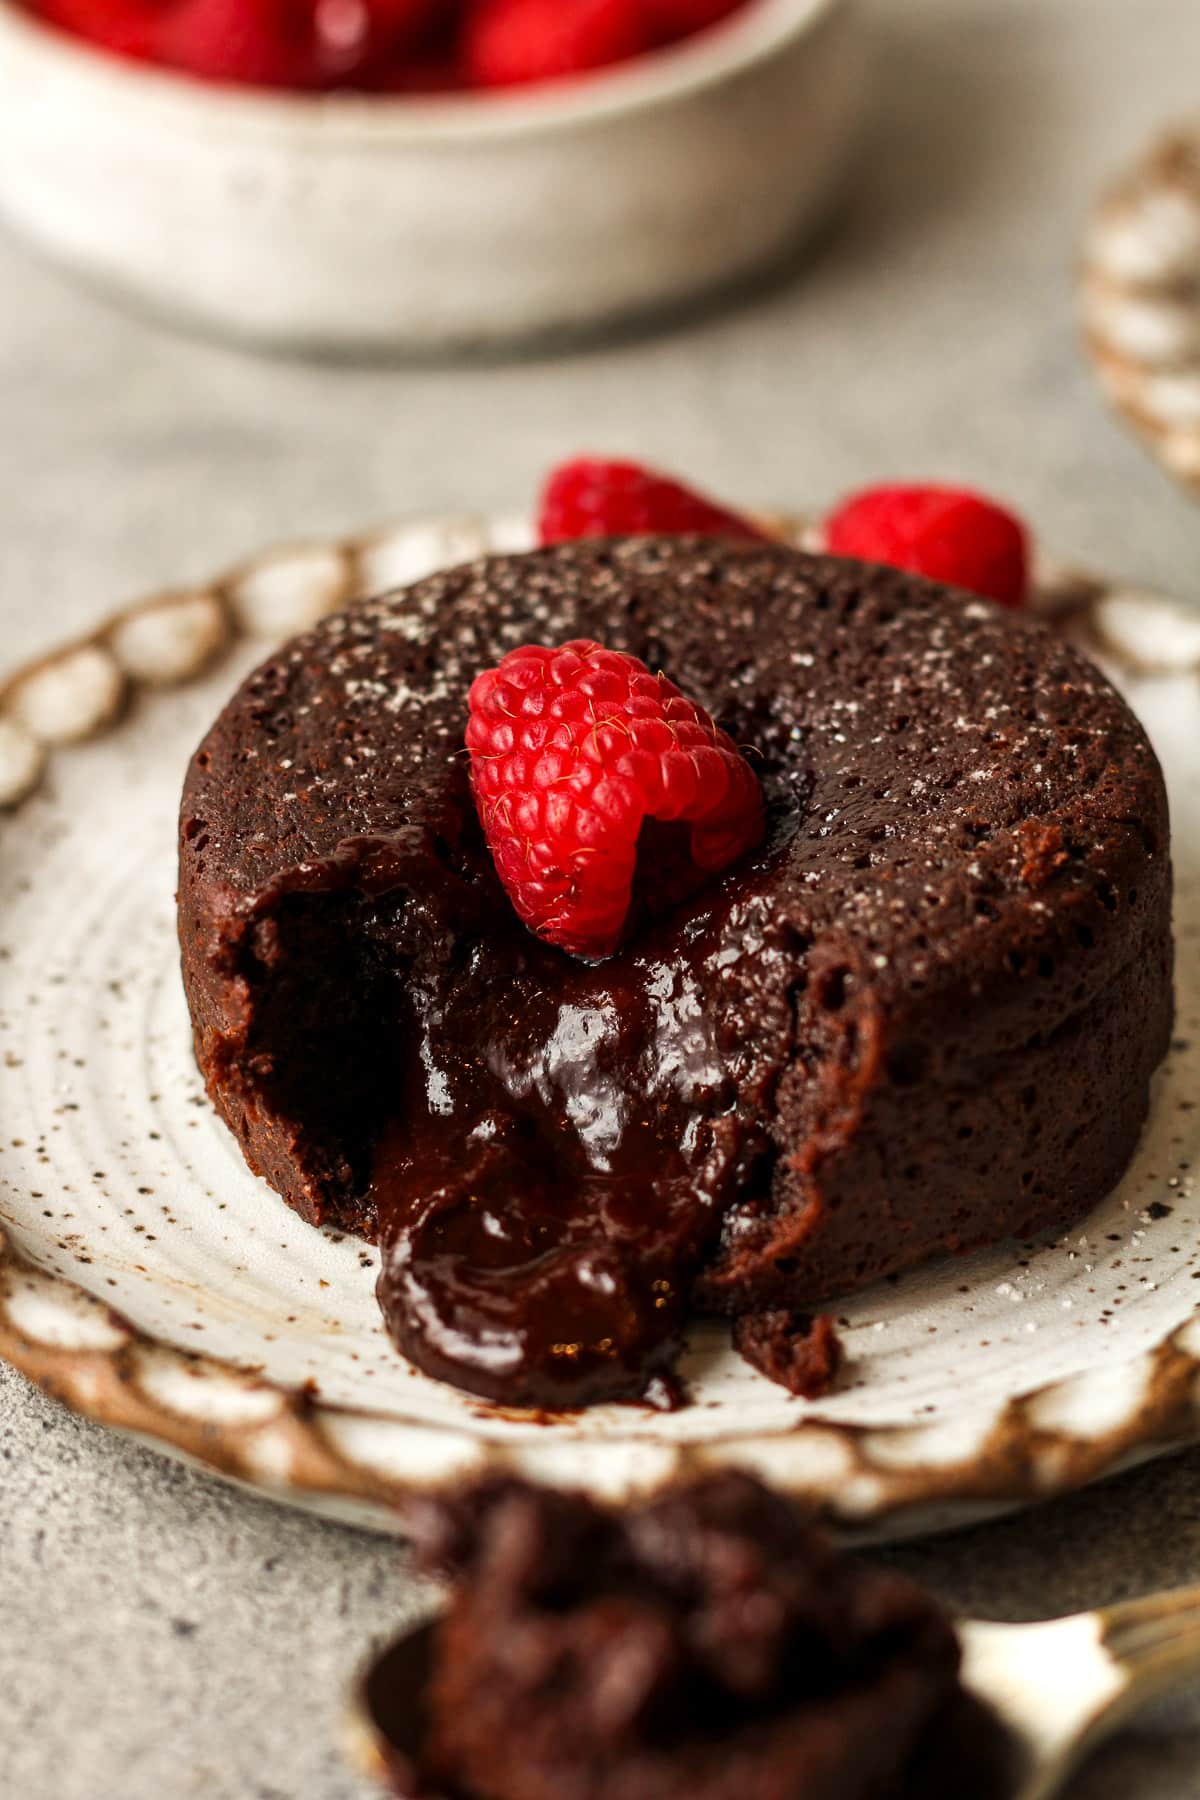
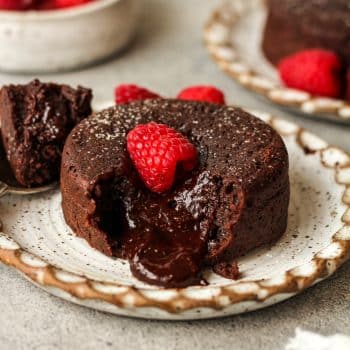
These mini Lava Cakes are meant to be gooey. When baking, it’s preferable to err on the side of undercooking rather than overcooking it. We want the cake to be melty and goopy. This is a cake that comes out of the oven, onto a plate, and into your mouth.
NOTE: Oven temperature is KEY. When testing this recipe, I made sure I added extra oven thermometers to make sure the temperature was close to 450 degrees F. For me, the right baking time was 11 minutes but that might be slightly different for you, depending on your oven. I recommend testing this before serving it to guests.
Step 1
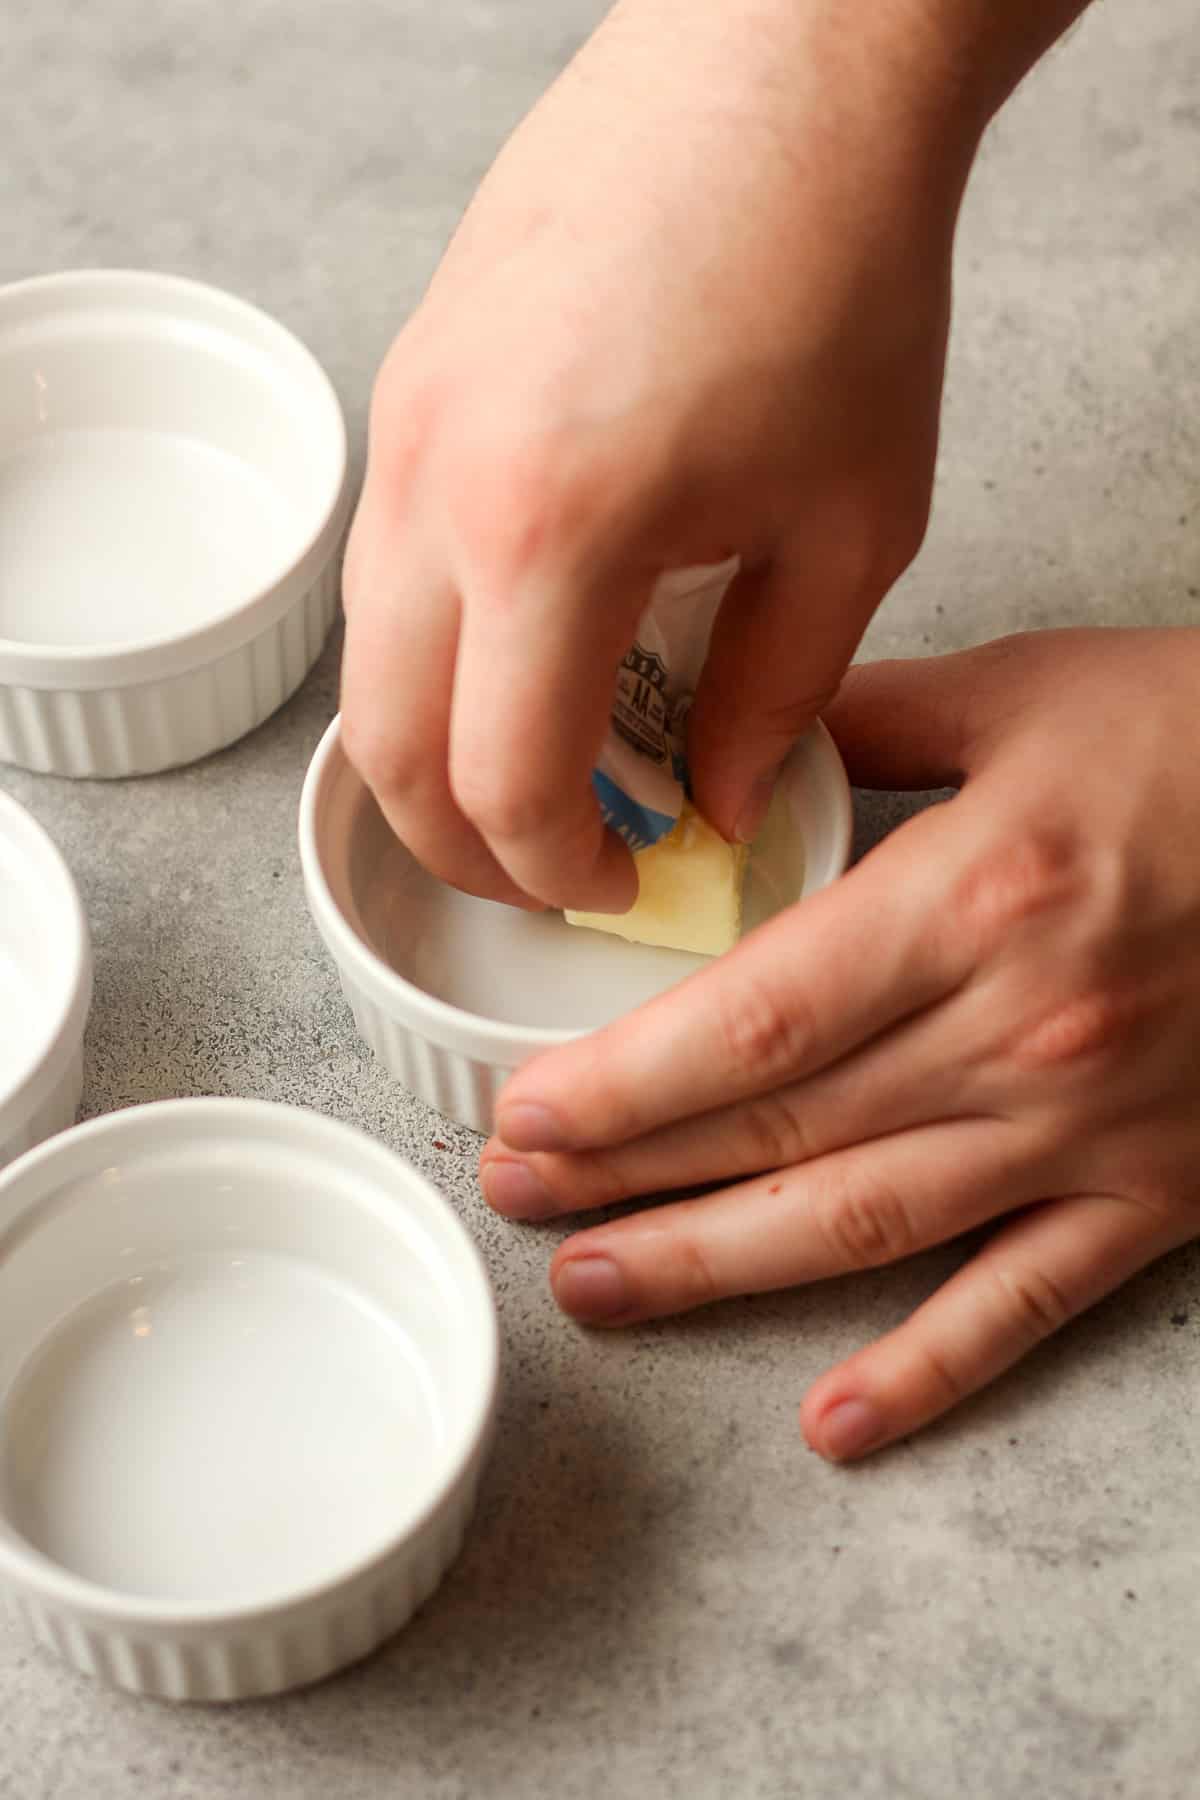
Prep for baking. Preheat oven to 450 degrees. Grease ramekins with butter. Be sure to spread butter into the corner of the ramekins to ensure a clean removal.
Step 2
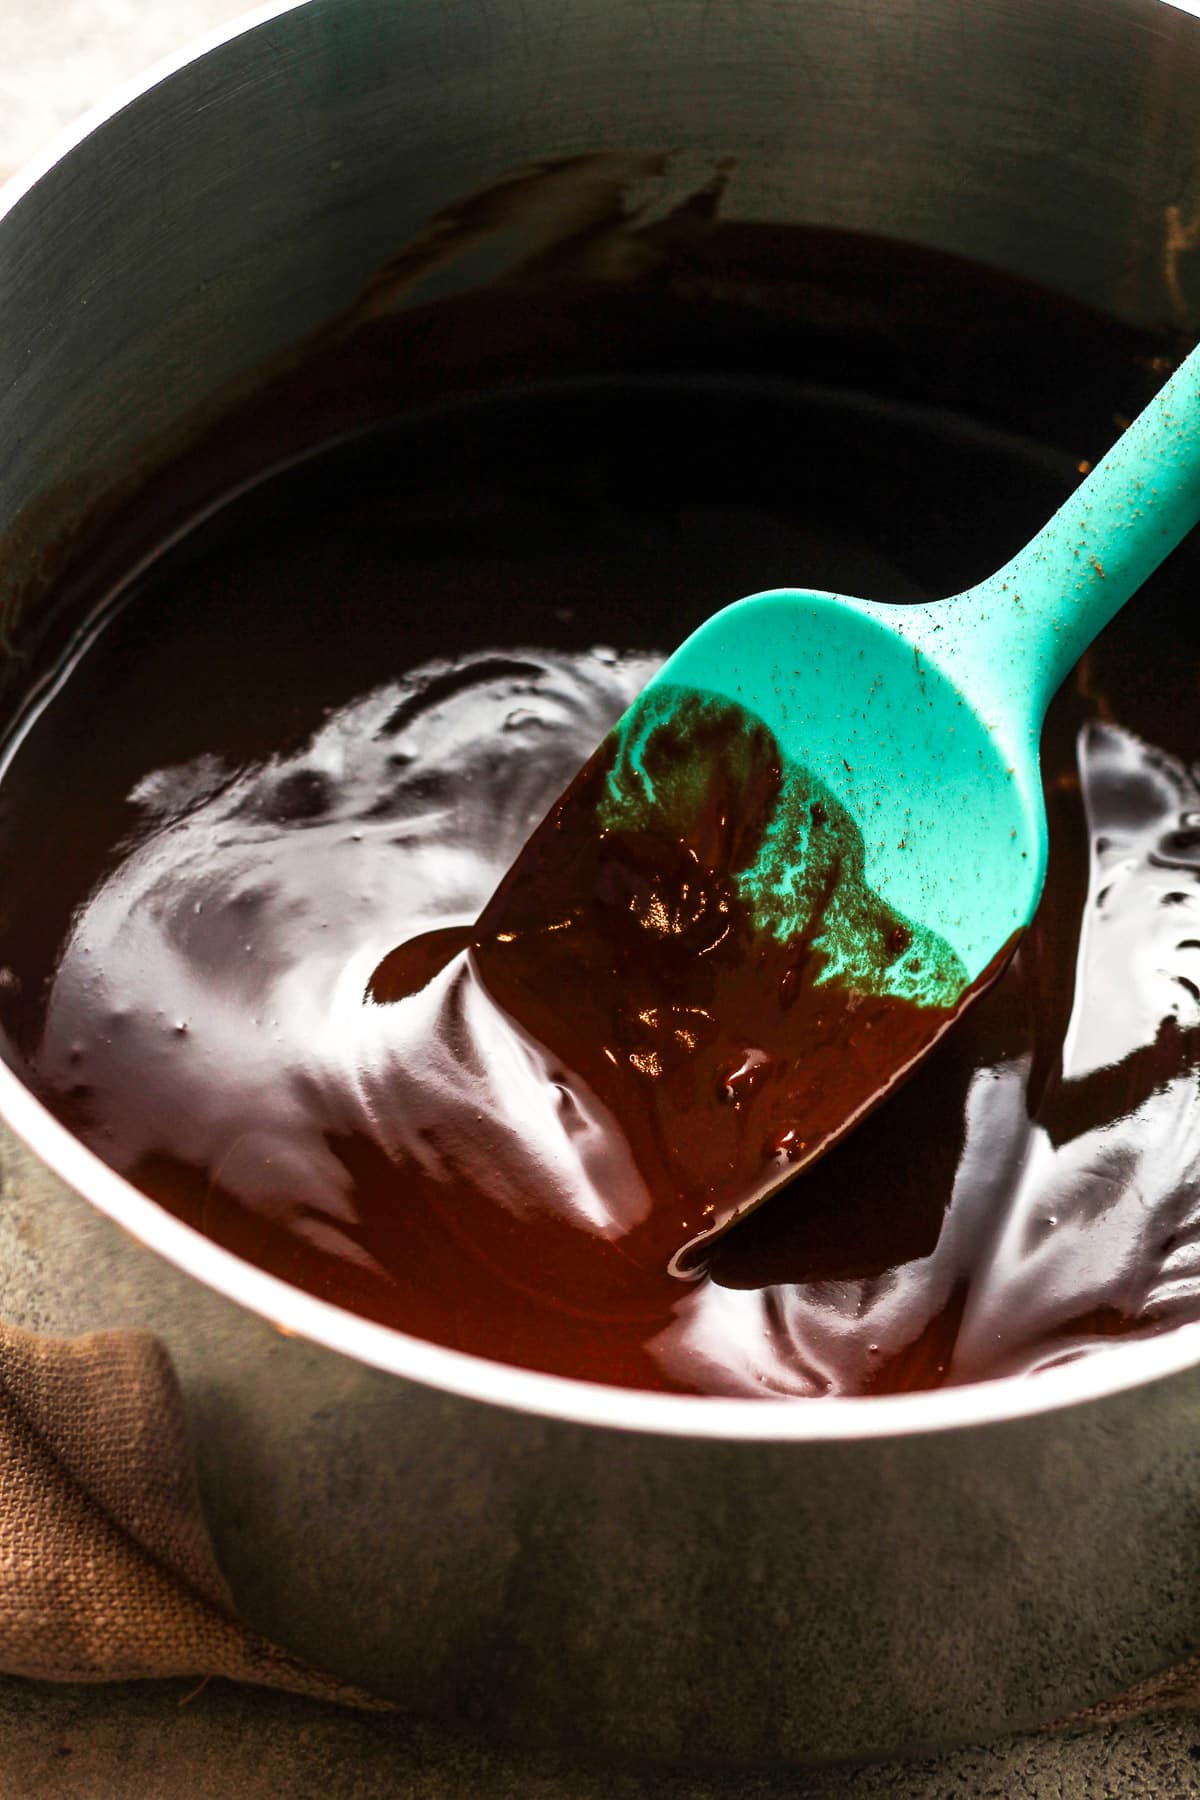
Melt chocolate and butter. Using a small pan or double boiler, melt the chocolate and butter over low heat, stirring almost constantly. Remove from heat.
Step 3
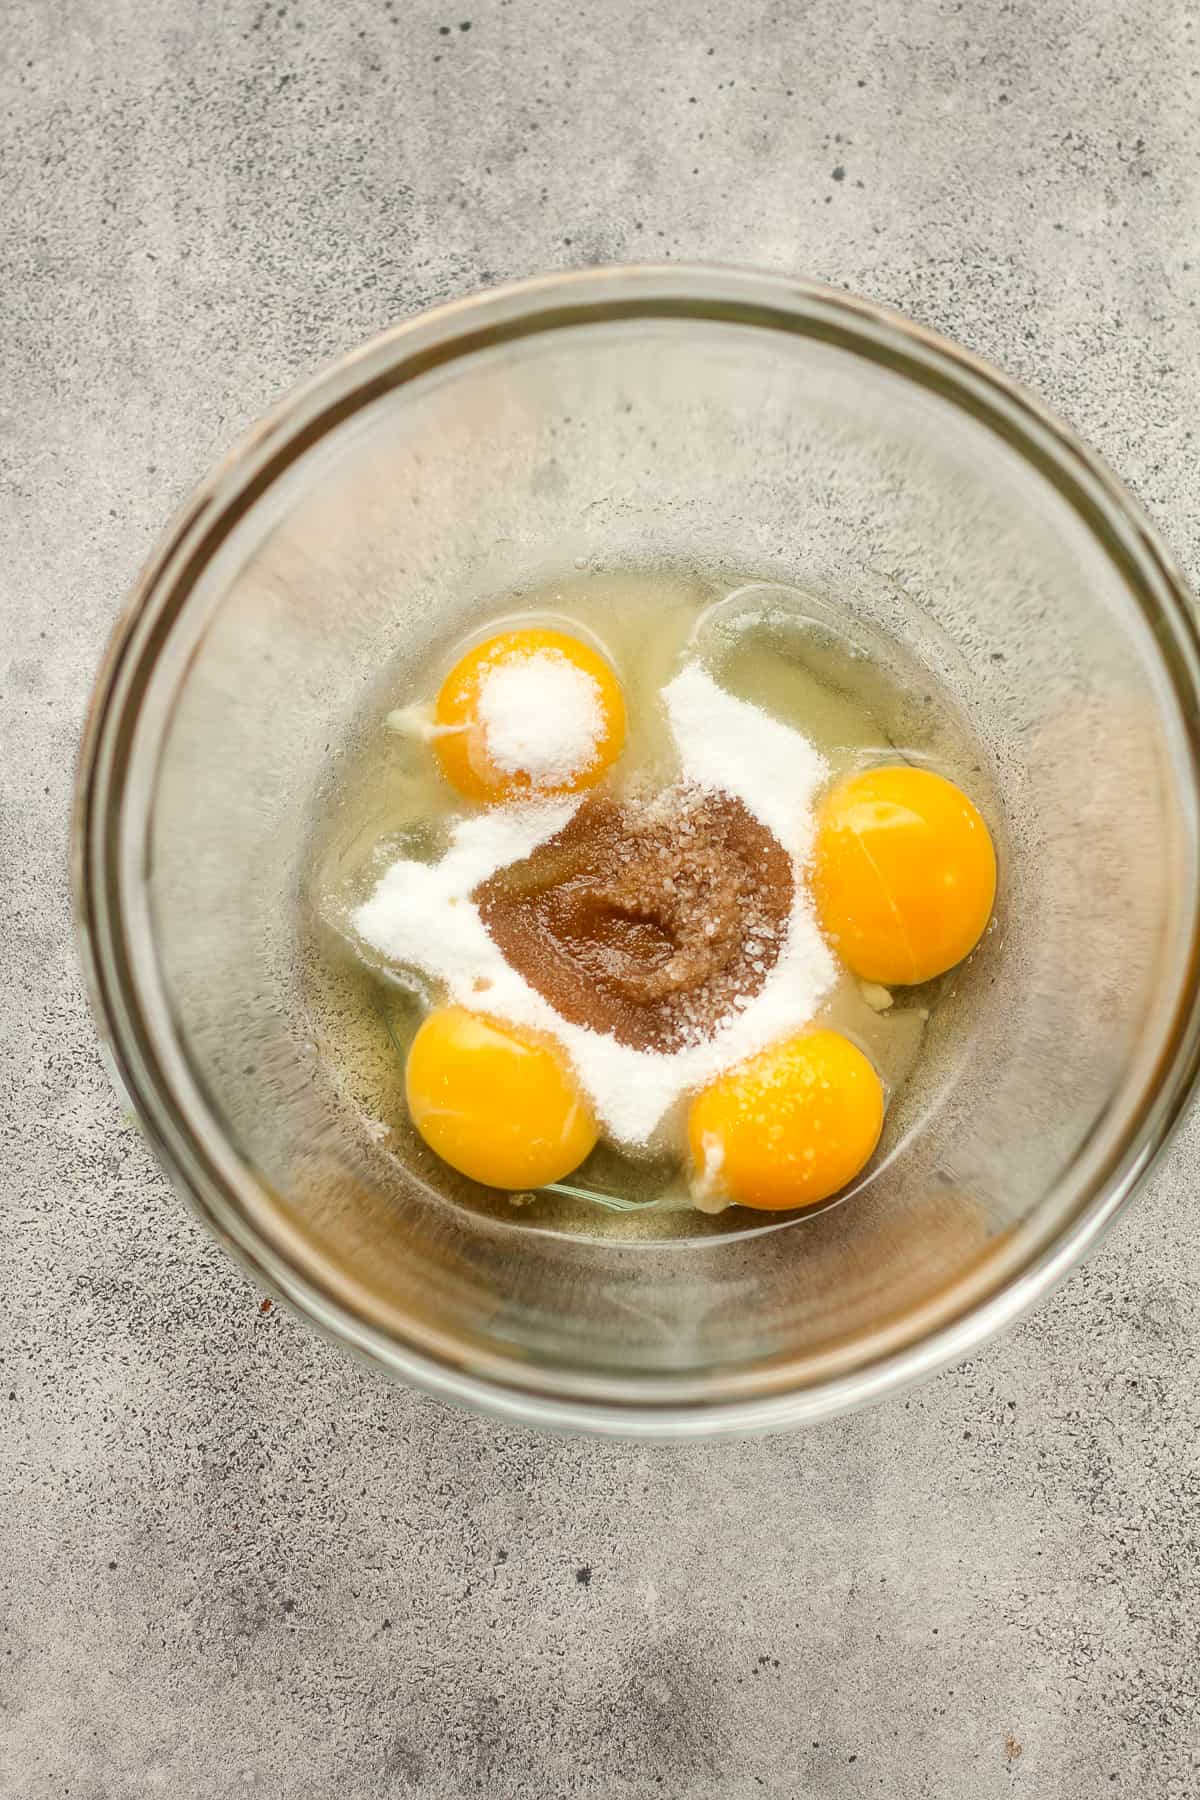
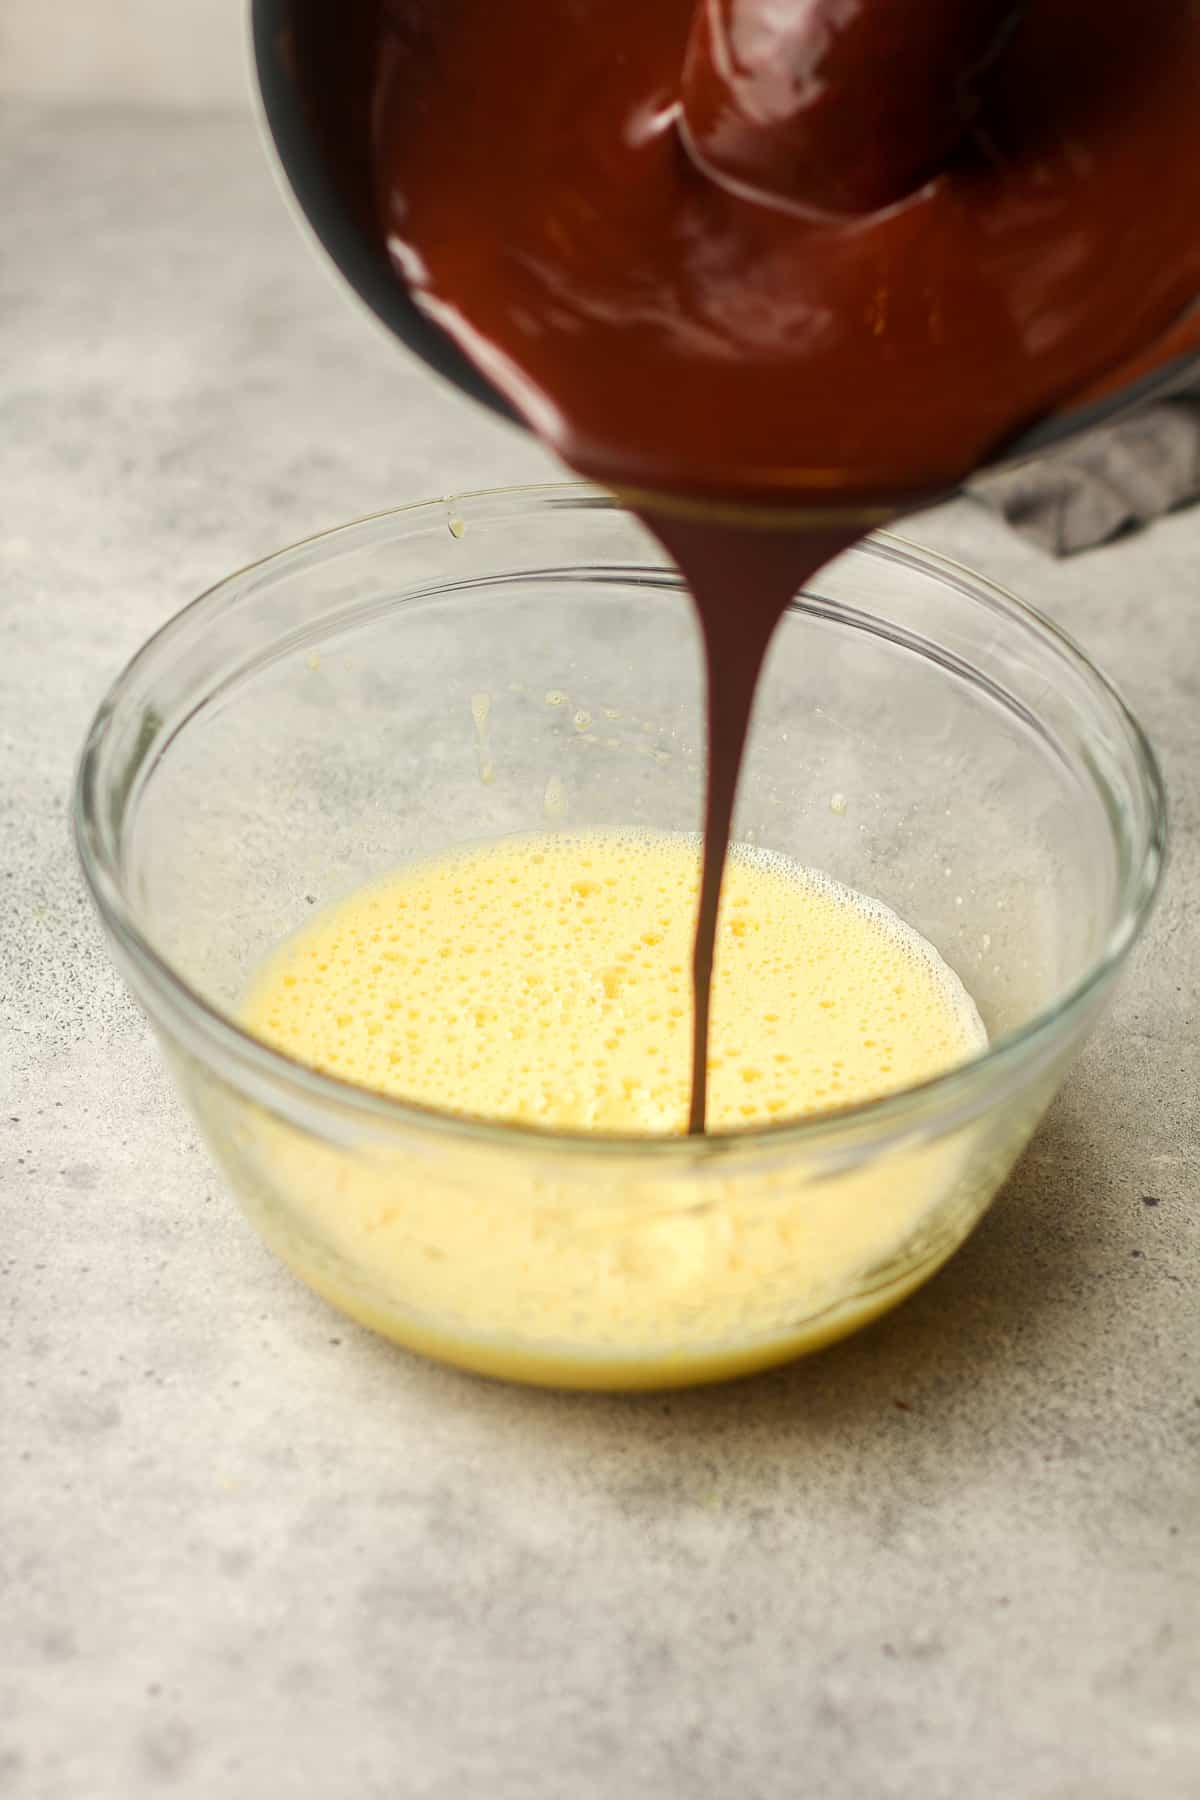
Prep remaining ingredients. In a small bowl, beat the eggs, sugar, and salt together until pale.
Step 4
Add in chocolate and flour. Use a spatula to gently fold in the chocolate and flour. Make sure the flour is fully absorbed in order to avoid clumping.
Step 4
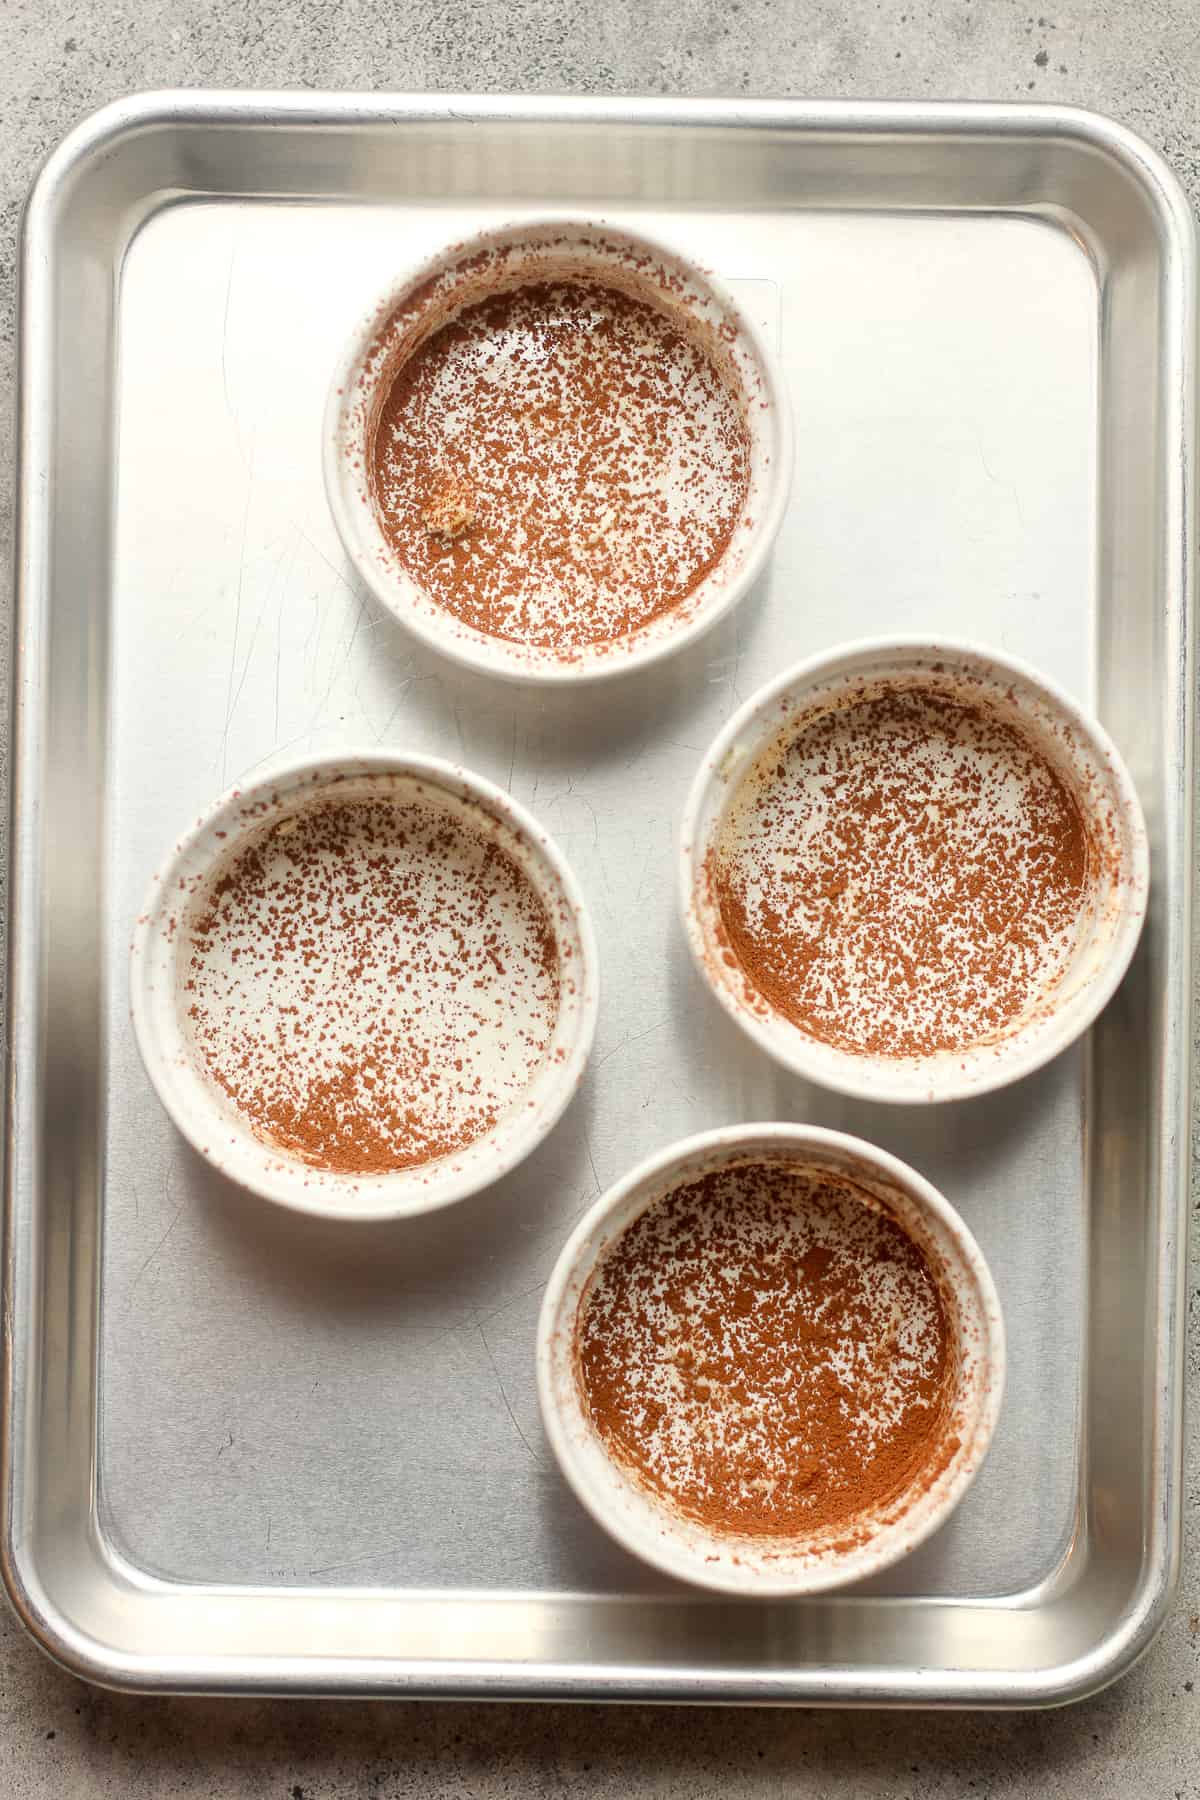
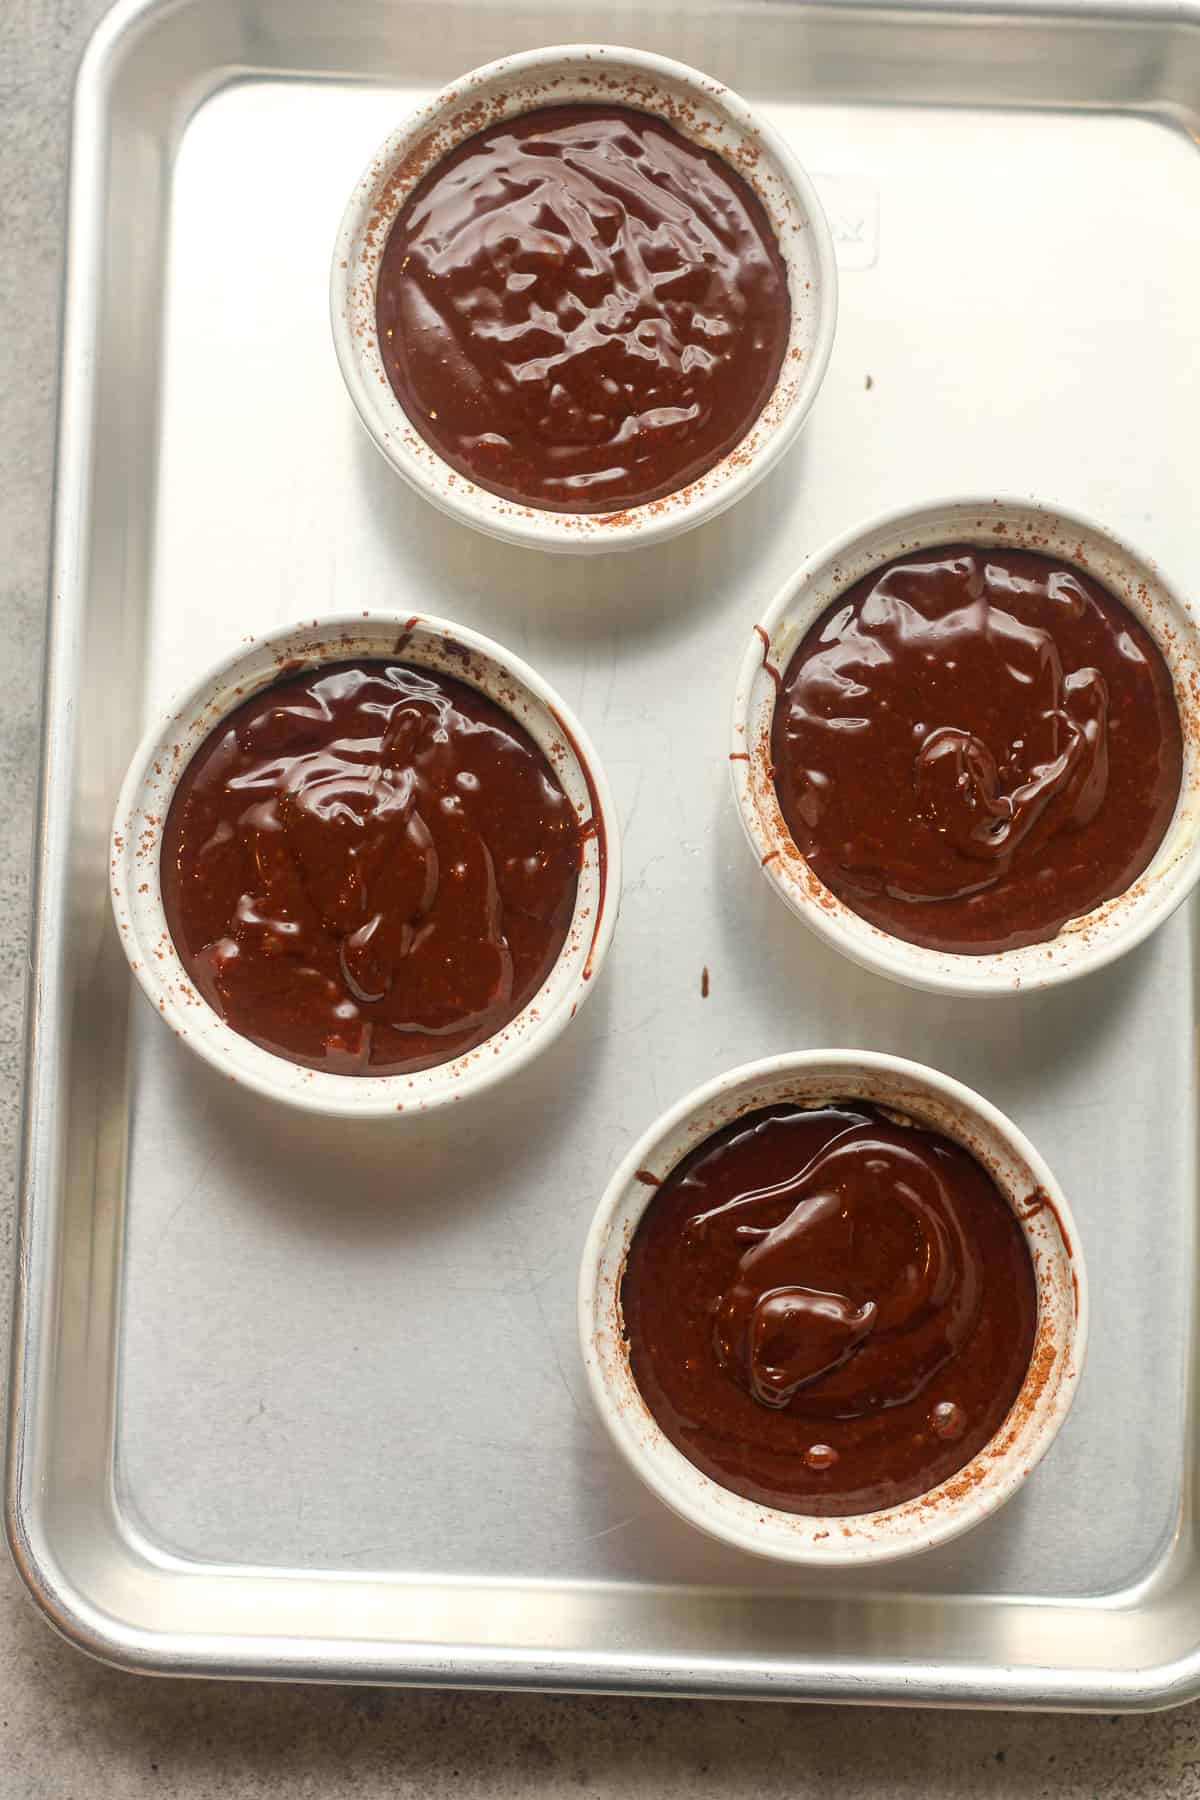
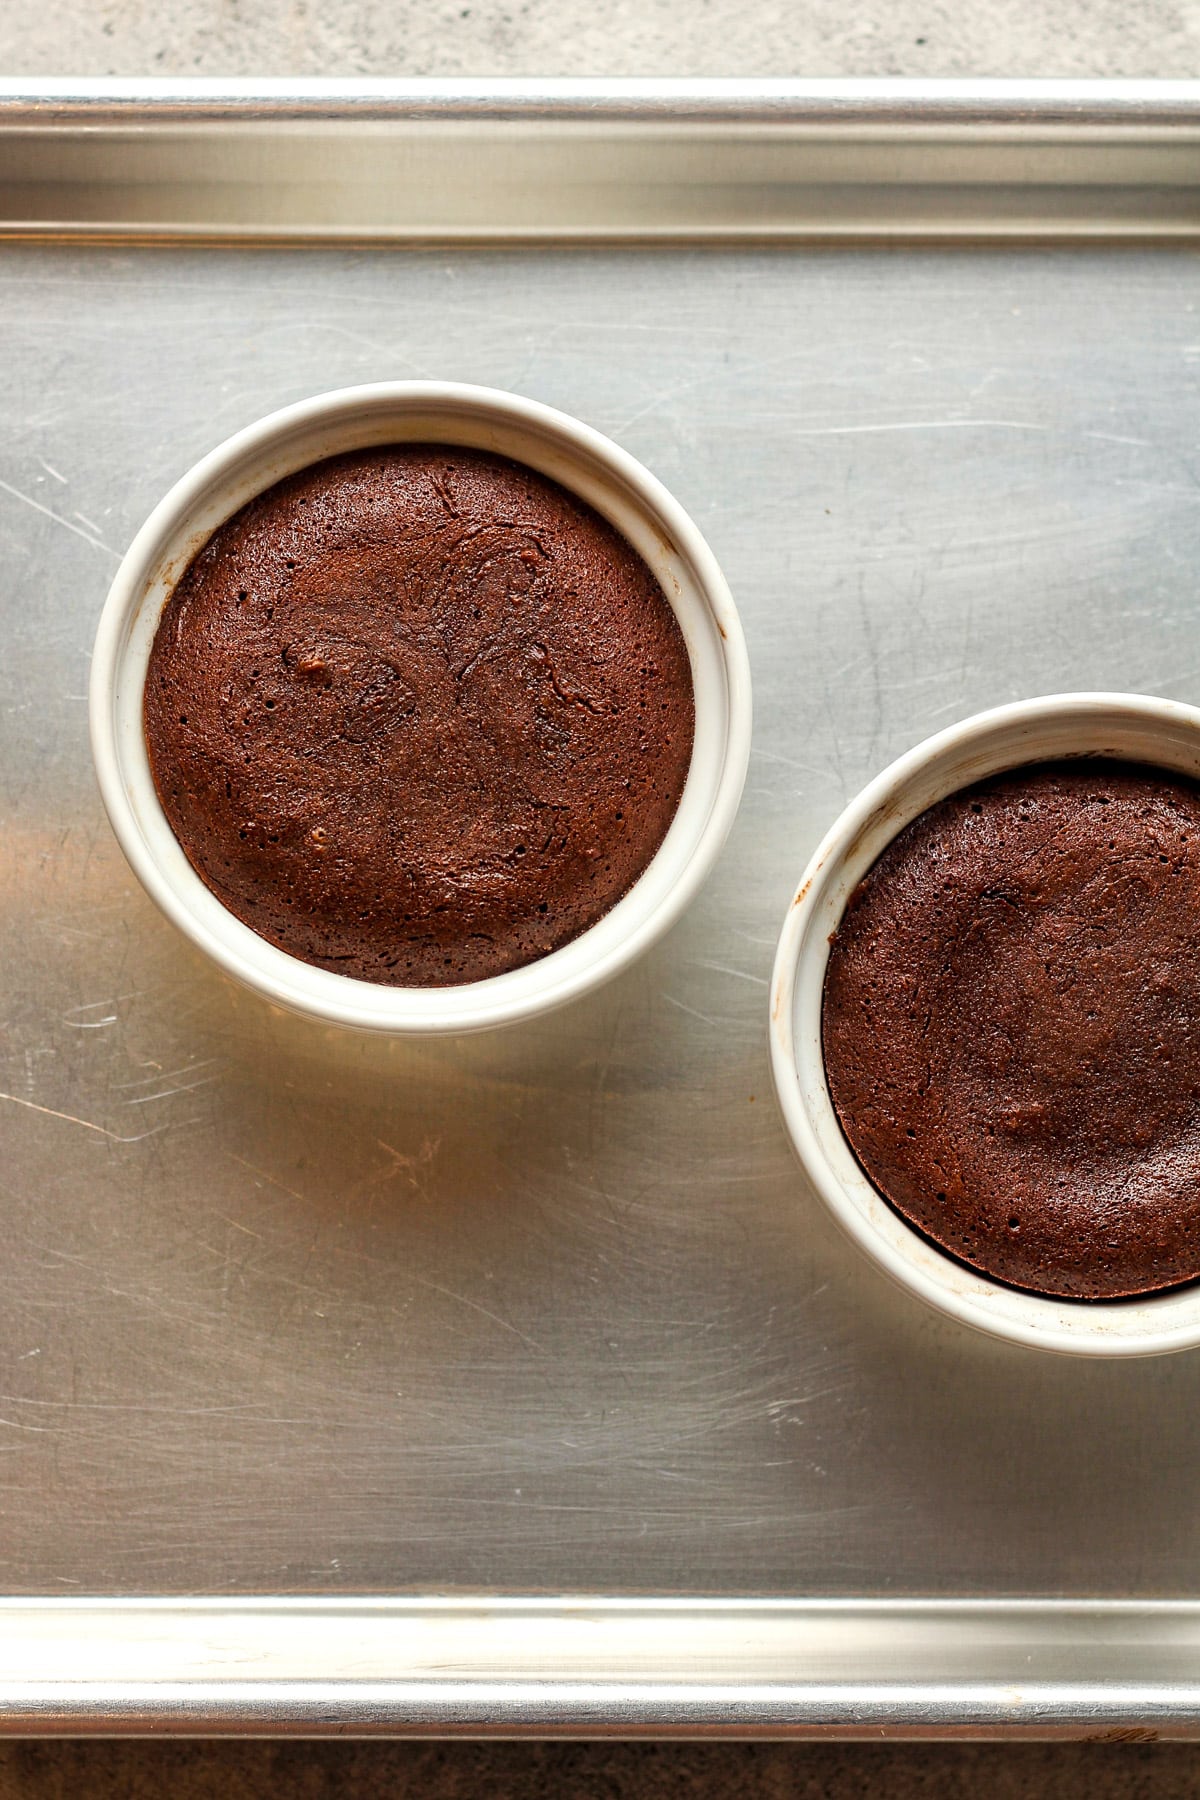
Bake. Pour batter evenly into prepared ramekins. Bake for about 11 minutes or until your liking (depending on your particular oven). The edges should look set and slightly puffed, while the centers still appear soft and slightly jiggly.
Step 5
Rest Cakes. Rest cakes for just one minute. Then carefully run a knife around the edges (if needed), invert onto small plates, and lift off the ramekins. Use a towel to handle ramekins as they will still be hot!
Step 6
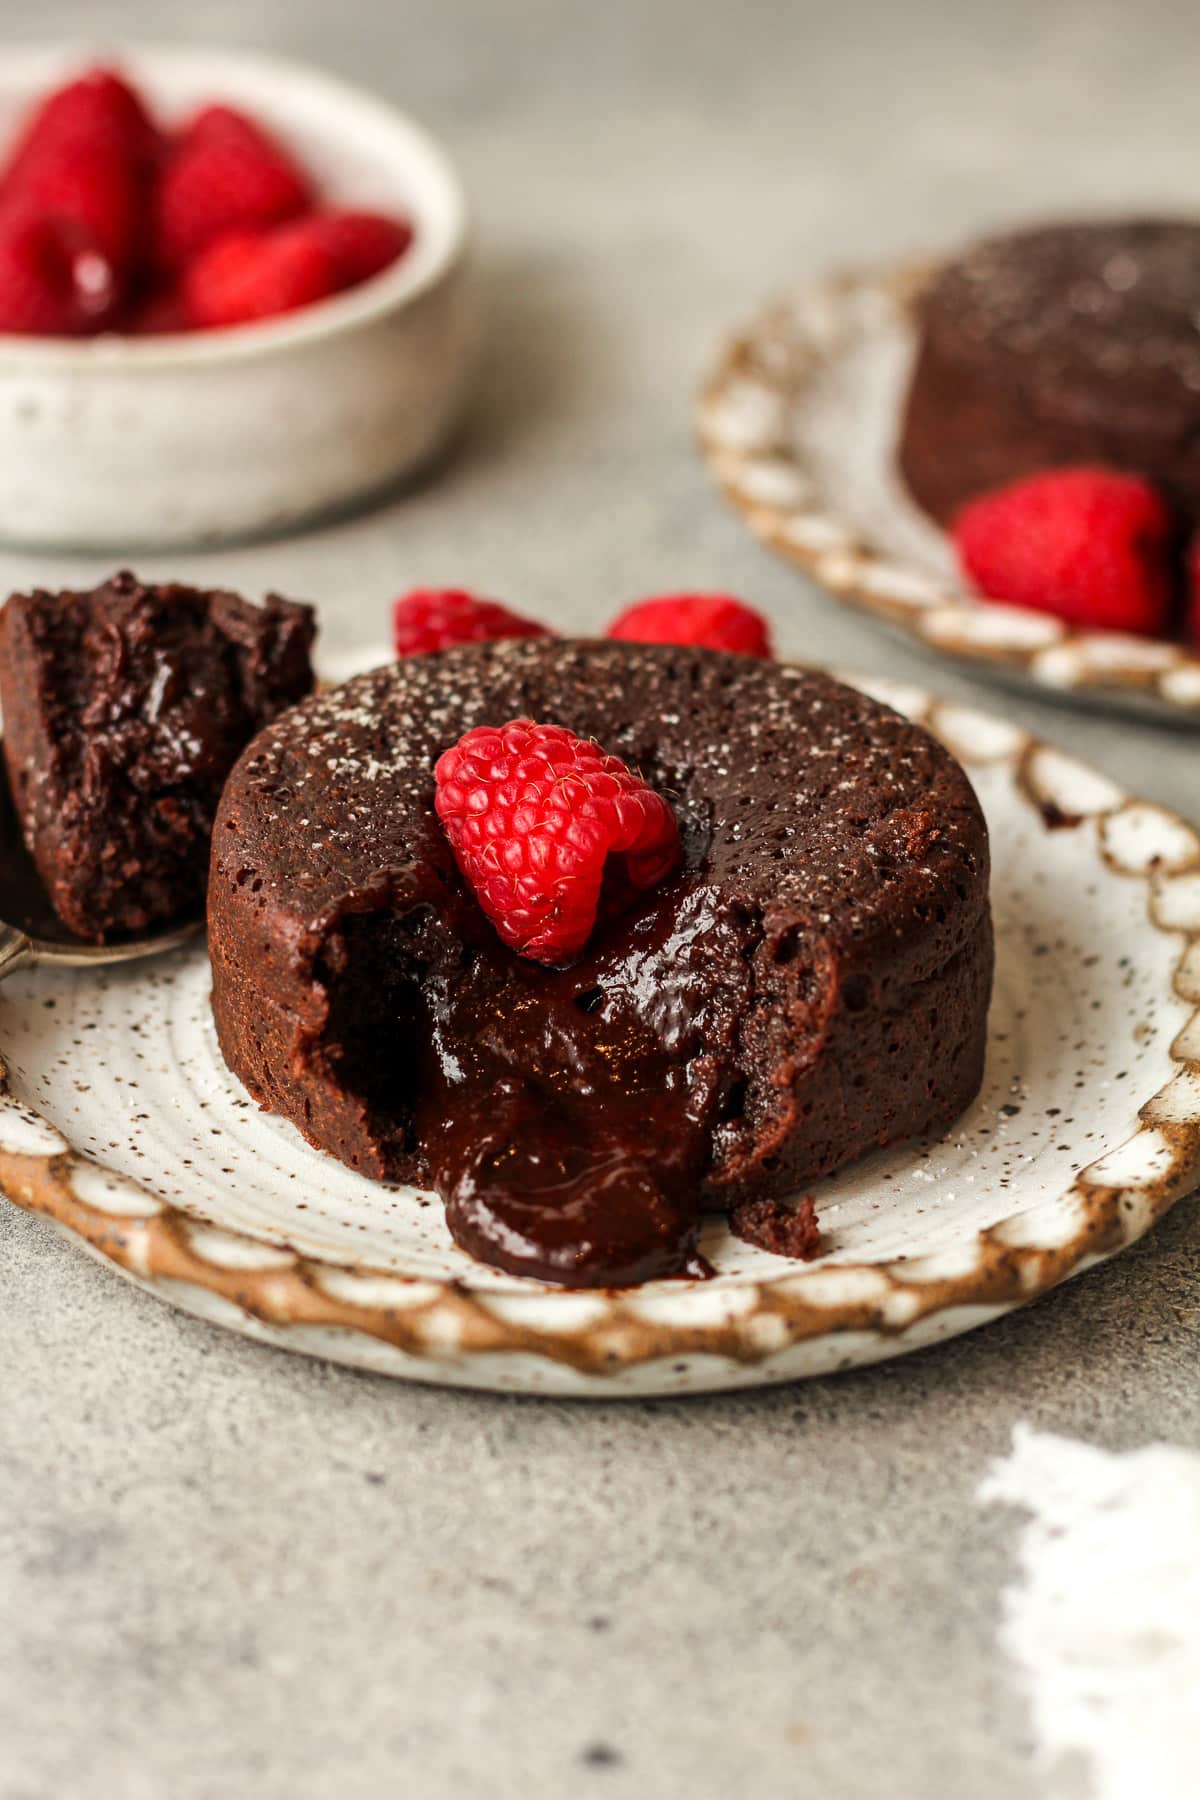
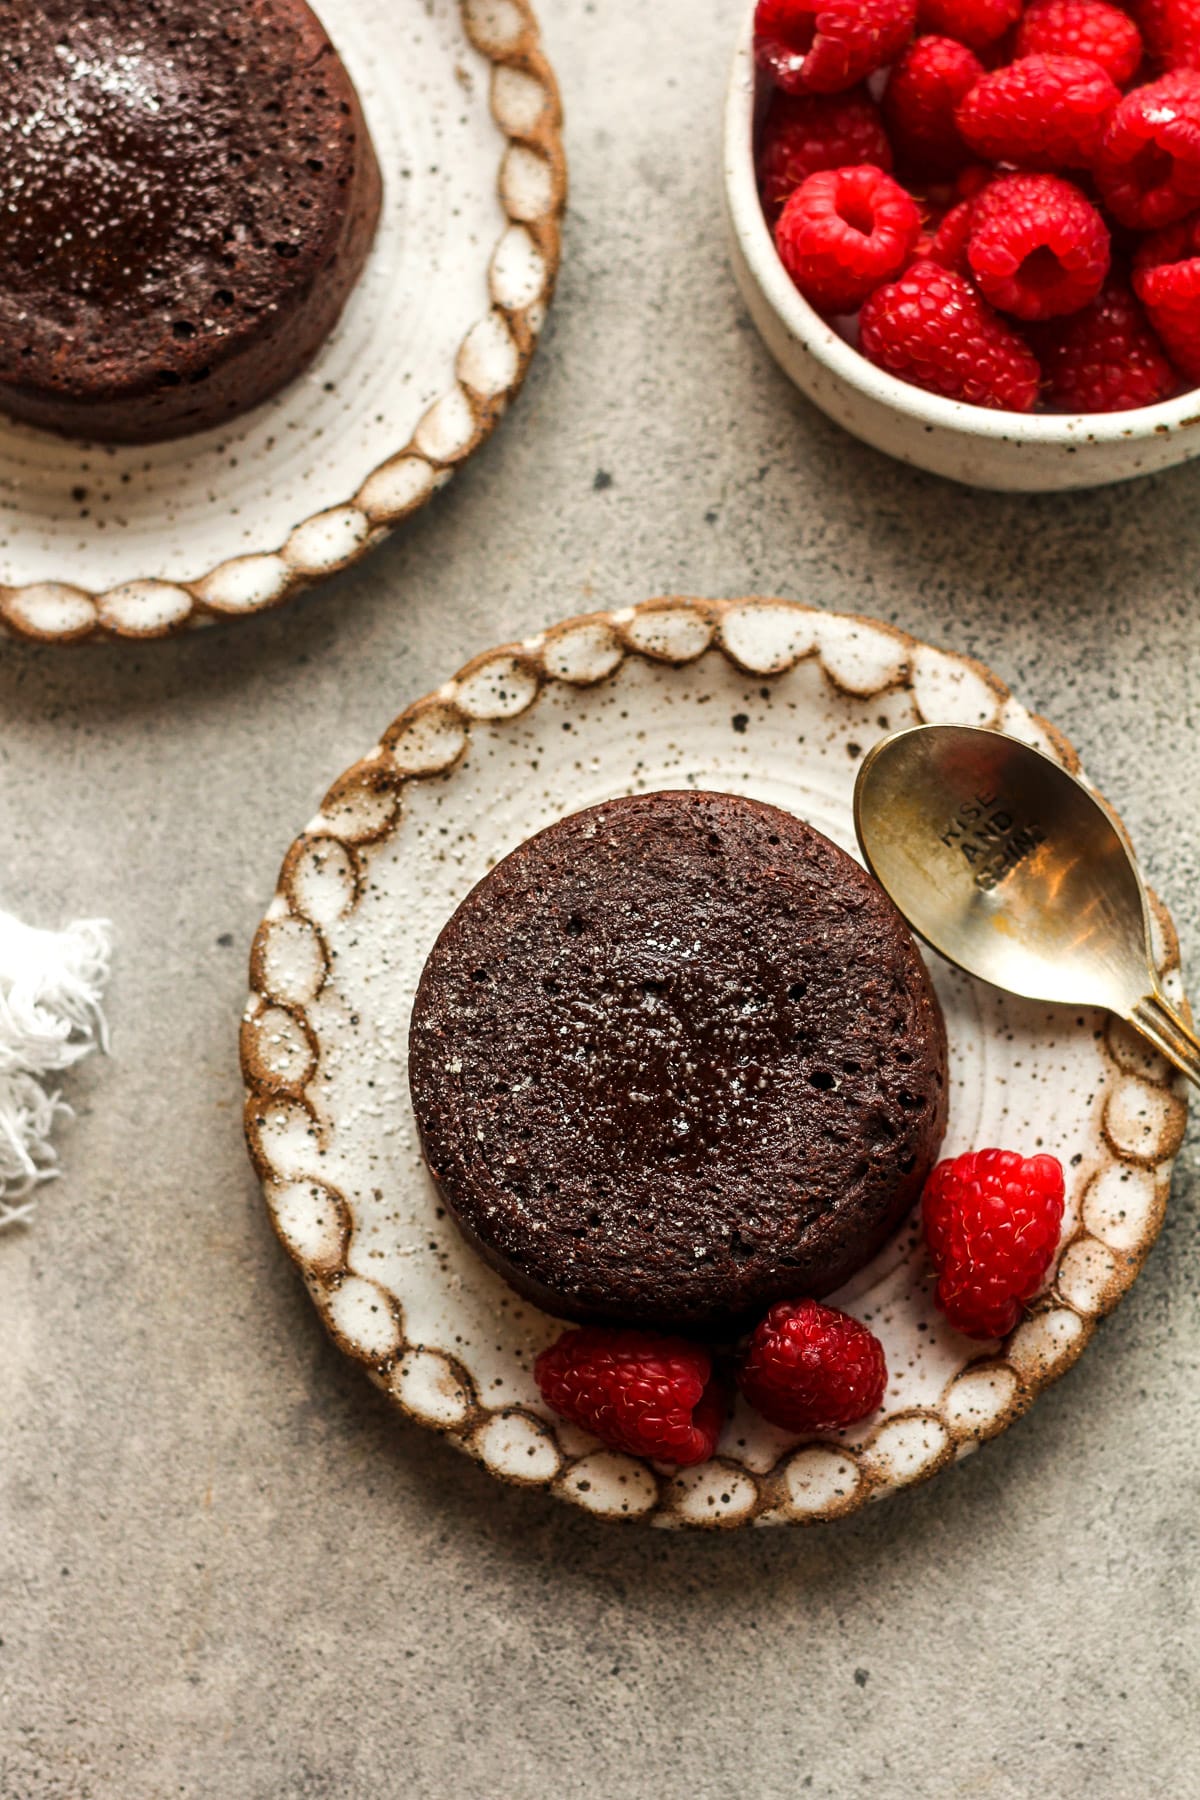
Serve. Serve with fresh raspberries or strawberries and enjoy!
OPTIONAL: Instead of adding fresh berries as a garnish, you could add a scoop of ice cream followed by a chocolate shell, or just a dusting of powdered sugar. Try our Vanilla Bean Ice Cream, Raspberry Ice Cream, or Strawberry Ice Cream Recipe!
Other Chocolate Desserts:
Is your love language CHOCOLATE? Well, here you go!

Recipe FAQs:
The gooey center comes from slightly underbaking the cakes so the middle stays molten while the edges set.
Use good-quality semisweet or bittersweet chocolate. Since chocolate is the star, better chocolate means better flavor.
Yes, but baking chocolate melts more smoothly. If using chips, choose a high-quality brand.
Yes, you can prepare the recipe through step 4 up to one day in advance. Refrigerate the ramekins in the meantime but set them out the day of baking to remove the chill. Then proceed as directed.
Since all ovens run a little diffently, you may need more or less time when making these cakes. If your oven runs cool, you may need more time and if it runs hot, you may need less time. Watch your oven closely during the baking process.
You can definitely double this recipe if serving a large group (or if a hungry person wants two). Just make sure you have the correct size of ramekins beforehand.
Kitchen Tools Used: (affiliate links)
xoxo ~Sue
Mini Lava Cakes
Ingredients
- 1/2 cup unsalted butter
- 6 oz. semi-sweet chocolate – rouchly chopped
- 2 large eggs
- 2 large egg yolks
- 1/4 cup granulated sugar
- 1 teaspoon vanilla extract
- 1 pinch salt
- 2 Tablespoons all-purpose flour
- raspberries, vanilla ice cream, and magic shell – to serve (optional)
Instructions
- Prep for baking. Preheat oven to 450 degrees. Grease your ramekins with butter. Be sure to spread butter into the corner of the ramekins to ensure a clean removal.
- Melt chocolate and butter. Using a small pan or double boiler, melt the chocolate and butter over low heat, stirring almost constantly. Remove from heat.1/2 cup unsalted butter, 6 oz. semi-sweet chocolate
- Prep remaining ingredients. In a small bowl, beat the eggs, sugar, and salt together until pale.2 large eggs, 2 large egg yolks, 1/4 cup granulated sugar, 1 teaspoon vanilla extract 1 pinch salt
- Add in chocolate and flour. Use a spatula to gently fold in the melted chocolate and flour. Make sure the flour is fully absorbed in order to avoid clumping.2 Tablespoons all-purpose flour
- Bake. Pour batter evenly into prepared ramekins. Bake for about 11 minutes or until your liking (depending on your particular oven). The edges should look set and slightly puffed, while the centers still appear soft and slightly jiggly.
- Rest Cakes. Rest cakes for just one minute. Then carefully run a knife around the edges (if needed), invert onto small plates, and lift off the ramekins. Use a towel to handle ramekins as they will still be hot!
- Serve. Serve with fresh raspberries or strawberries and enjoy!OPTIONAL: Instead of adding fresh berries as a garnish, you could add a scoop of ice cream followed by a chocolate shell, or just a dusting of powdered sugar. Try our Vanilla Bean Ice Cream, Raspberry Ice Cream, or Strawberry Ice Cream Recipe!raspberries, vanilla ice cream, and magic shell
Notes
- These mini Lava Cakes are meant to be gooey. When baking, it’s preferable to err on the side of undercooking rather than overcooking it. We want the cake to be melty and goopy. This is a cake that comes out of the oven, onto a plate, and into your mouth.
- Oven temperature is KEY. When testing this recipe, I made sure I added extra oven thermometers to make sure the temperature was close to 450 degrees F. For me, the right baking time was 11 minutes but that might be slightly different for you, depending on your oven. I recommend testing this before serving it to guests.
Well done Zach! Awesome recipe and gift! ❤️
Amen!