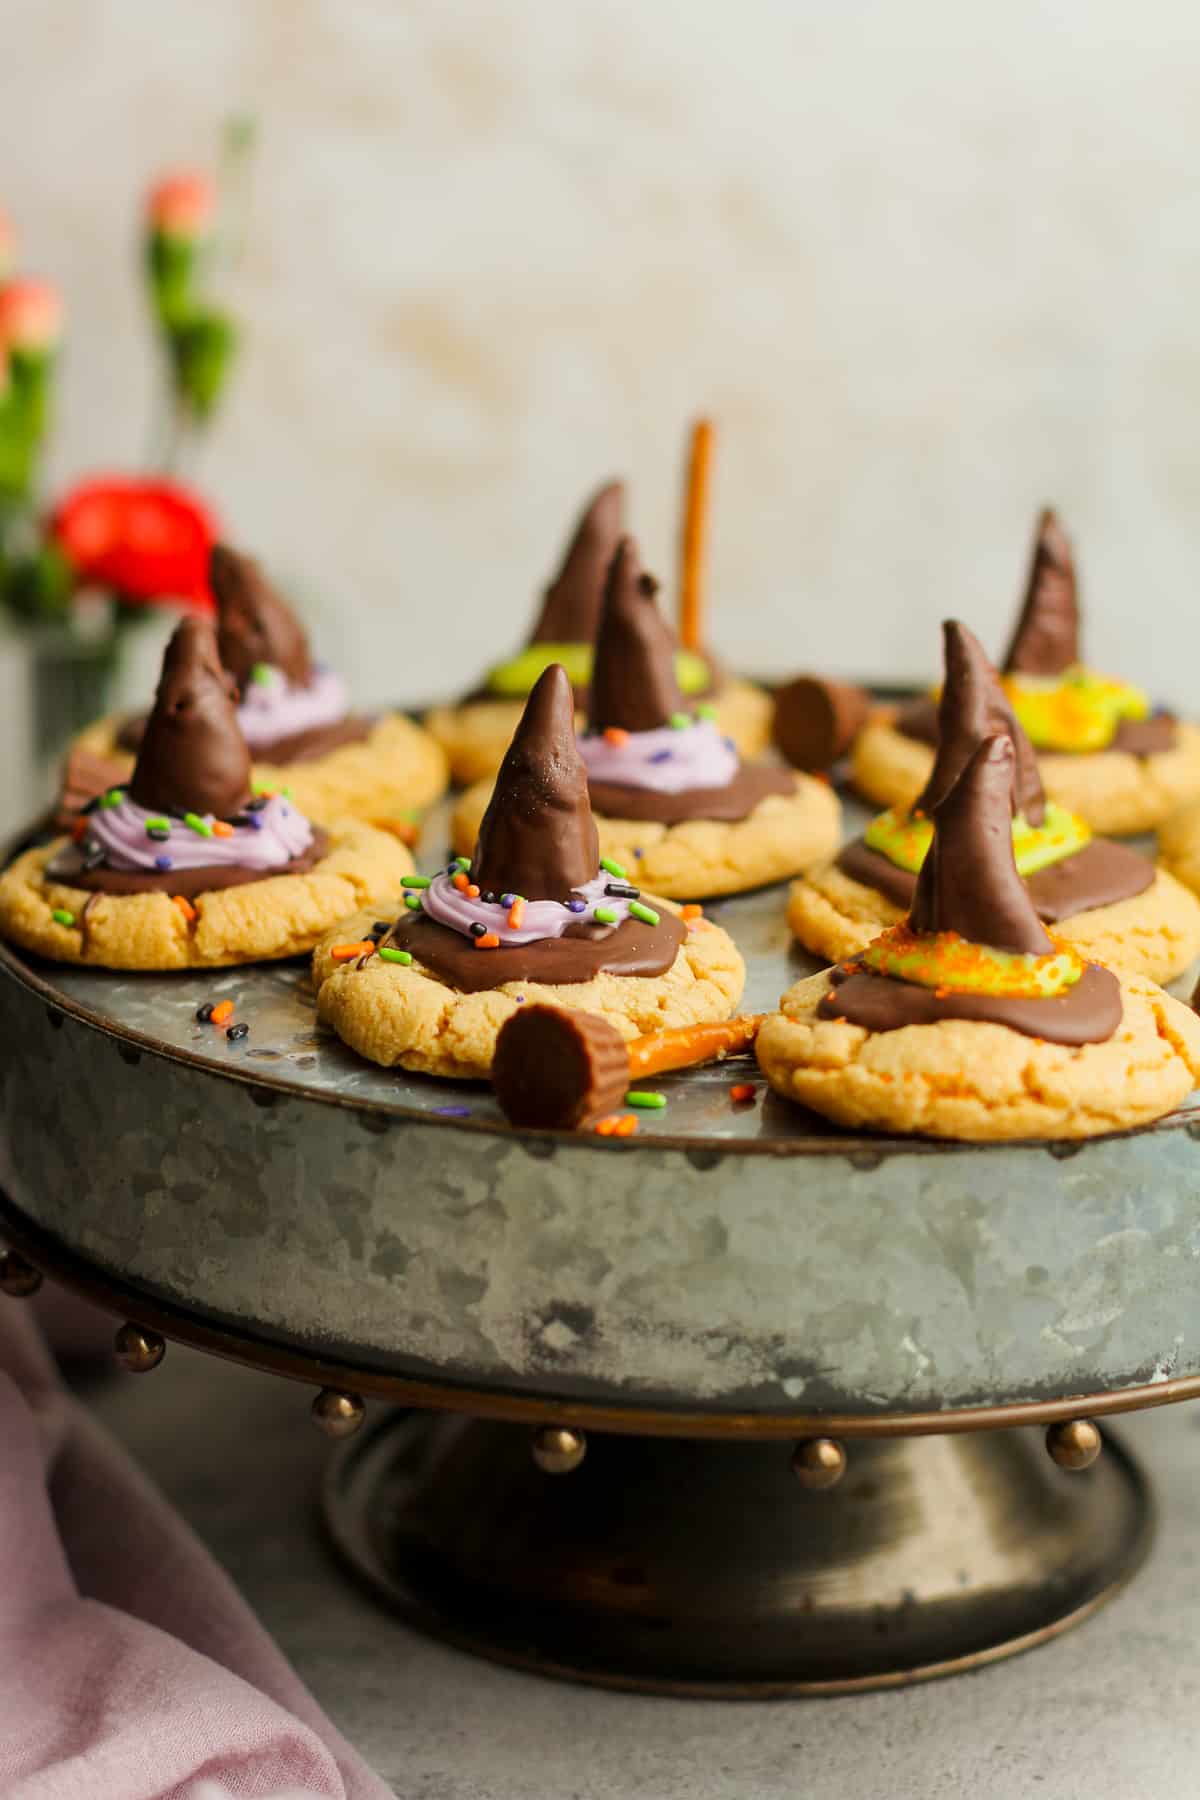
Witch Hat Cookies
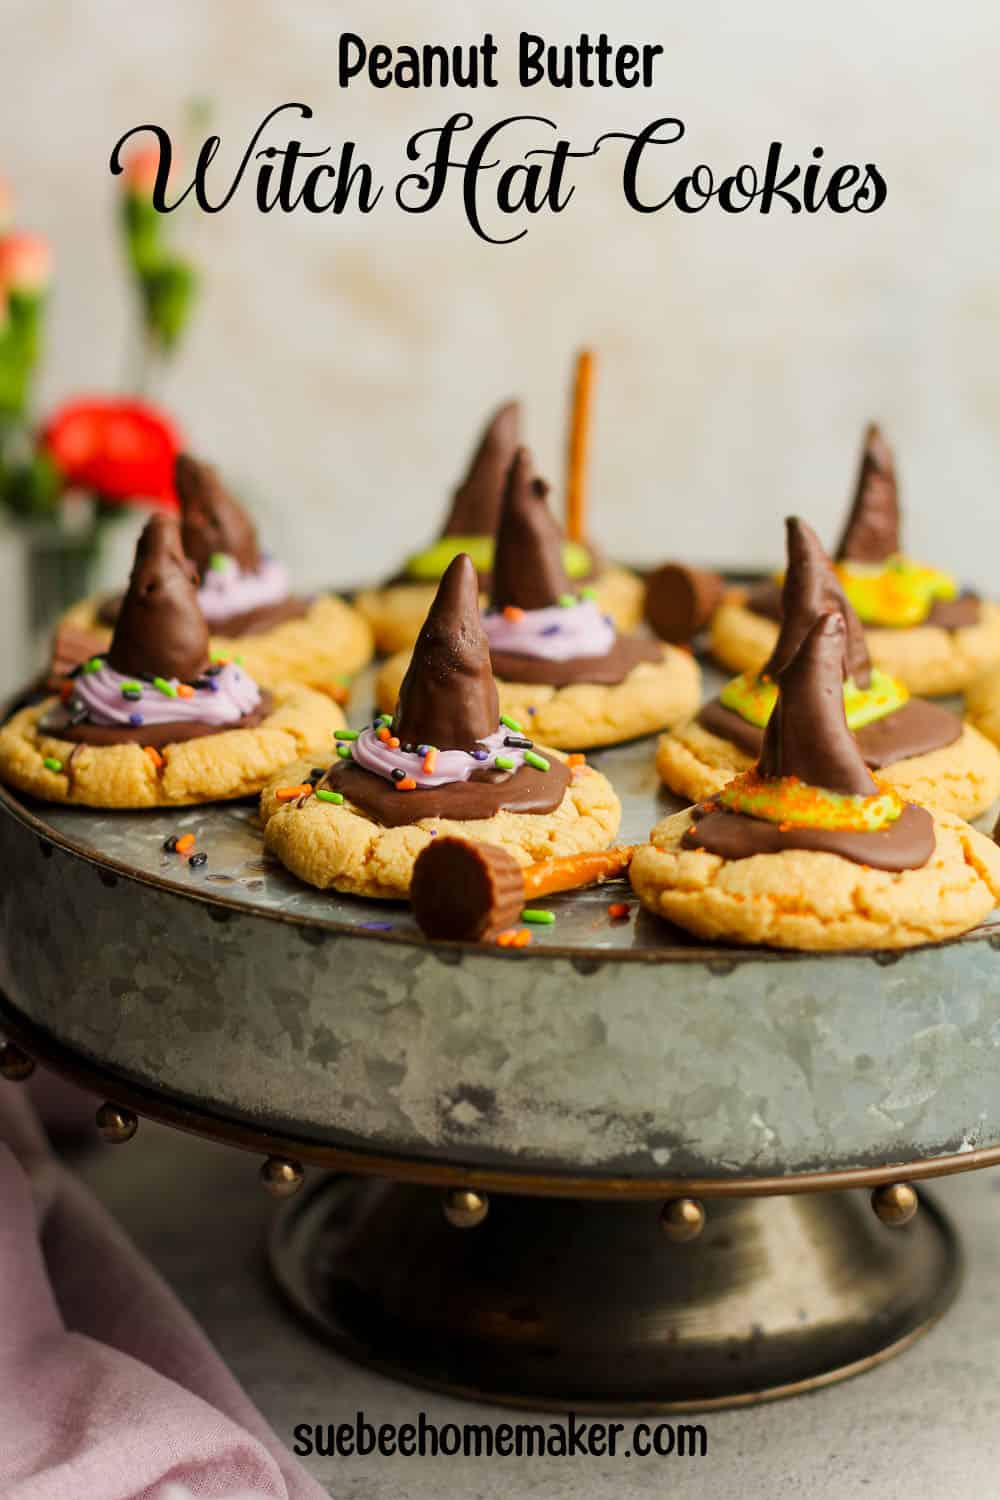
Halloween Witch Hat Cookies are a simple peanut butter cookie all tricked up with a chocolate witch hat made from bugles, melting chocolate, and a powdered sugar icing. These fun treats are fun to make and are unbelievably delicious too!
Peanut Butter Witch Hat Cookies
While I don’t make a ton of themed cookie recipes, I do love to make them on occasion. Decorating can be a bit intimidating for me, so I usually keep things pretty straight forward. So trust me when I say – if I can make these Halloween treats, then you can too.
Other Halloween Treats
Let’s have a Halloween party and make all the treats. Here are a few ideas to get you started!
Why we LOVE these cookies
- Simple. These do take a little bit of time to make, but they are simple. Just a classic peanut butter cookie and then the hat made of chocolate and some icing.
- A Cute Idea! Who can resist these adorable cookies that resemble a witch’s hat? A perfect treat for kids and adults alike.
- Kid Friendly. The kiddos are going to love these. They are fun and I can promise you that the chocolate covered bugle will be their favorite part. It is ours! 😀
- Delicious. Peanut butter and chocolate go together, don’t you think? Which is why we love these so much.
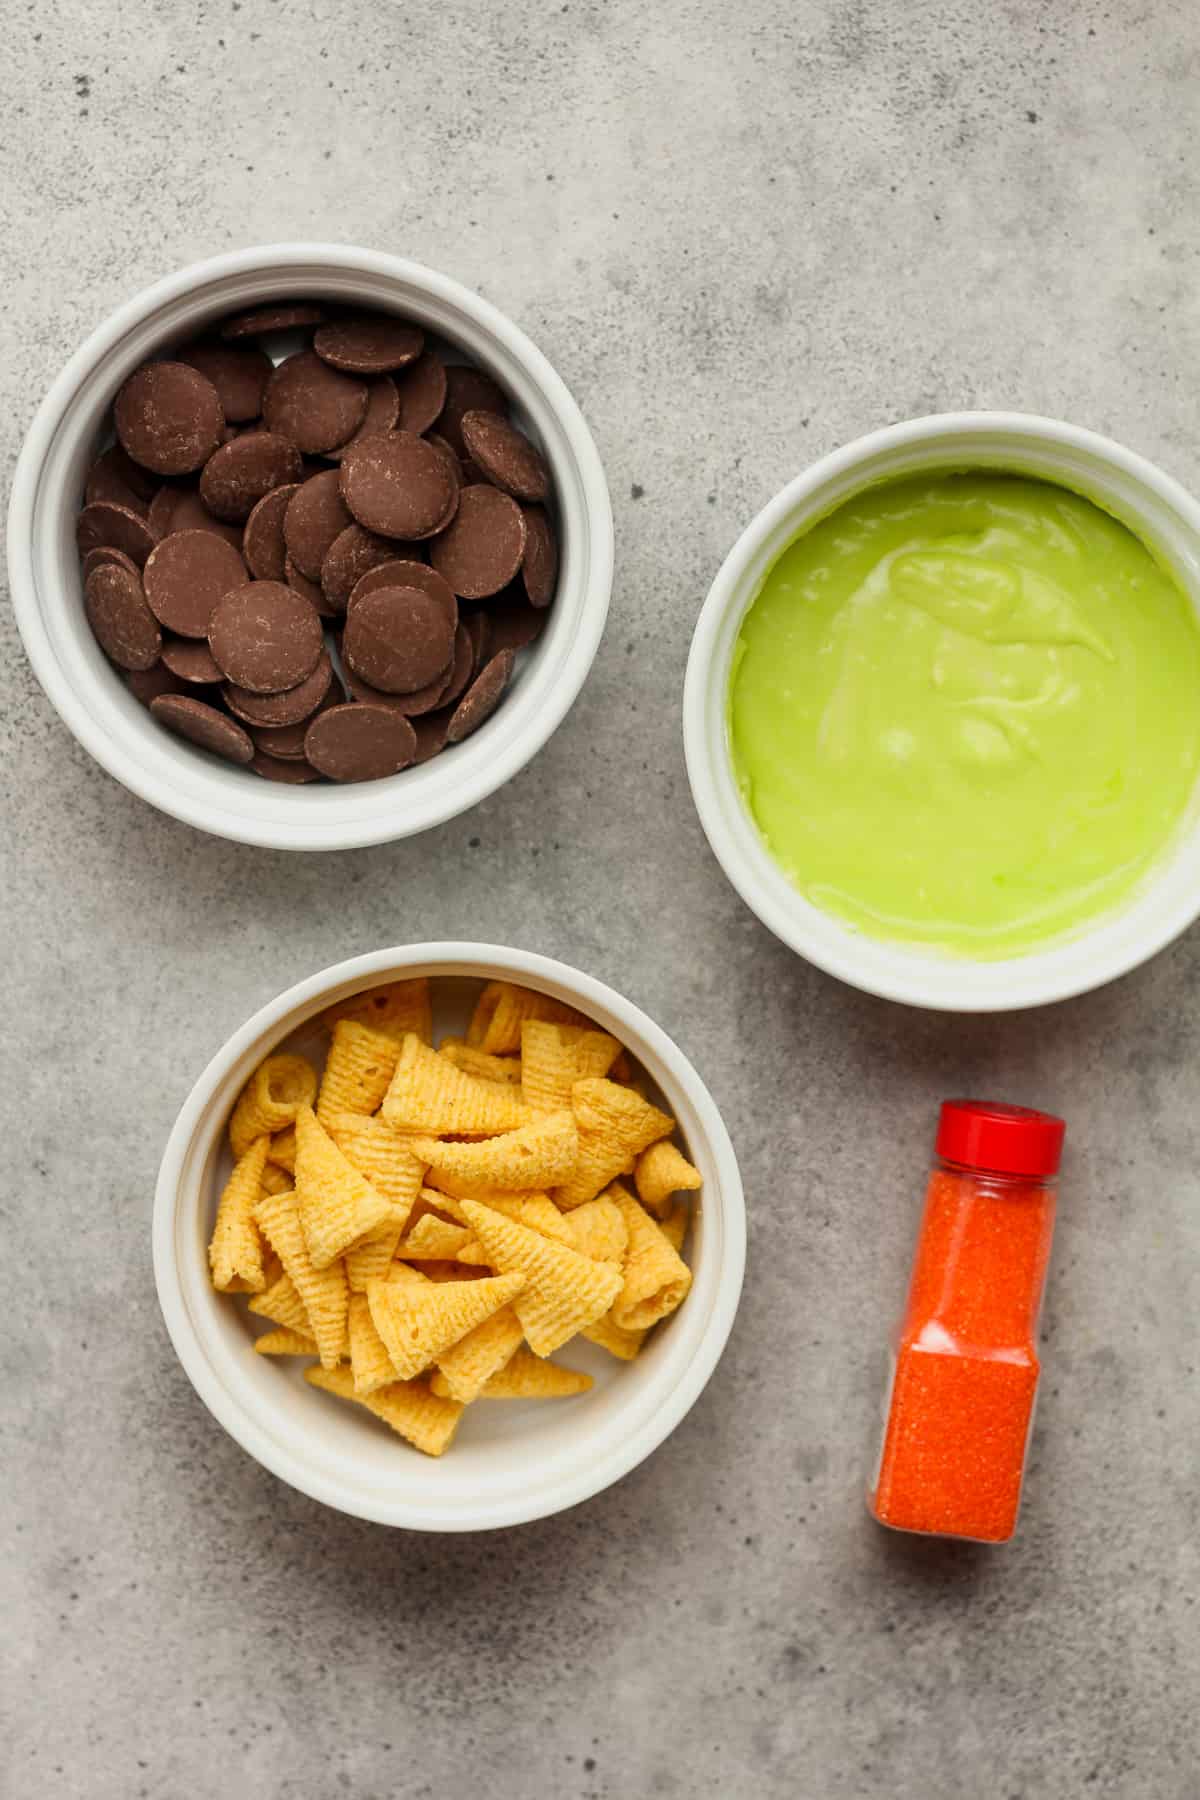
Ingredient Notes:
- Peanut Butter Cookies – I used my mom’s peanut butter cookie recipe for these and cut that in half. These cookies are also smaller than the original and include simple ingredients.
- Bugles – You’ll need regular bugles that aren’t chipped and have decent shape to them. Just sort through the bag until you find your favorite ones.
- Chocolate – You’ll want to use some melting chocolate for the hats. I prefer the Ghirardelli brand and use the dark chocolate.
- Icing – This is just an easy powdered sugar icing, but you can also buy whatever icing you that you like in the store.
- Sprinkles – Any Halloween colored sprinkles work well.
How to make Witch Hat Cookies:
Step 1
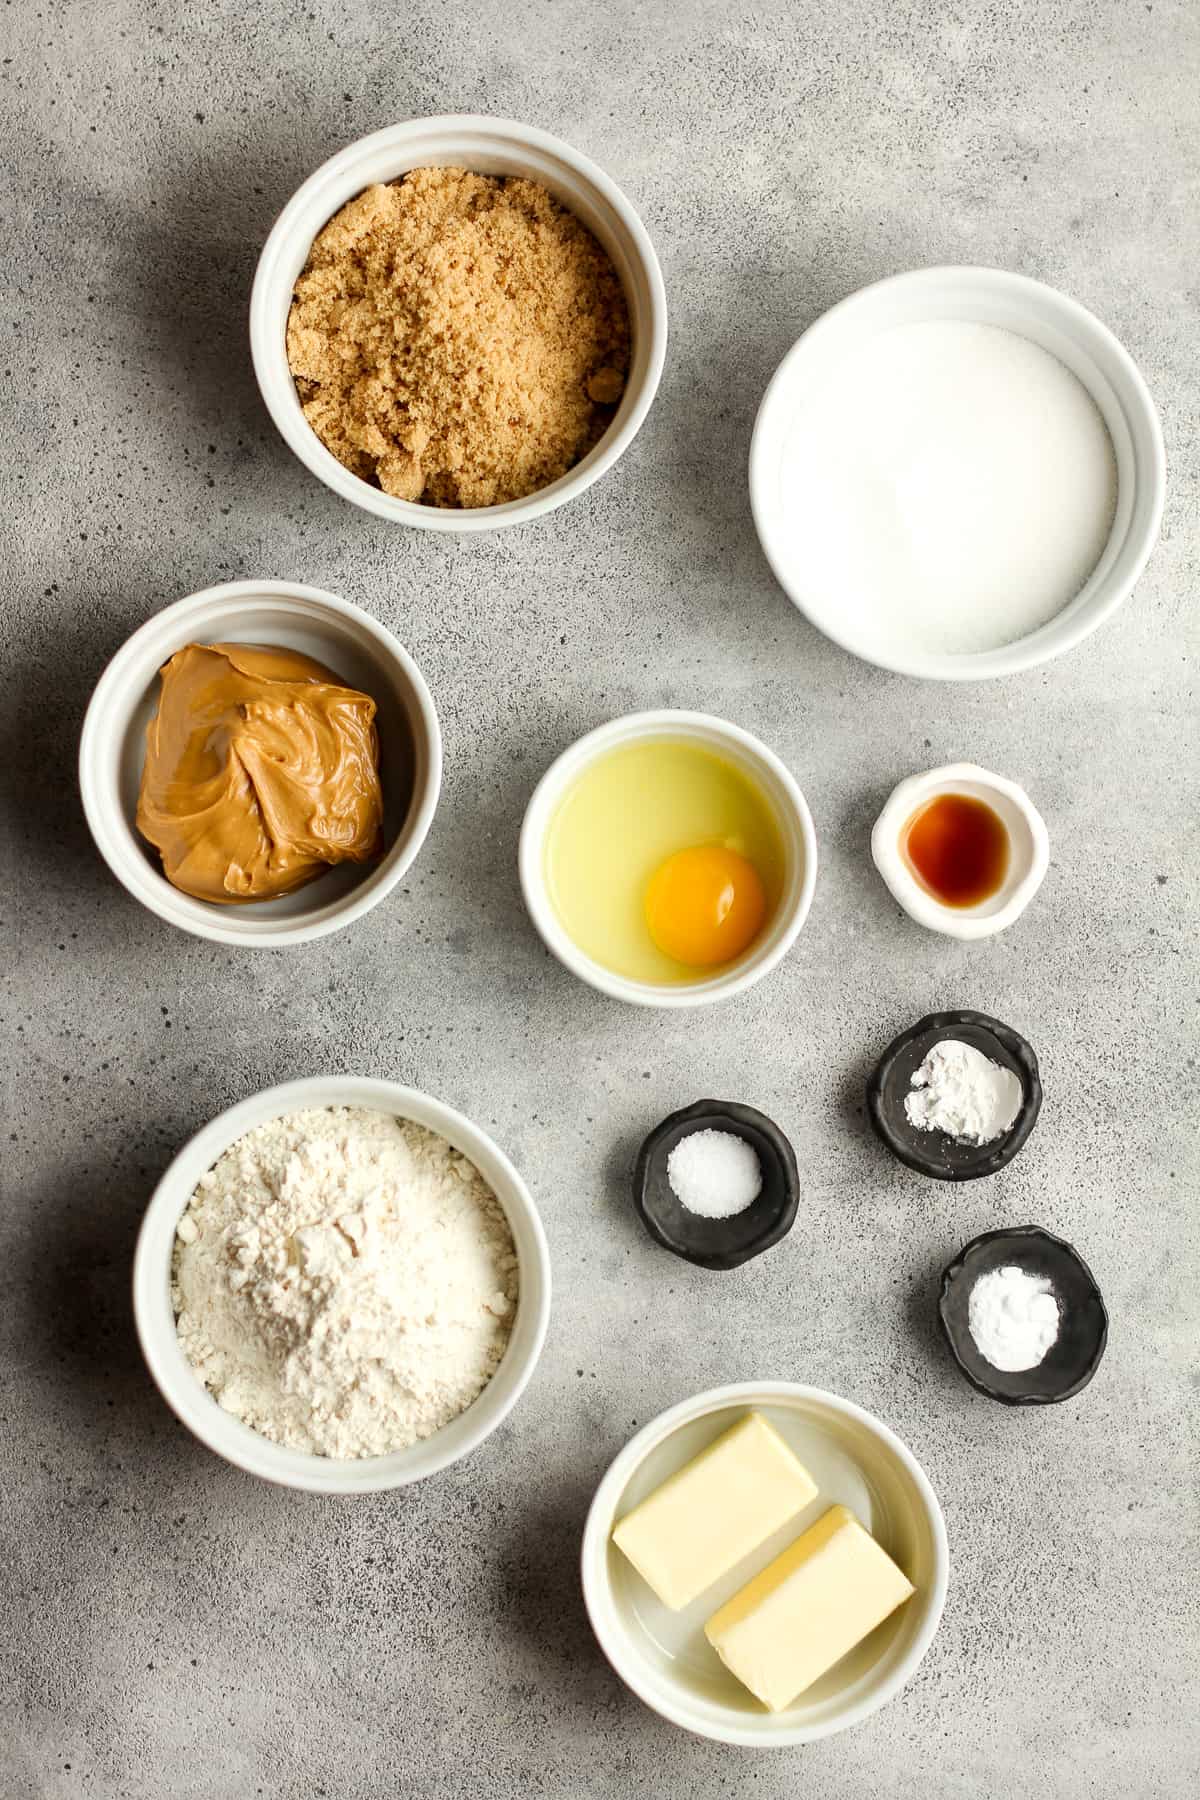
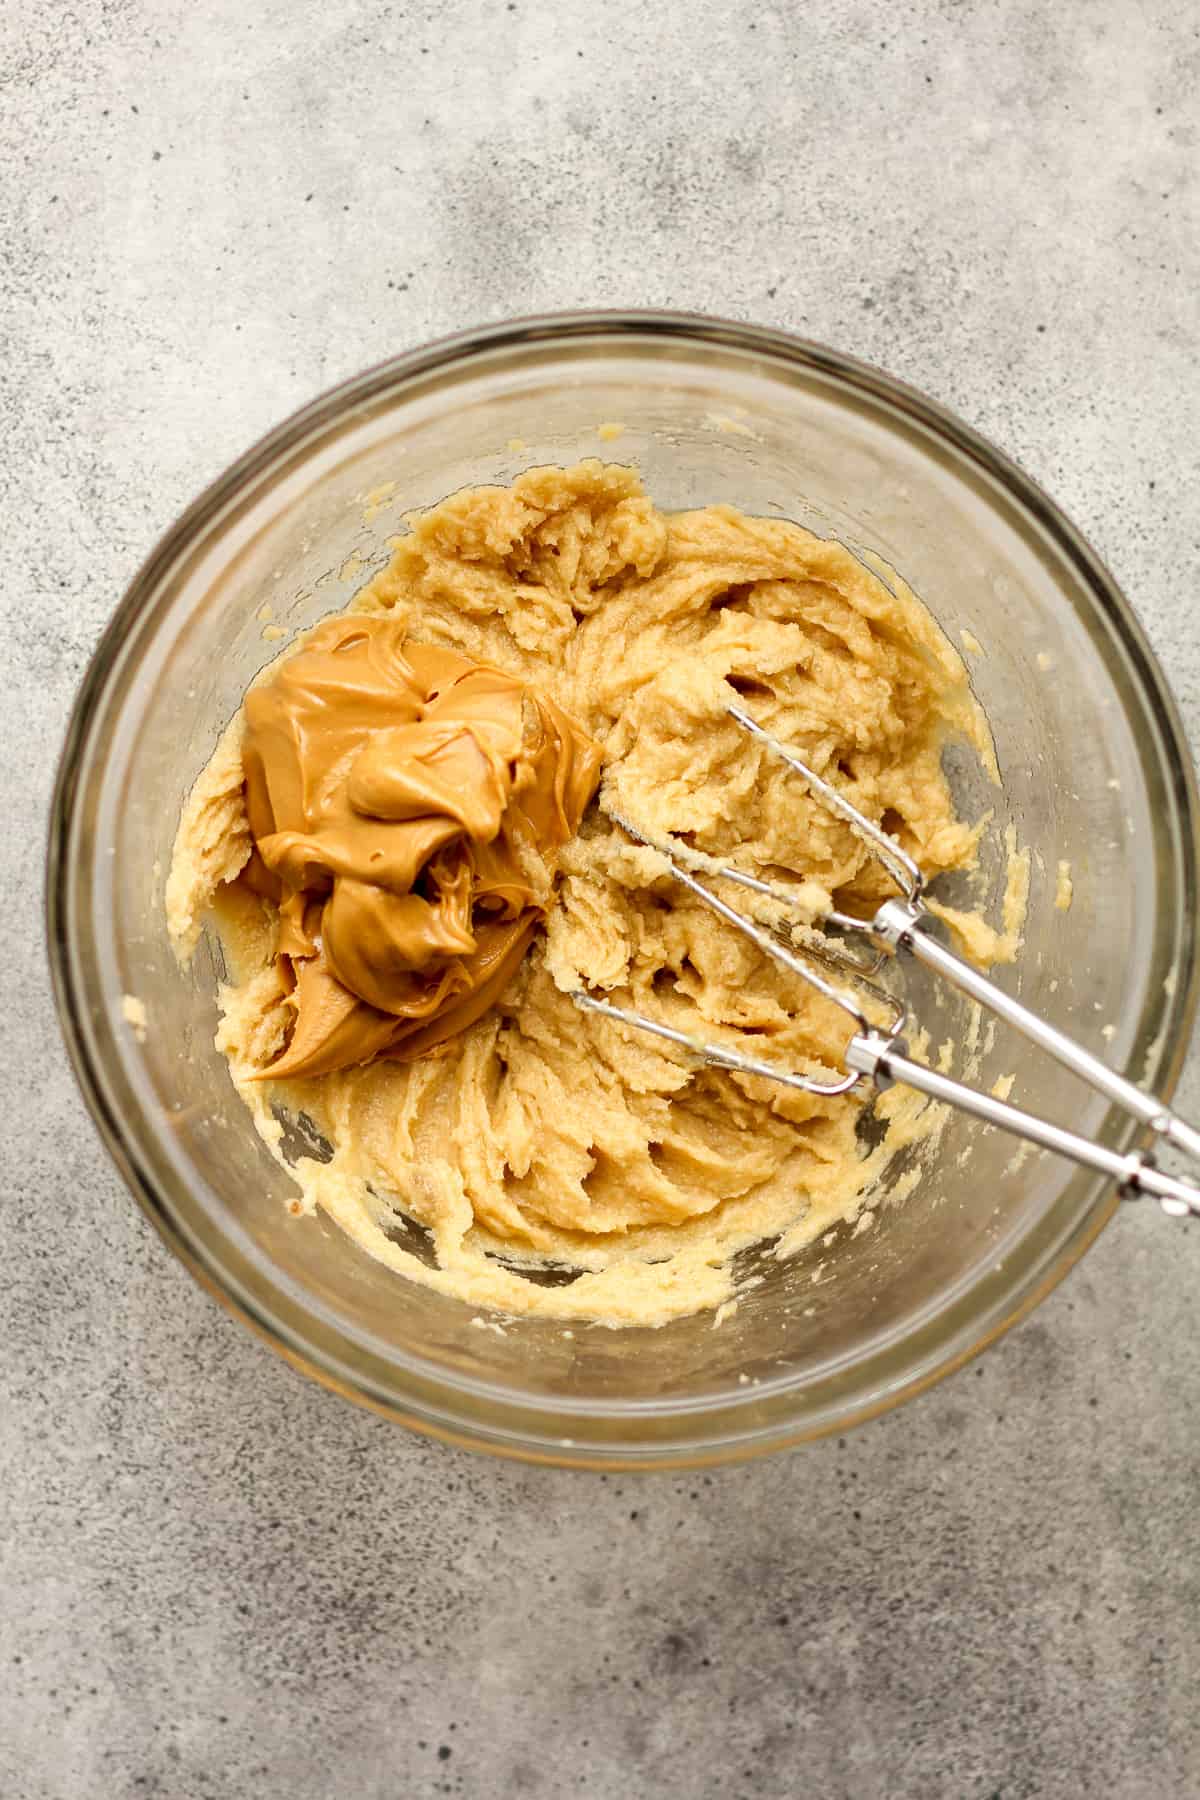
Make the peanut butter cookie batter. Use an electric hand mixer to cream the butter and sugar (brown and granulated). Then add the remaining wet ingredients – the egg, vanilla, and peanut butter.
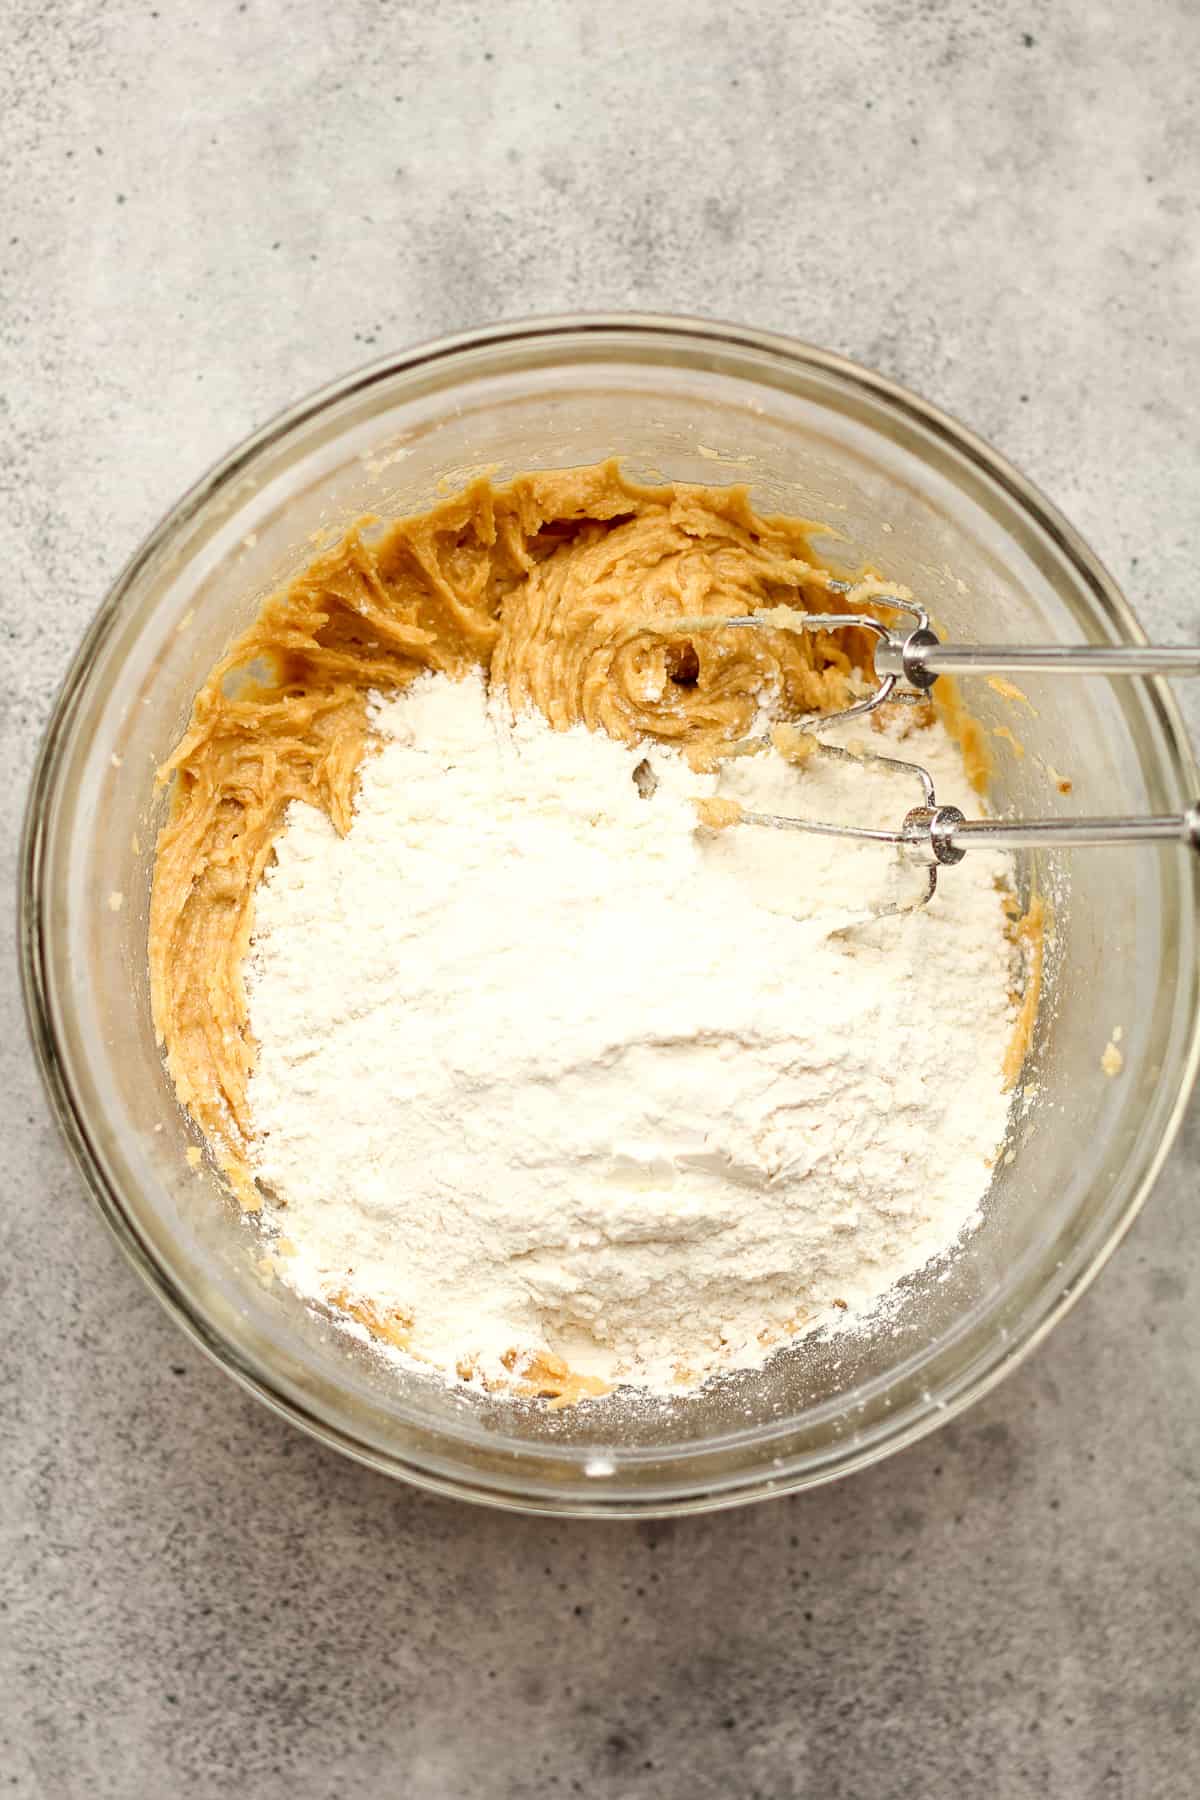
Add dry ingredients. Add the baking soda, baking powder, salt, and flour. Mix until just combined.
Step 2
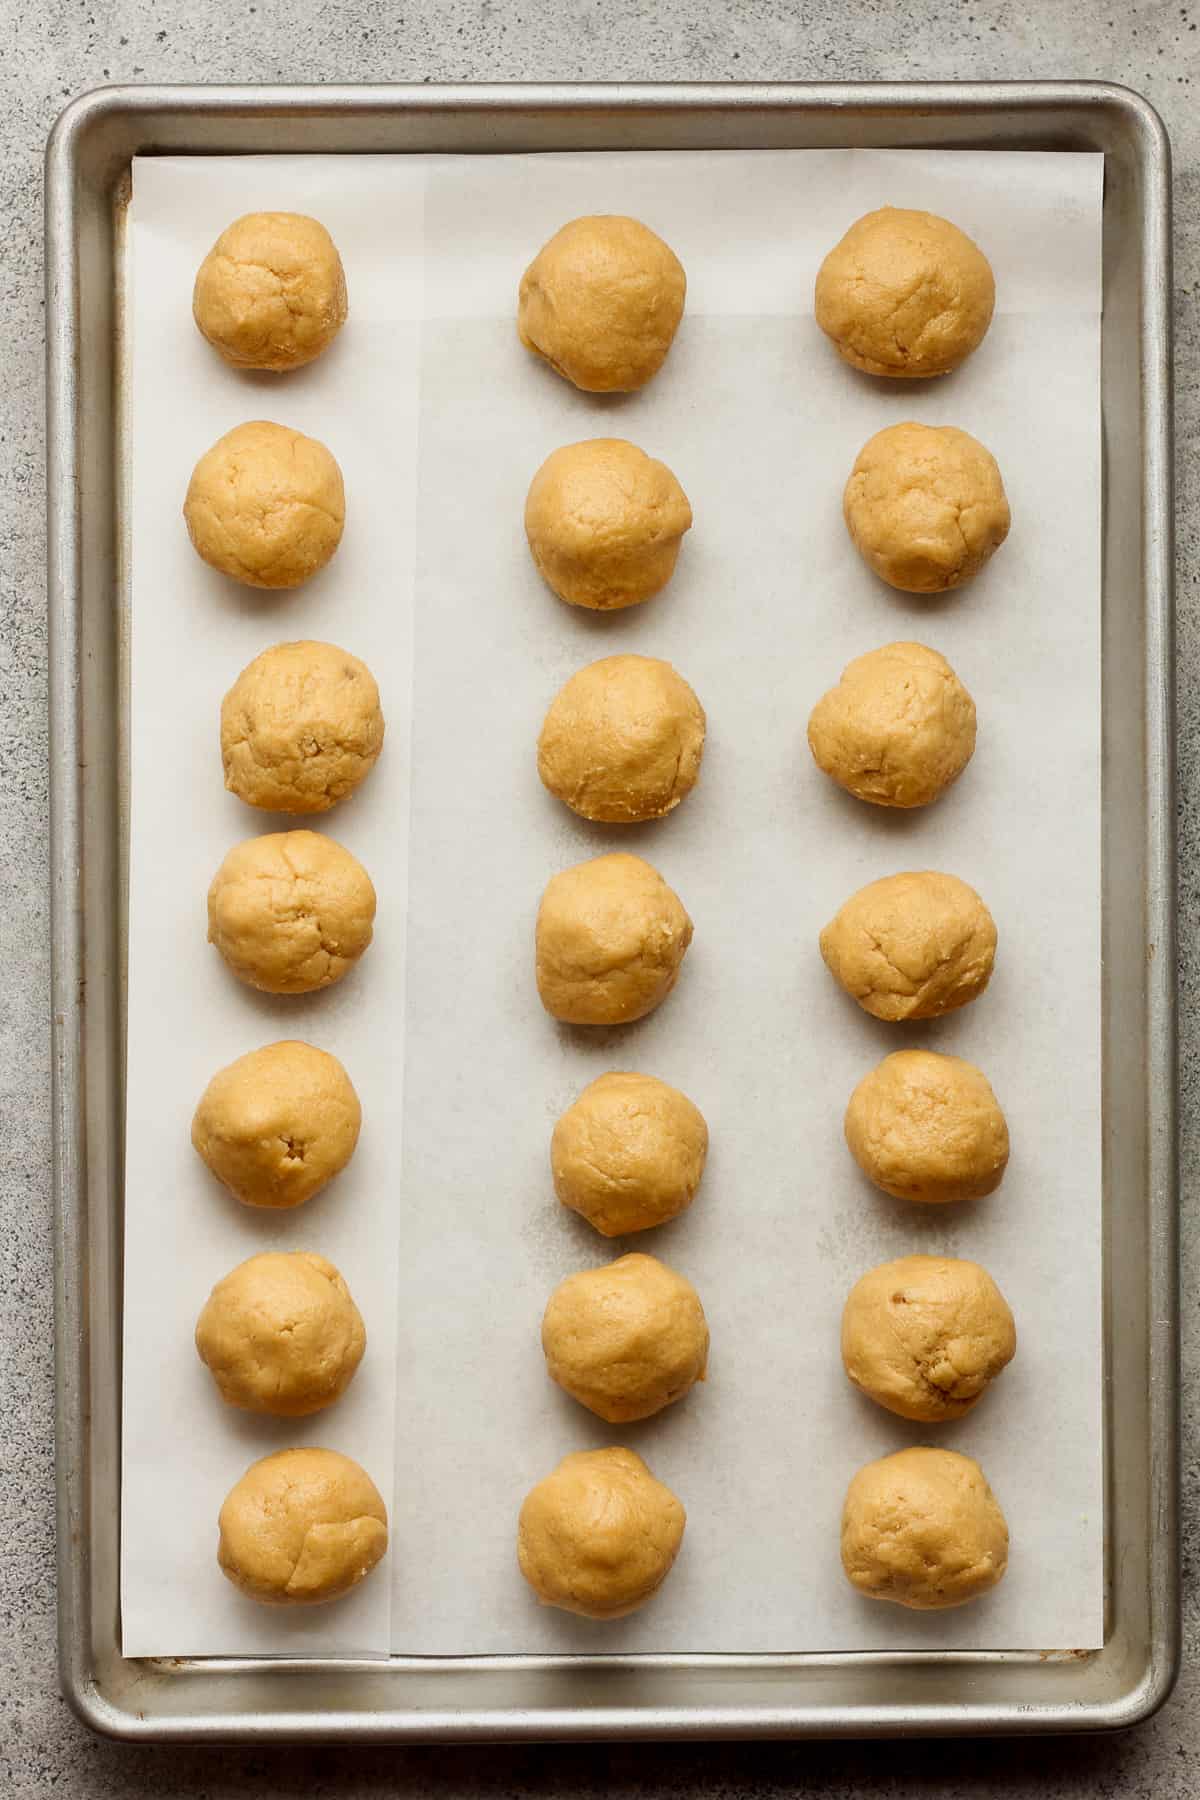
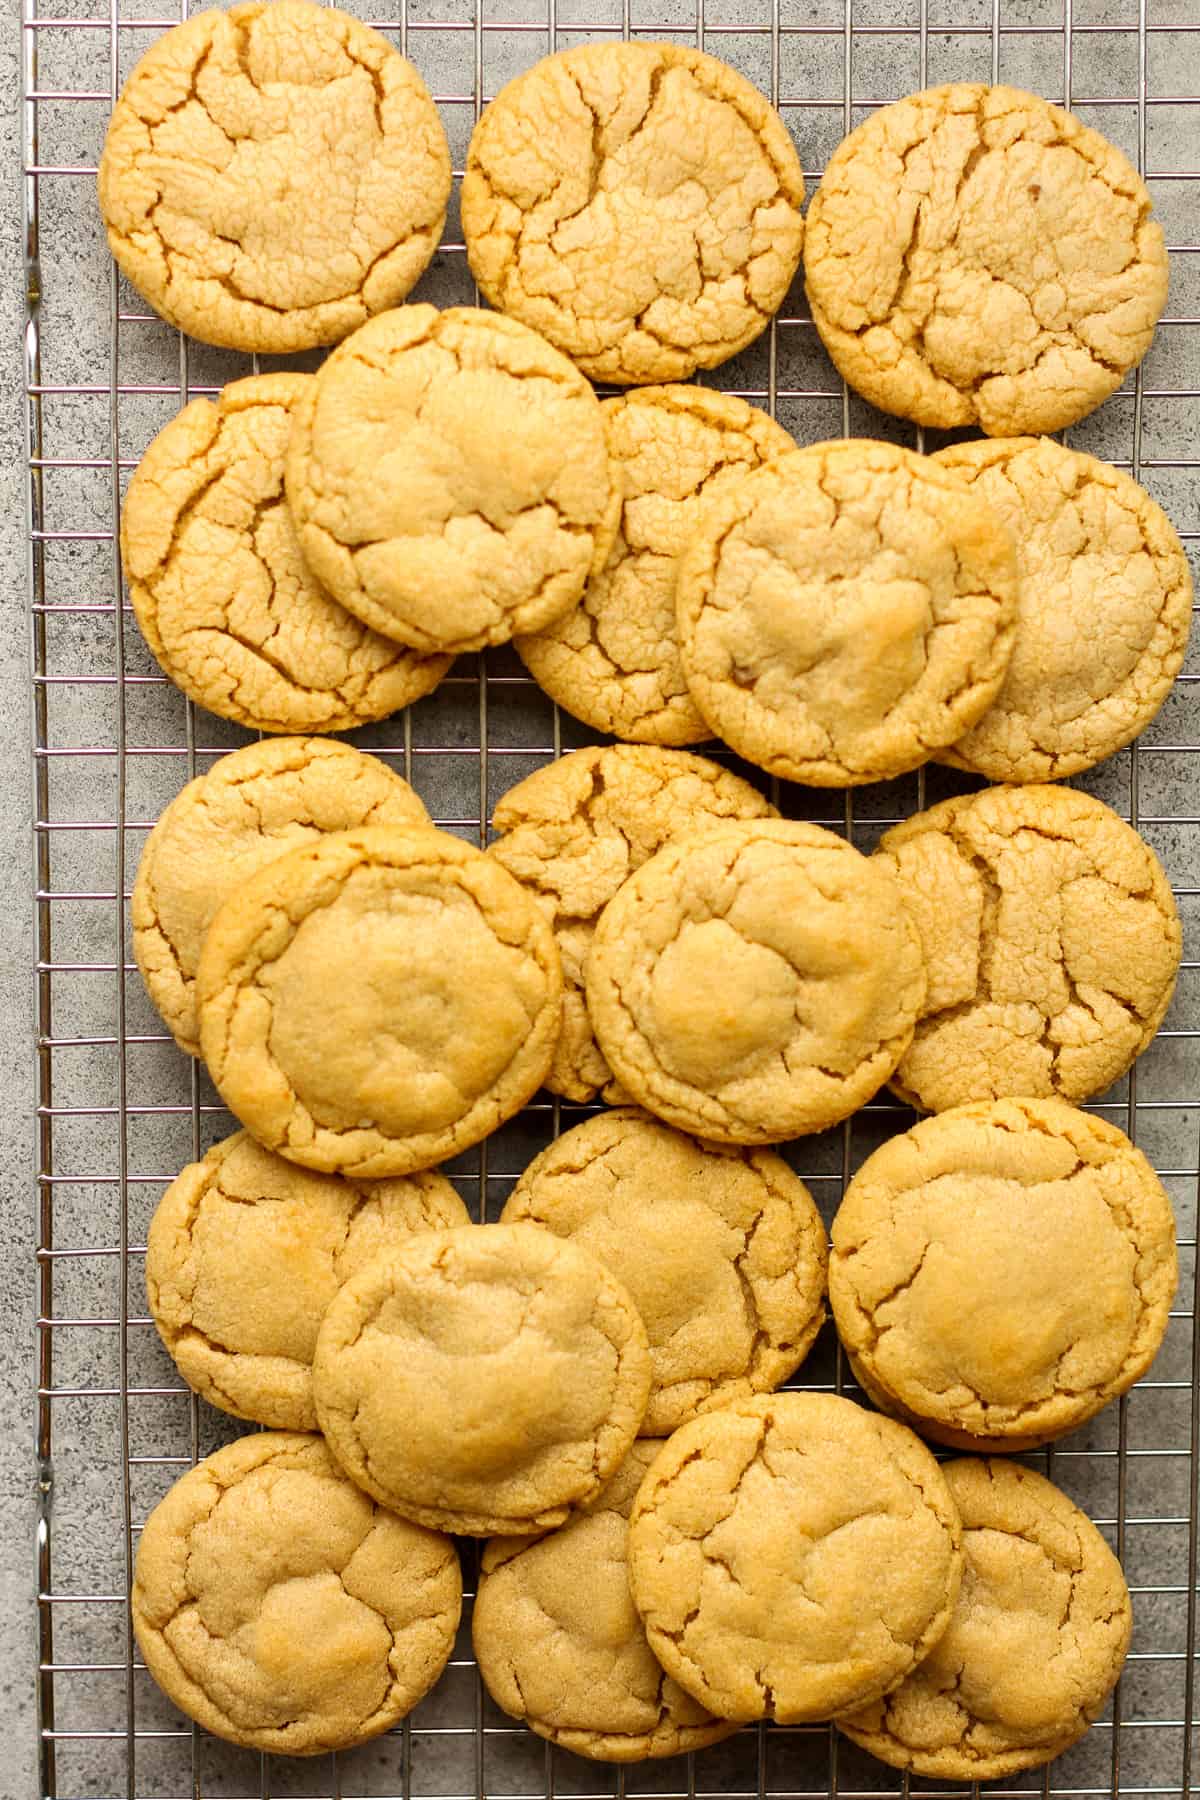
Chill. Roll the cookie dough into 22 cookie balls. Place on a baking sheet lined with parchment paper and then chill for a couple of hours (or overnight).
Step 3
Bake. Place the cookie balls on a baking sheet with a couple of inches in between. Bake in a preheated 350 degree oven until slightly browned on top, approximately 12-13 minutes.
Step 4
Cool. Let cookies sit on baking sheets for about five minutes before transferring to a wire cooling rack. Let cool completely.
Step 5
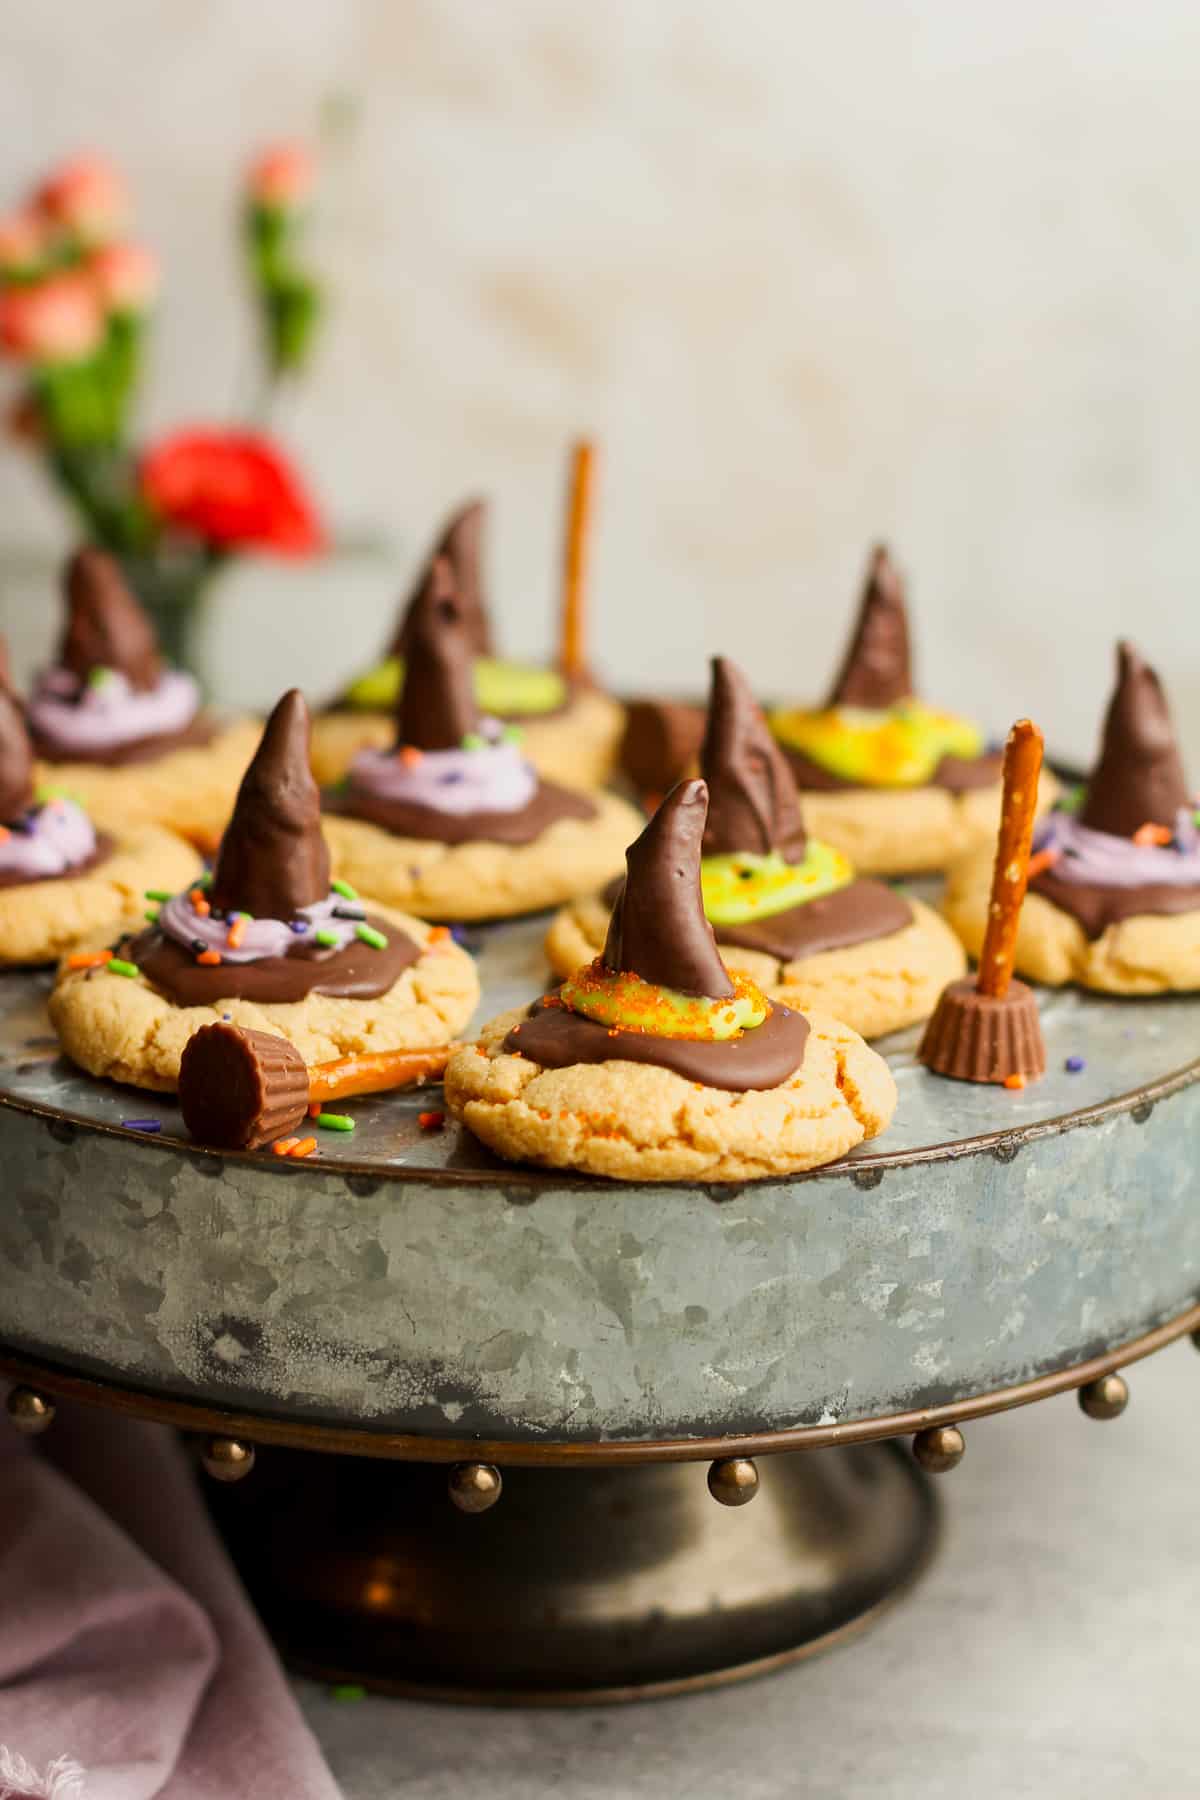
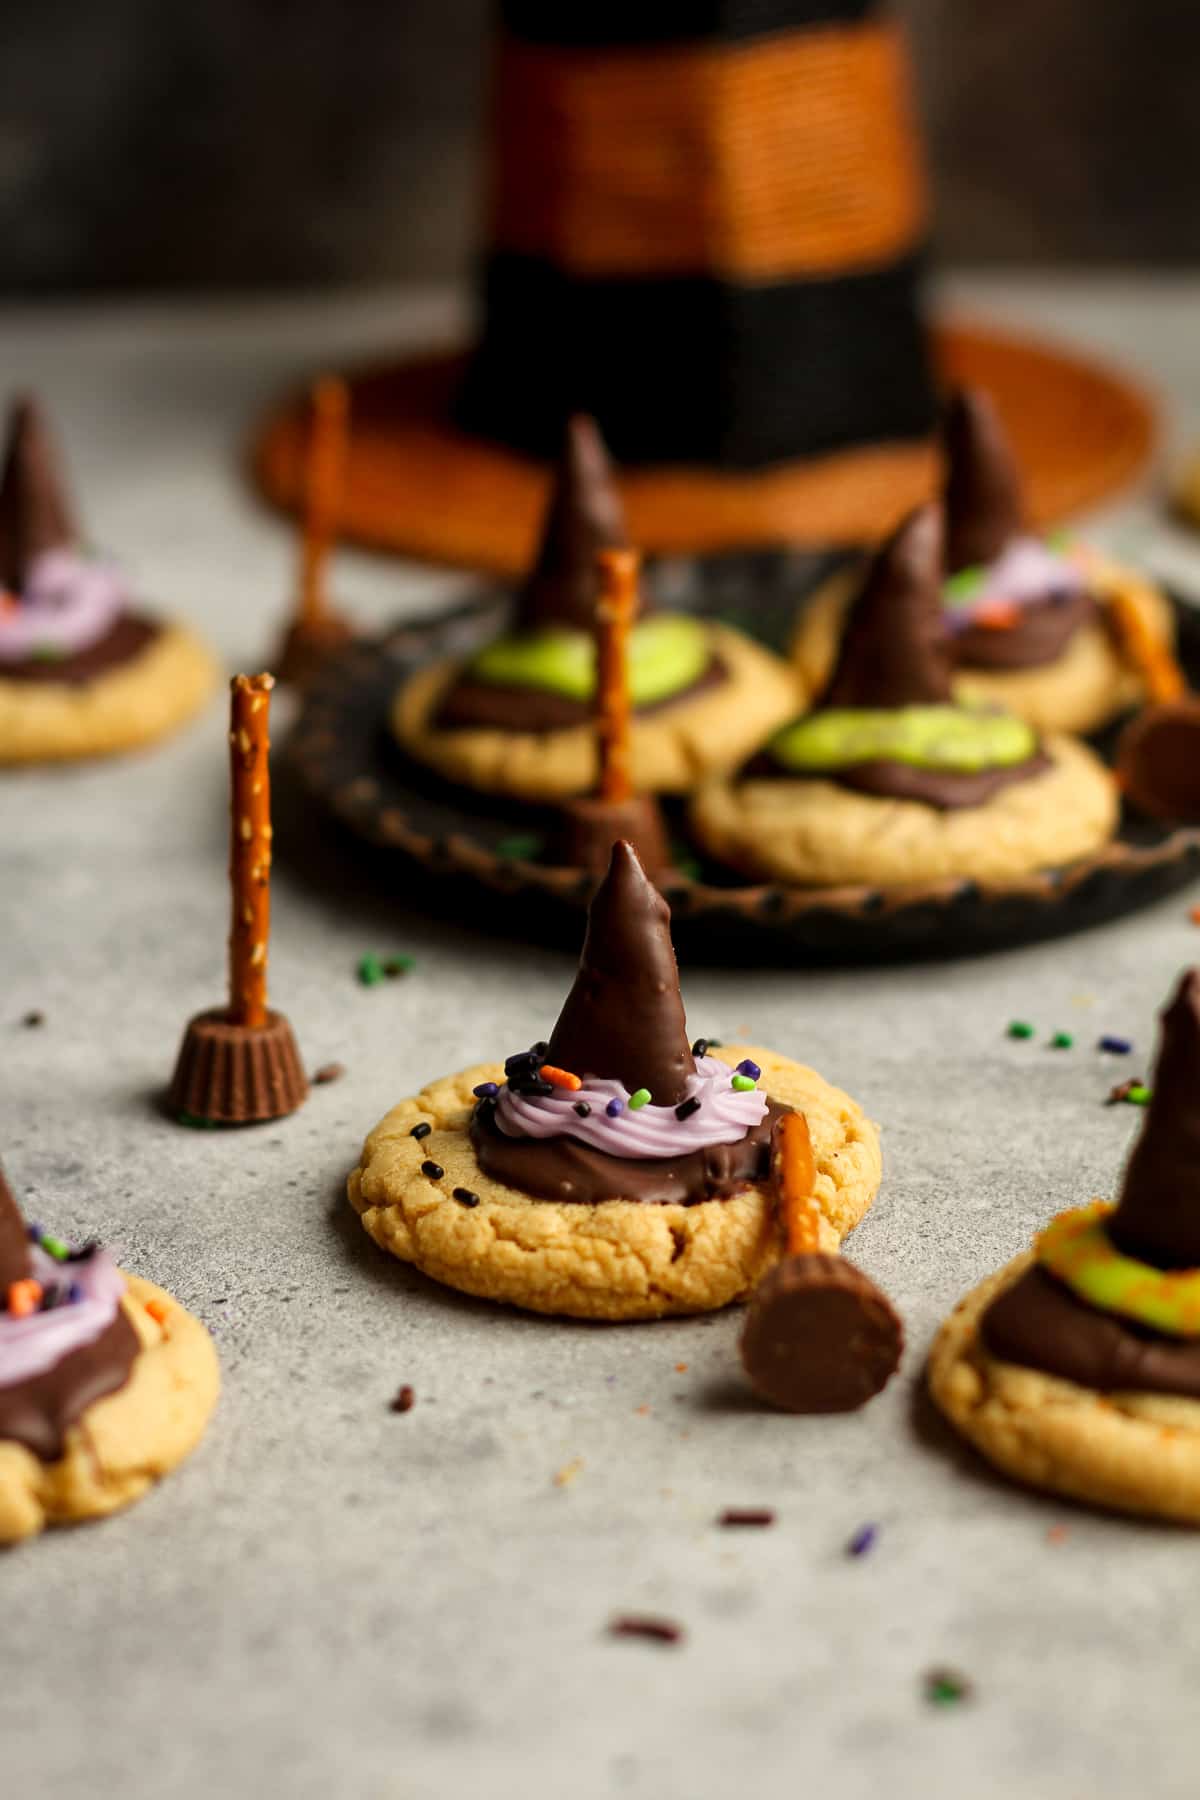
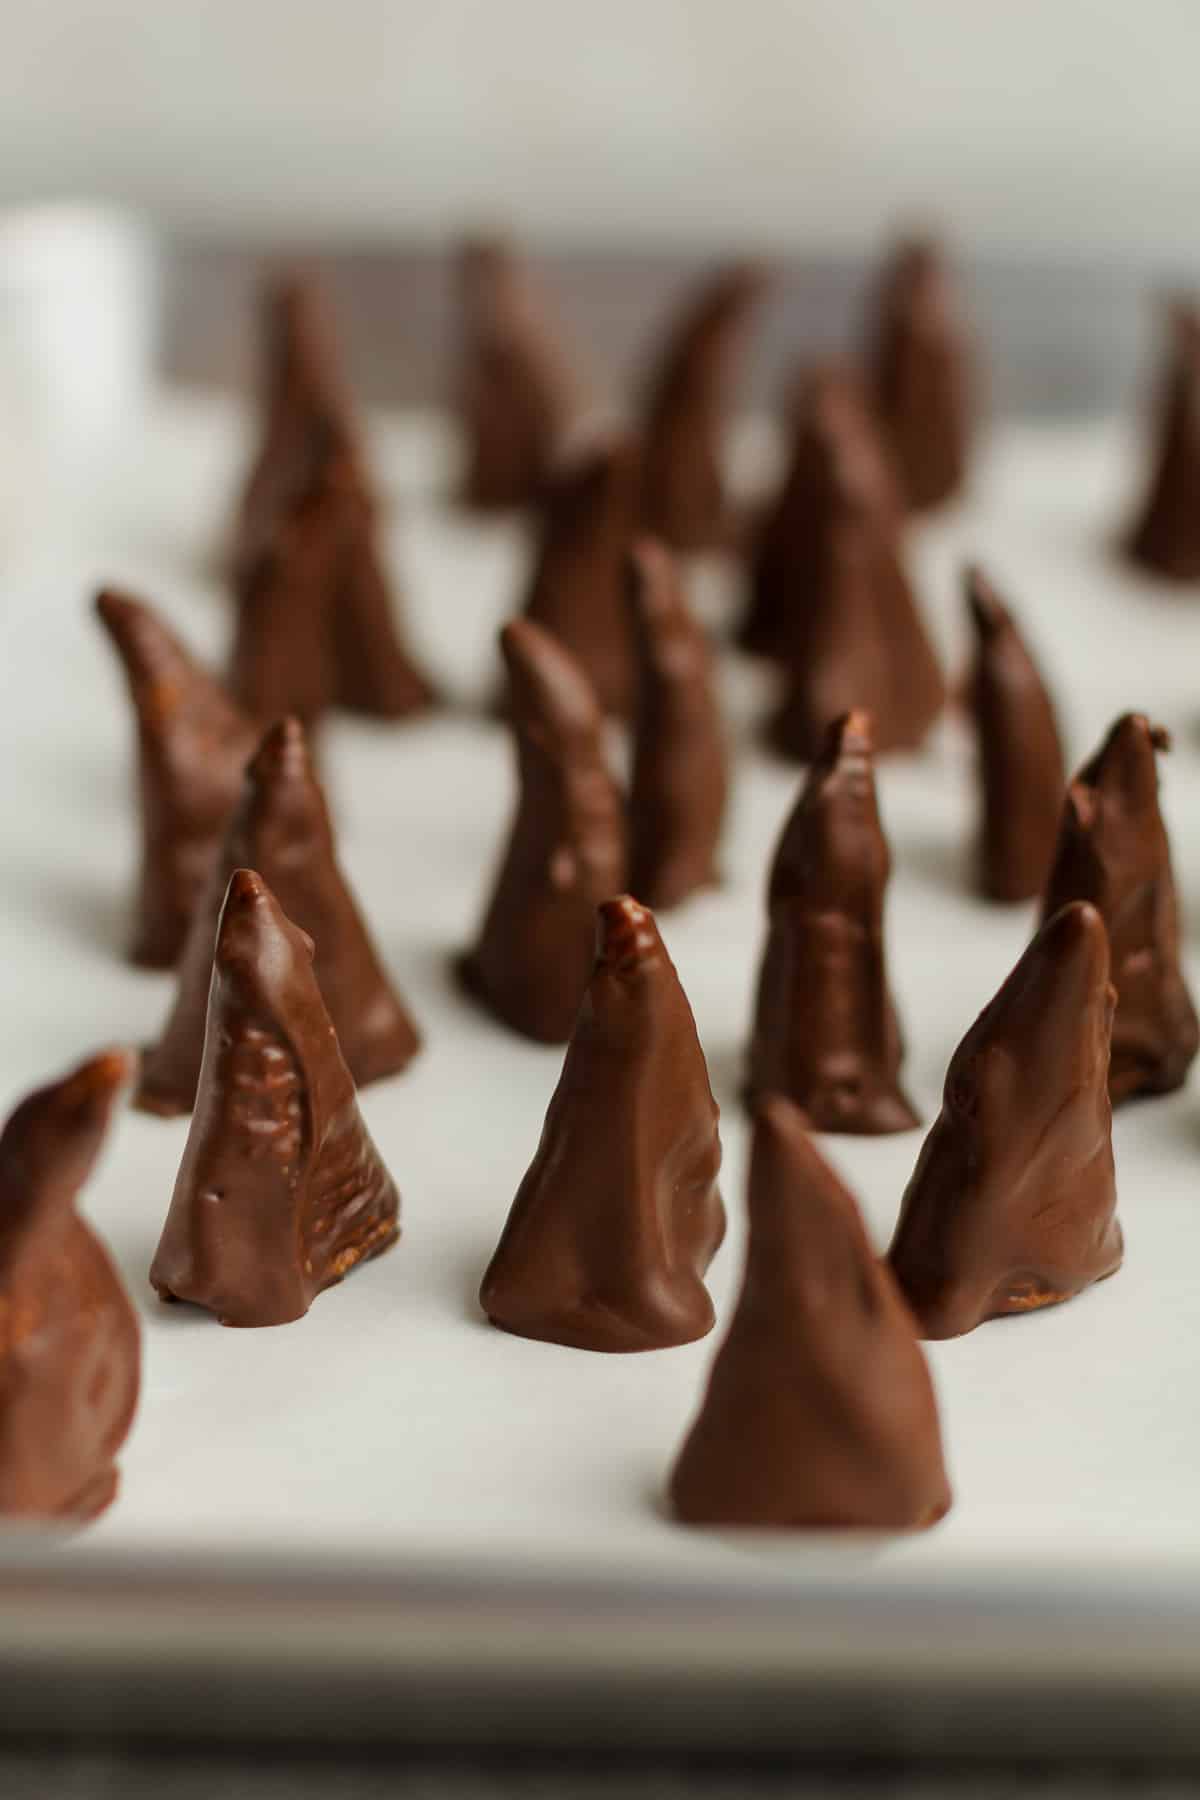
Dip the bugles in chocolate. Melt the chocolate in microwave (in glass dish) at 50% power for a minute at a time until creamy. Dip the bugles in the melted chocolate and shake off excess. Place on a parchment paper lined pan with the top of the hat sitting up – until set.
Step 6
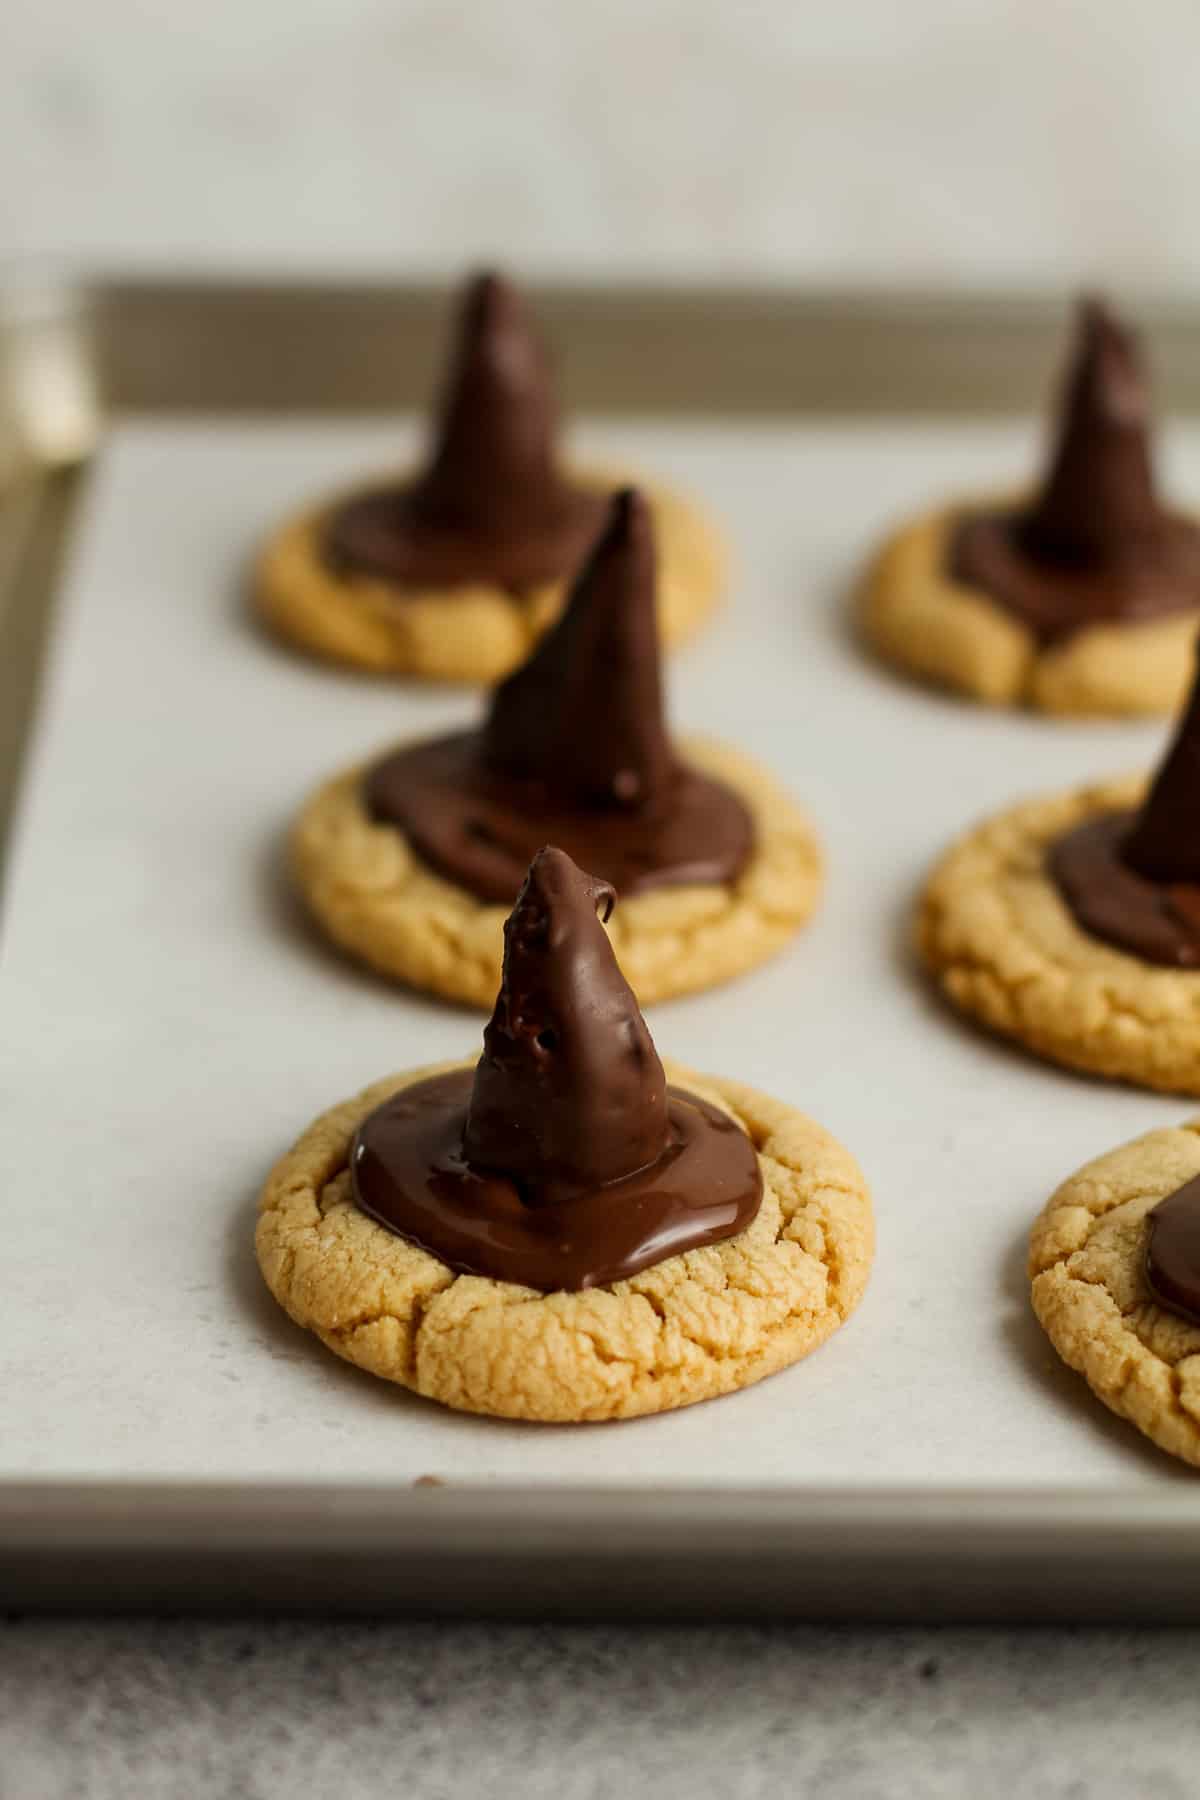
Make the hats. When the chocolate bugles are set, add some more chocolate in a circle shape on the middle of the cookies. Immediately place each bugle on the cookie before the chocolate sets up. Place cookies on pan until the entire hat is firm.
Step 7
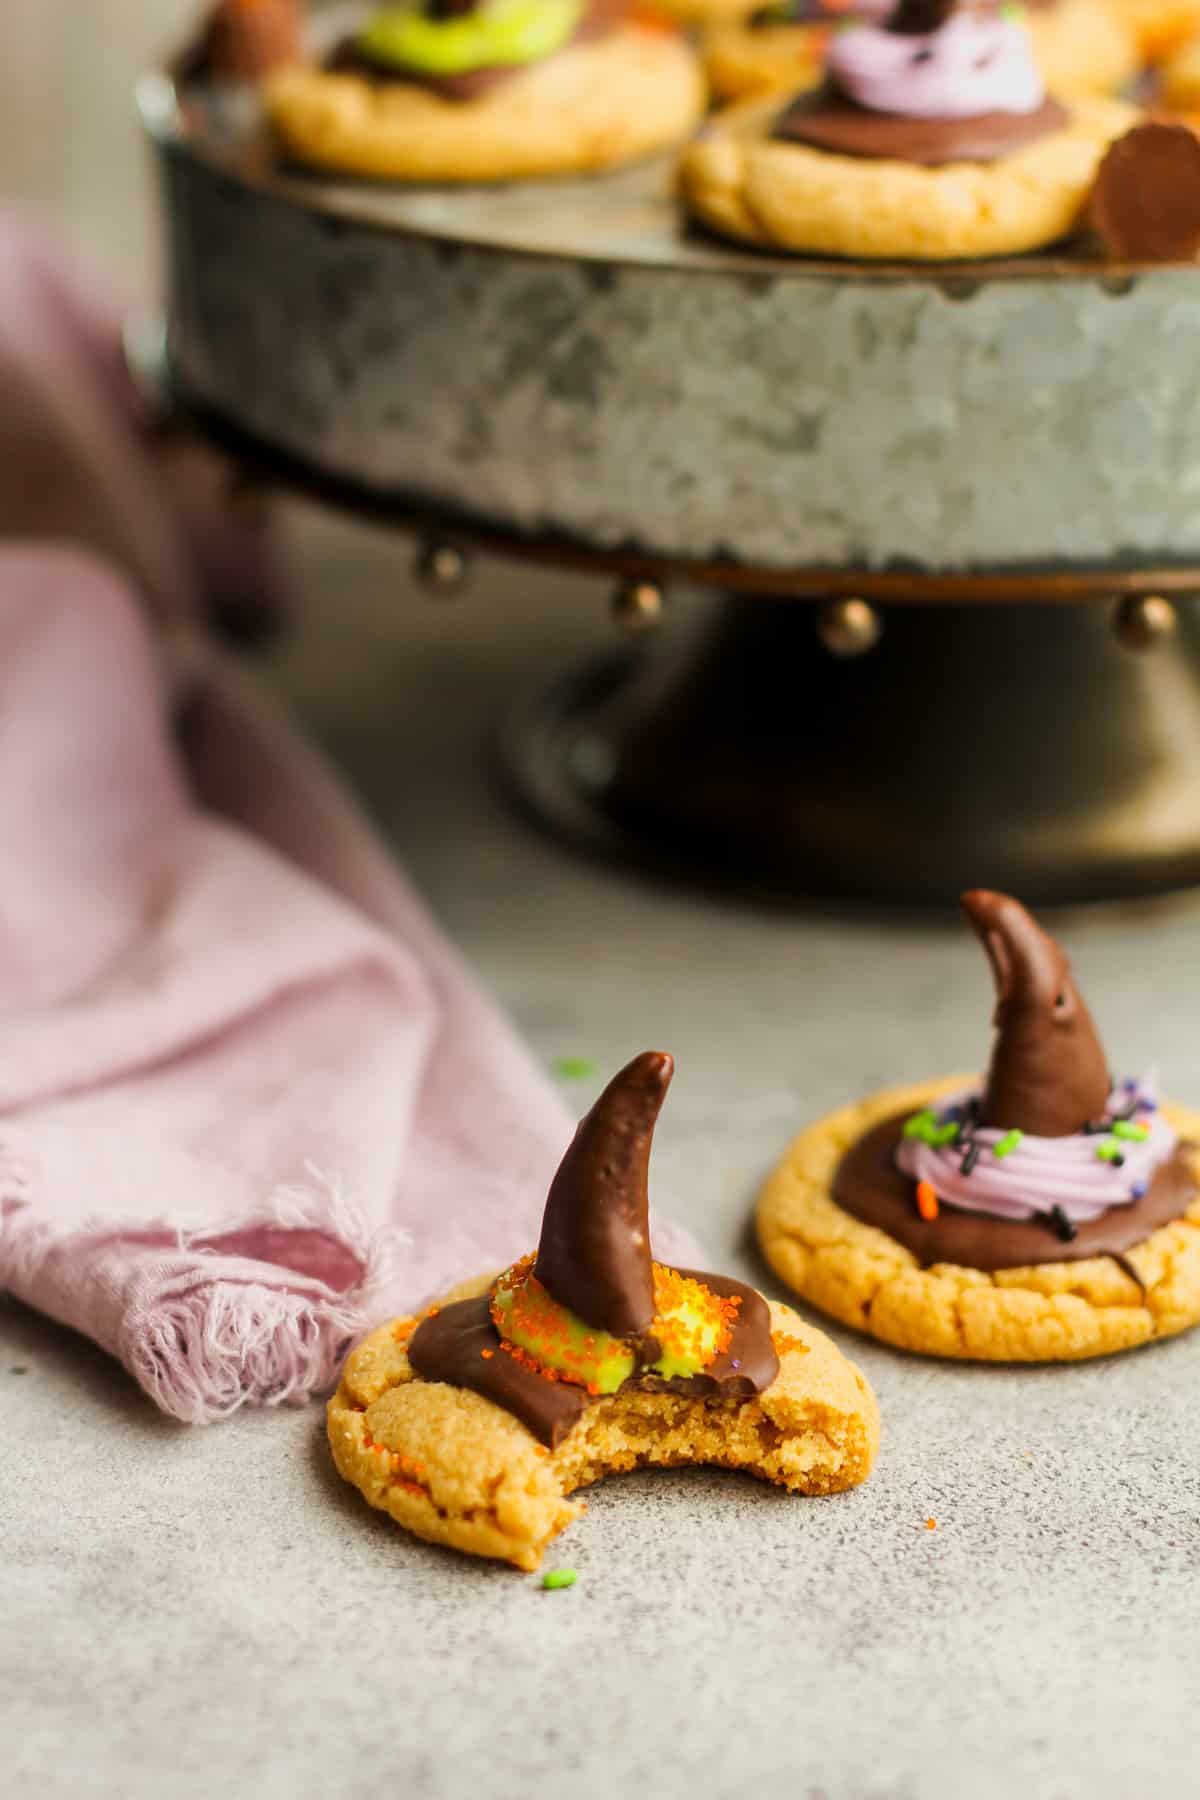
Add icing. Make the powdered sugar icing. Melt the butter and then add the vanilla extract, half and half, and the powdered sugar. Add whatever Halloween food coloring to the icing. The consistency should be just thin enough to easily pipe around the hat.
Spoon the icing into a small plastic bag or a piping bag. Clip the corner of the bag and pipe the icing around the bugle to create the sash. Add sprinkles immediately (before the icing sets up).
Pro-Tip: If you’re making these Halloween cookies for Halloween parties, make some broomsticks too. They’re simple and so much fun. Just break off about a fourth of each pretzel stick and press the larger piece into mini Reese’s peanut butter cups (the ones that aren’t wrapped – they are tiny). The broomsticks complete the cookies, and make another easy treat as well.
Storing and Freezing
STORE. Store the witch hat cookies on a large baking sheet in a cool place in your kitchen. Cover loosely with aluminum foil or plastic wrap. These adorable witch hat cookies will store nicely at room temperature for up to three days.
FREEZE. You can freeze these festive treats too. Place in an airtight container or an aluminum tin covered with a freezer bag. These will freeze nicely for approximately two months.
Recipe Tips
- Use room temperature butter and eggs to up your cookie game. This allows the ingredients to form an emulsion which traps air. While baking, this trapped air expansionists to produce a fluffier cookie. Using cold ingredients will prevent this magic from happening.
- Chill your dough. This will allow the fat in the cookies to chill and firm up. When baking, this chilled fat will prevent an over-spreading of the cookies. The resting time will also allow the flour to soak up the liquids in the dough. When the cookies are fully-hydrated, they brown better, bake more evenly, and have a more complex flavor.
- Over-Spreading TIP: If the cookies spread too much, take them out of the oven, fix them with a spoon, and place back in the oven to finish baking.
- Shake off excess chocolate from the bugles. When coating the bugles, use a fork and insert part of it into the bugle and shake off excess chocolate. Then stand the bugle up on the sheet pan.
- Let chocolate set. The chocolate covered bugles will set up at room temperature after a pretty short amount of time.
- Place bugles on the hat. When forming the base of the hat with the melting chocolate, press the chocolate covered bugle into the middle of the chocolate as soon as possible so that the bugle sticks. Repeat with remaining bugles and cookies.
- Pipe icing. I find that piping the icing for the sash is the easiest method. Make sure your icing is a nice consistency to pipe.
- Add sprinkles immediately. You’ll want to add the Halloween sprinkles to the sash (powdered sugar icing) before it sets.
Kitchen Tools Used: (affiliate links)
xoxo ~Sue

Witch Hat Cookies
Ingredients
For the peanut butter cookies:
- 1/2 cup unsalted butter – softened to room temperature
- 1/2 cup brown sugar
- 1/2 cup granulated sugar
- 1/2 cup creamy peanut butter
- 1 large egg – at room temp
- 1 teaspoon vanilla
- 1/2 teaspoon salt
- 1/2 teaspoon baking soda
- 1/2 teaspoon baking powder
- 1 1/2 cups all-purpose flour
For the decorating:
- 22 bugles
- 10 ounces Ghirardelli dark chocolate melting wafers
- 1 Tablespoon unsalted butter – melted
- 2 Tablespoons half and half
- 2 teaspoon vanilla
- 1 ½ – 2 cups powdered sugar – adjust according to how stiff you want frosting
- food coloring and sprinkles – any color
Instructions
For the cookies:
- Using a hand mixer, cream butter and sugars together until creamy. Add egg and mix well. Then add vanilla and peanut butter and mix until well combined.1/2 cup unsalted butter, 1/2 cup brown sugar, 1/2 cup granulated sugar, 1 large egg, 1 teaspoon vanilla, 1/2 cup creamy peanut butter
- Mix dry ingredients (flour, salt, baking soda, baking powder) together. Add to wet ingredients and mix until just combined. 1 1/2 cups all-purpose flour, 1/2 teaspoon salt, 1/2 teaspoon baking soda, 1/2 teaspoon baking powder
- Roll dough into small balls (you should get 22) and place on sheet pan lined with parchment paper. Chill for at least two hours or overnight.
- Prep oven to 350 degrees. Place eight cookie balls on a large baking sheet (lined with parchment paper) at a time to bake.
- Bake cookies for 10 – 13 minutes, depending on how dark you like your cookies.
- Let the cookies sit on baking sheet for five minutes before transferring to wire cooling racks to fully cool.
To decorate:
- Melt a small amount of dark chocolate melting wafers. Coat 22 bugles with chocolate and set upright on a pan lined with parchment paper. Let the chocolate harden before continuing.10 ounces Ghirardelli dark chocolate melting wafers, 22 bugles
- Melt more chocolate and add a spoonful on top of each cookie, spreading around carefully to make a circle (the brim of the hat). Place chocolate bugles on top of chocolate before it sets.
- Make buttercream frosting by mixing the butter, half and half, vanilla, and powdered sugar. Use hand mixer to cream, and then add food coloring. You may need more powdered sugar if frosting is too runny. Or more half and half if it is too stiff. Adjust accordingly.1 Tablespoon unsalted butter, 2 Tablespoons half and half, 2 teaspoon vanilla, 1 ½ – 2 cups powdered sugarfood coloring and sprinkles
- Pipe frosting on cookies to form the sash of the hat. Add Halloween sprinkles immediately.
- STORE. Store the witch hat cookies on a large baking sheet. Cover loosely with aluminum foil. These will store nicely at room temperature for up to three days.FREEZE. You can freeze these cookies too. Place in an airtight container or an aluminum tin covered with a freezer bag. These will freeze nicely for approximately two months.
Notes
- Use room temperature butter and eggs to up your cookie game. This allows the ingredients to form an emulsion which traps air. While baking, this trapped air expansionists to produce a fluffier cookie. Using cold ingredients will prevent this magic from happening.
- Chill your dough. This will allow the fat in the cookies to chill and firm up. When baking, this chilled fat will prevent an over-spreading of the cookies. The resting time will also allow the flour to soak up the liquids in the dough. When the cookies are fully-hydrated, they brown better, bake more evenly, and have a more complex flavor.
- Over-Spreading TIP: If the cookies spread too much, take them out of the oven, fix them with a spoon, and place back in the oven to finish baking.
- Shake off excess chocolate from the bugles. When coating the bugles, use a fork and insert part of it into the bugle and shake off excess chocolate. Then stand the bugle up on the sheet pan.
- Let chocolate set. The chocolate covered bugles will set up at room temperature after a pretty short amount of time.
- Place bugles on the hat. When forming the base of the hat with the melting chocolate, press the chocolate covered bugle into the middle of the chocolate as soon as possible so that the bugle sticks. Repeat with remaining bugles and cookies.
- Pipe icing. I find that piping the icing for the sash is the easiest method. Make sure your icing is a nice consistency to pipe.
- Add sprinkles immediately. You’ll want to add the Halloween sprinkles to the sash (powdered sugar icing) before it sets.
Zach and I make a good team. His favorite is the hat and I am old school. Just give me the cookie!
And I love them both!!