Easy Frankenstein Cookies
Whip up these Easy Frankenstein Cookies for a fun and spooky Halloween treat! Soft, colorful, and decorated with candy eyes and chocolate drizzle, they’re perfect for parties, school events, or a fun baking day at home!

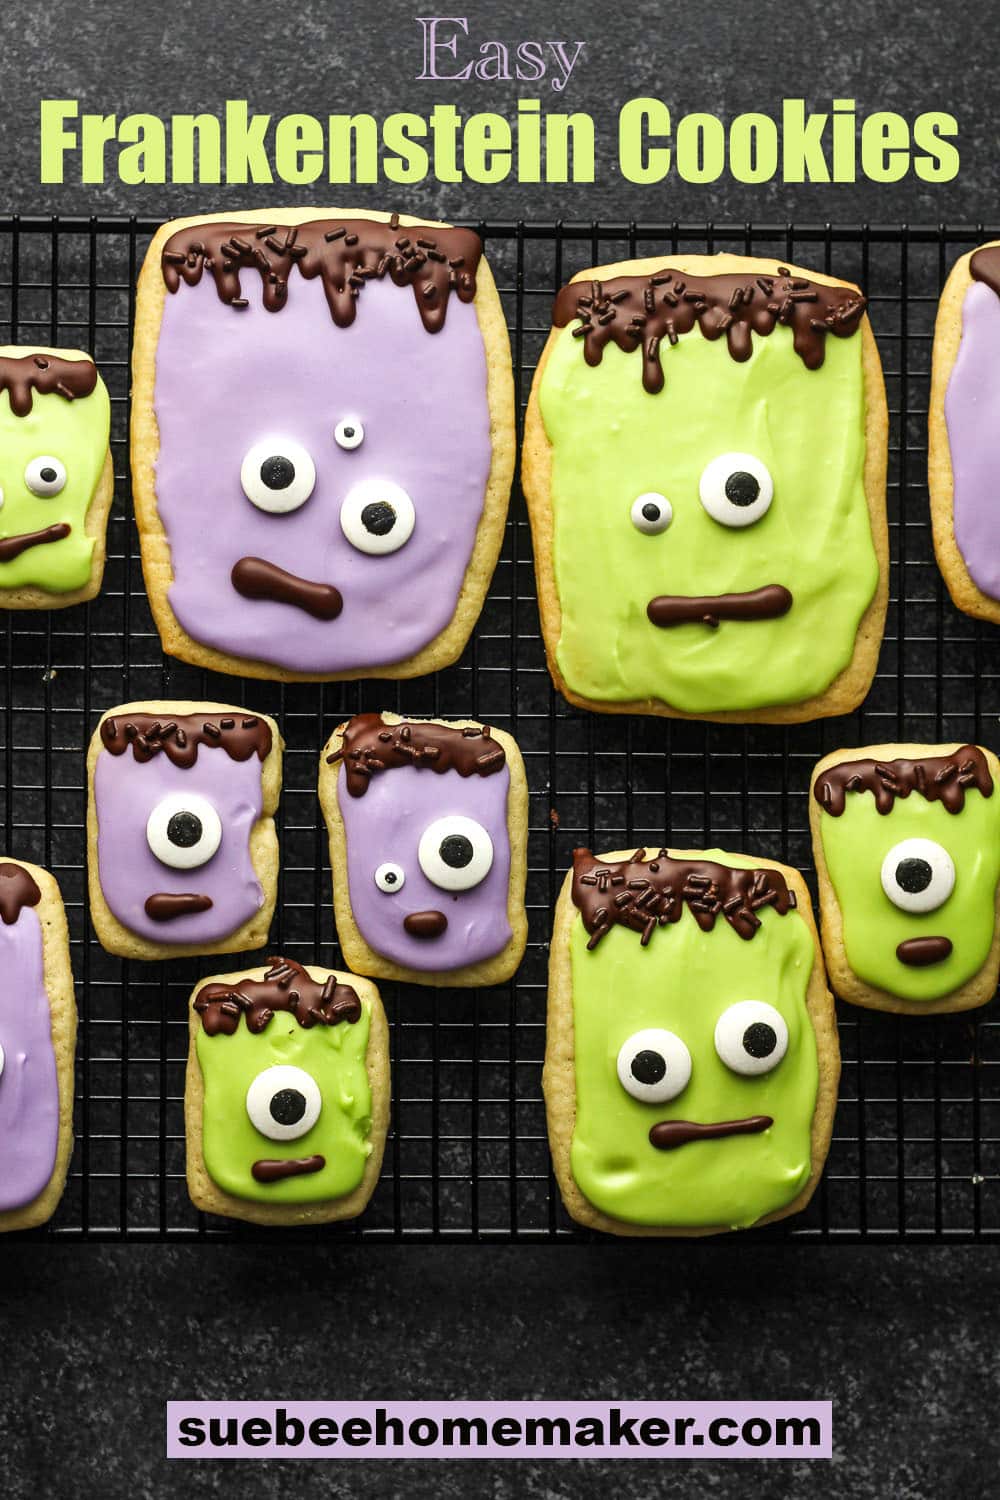
Spooky Halloween Cookies
For us, Halloween is just as much about fun and creativity as it is about scares, so we love leaning into the cutesy side of decorating. Instead of eerie ghosts and gory monsters, our cookies and treats are full of bright colors, silly faces, and playful designs that make everyone smile.
Think candy-eyed Frankenstein cookies, pumpkin faces with cheerful grins, and little witch hats with sparkly frosting — it’s all about whimsy and laughter rather than frights. Boring? Maybe—but we’d rather be cutesy than creepy any day!
Prefer chocolate over these classic cut-out sugar cookies? Try our Chocolate Cut-Out Cookies next! You can even get creative with other shapes like bats, ghosts, pumpkins, etc.
Why we LOVE Frankenstein Cookies:
- Festive & Fun – They instantly bring Halloween spirit to the table.
- Soft and Delish – These soft Frankenstein cookies are soft and oh-so-delish!
- Kid-Friendly – Little hands love helping decorate these silly monsters. They don’t have to be perfect to be yummy.
- Party-Perfect – Ideal for school events and Halloween gatherings.
- Customizable – Mix up the colors, candies, or cookie base to make them your own.
- Frosting is 10/10 – We’re not a huge fan of royal icing. The taste of this simple powdered sugar frosting is way better, trust me.

What You’ll Need:
- wet ingredients – unsalted butter, sugar, eggs, vanilla extract
- dry ingredients – all-purpose flour, baking soda, cream of tartar, kosher salt
- icing ingredients – butter, half and half, vanilla extract, powdered sugar
- other – food coloring, candy eyes, chocolate bar, chocolate sprinkles
How to make Frankenstein Cookies:
Step 1
Combine wet ingredients. In the bowl of a large standing mixer, combine the softened butter and sugar. Attach paddle and run mixer on low or until butter and sugar is creamy, about 1-2 minutes. Add eggs and vanilla, and mix again until well combined.
Step 2
Add dry ingredients. Add flour, baking soda, cream of tartar, and kosher salt. Run mixer on low to combine, scraping down sides of bowl as needed.

Step 3
Chill dough. Remove dough and wrap in plastic wrap. Place in refrigerator to chill for at least two hours, or overnight.

Step 4
Roll out dough. Use a baking mat or large board to roll out dough. Sprinkle a thin layer of flour on surface and place about 1/3 of cookie dough on top (keep remaining dough chilled). Roll out dough with a well-floured rolling pin to about 1/4 of inch. Use cookie cutters dipped in flour, then transfer shapes with a spatula onto a parchment-lined baking sheet. You can re-roll scraps if desired.
Step 5
Bake cookies. Bake cut-out cookies in a preheated 350-degree oven for 8-10 minutes, or until done to your liking. Let cookies sit on pans for 5-6 minutes before carefully transferring to cooling racks.


Step 6
Make icing. In a mixing bowl, combine melted butter, powdered sugar, half and half, and vanilla extract. Use a spoon to mix well until icing is thick but spreadable.
To adjust icing: If icing is too thick, add additional half and half. If it’s too thin, add more powdered sugar.
Step 7
Melt chocolate. Break chocolate apart with your fingers and add to a small pan. Add a small pat of butter and melt chocolate over medium-low heat, stirring almost constantly to avoid burning. Pour chocolate into a small baggie and add a clip to secure.

Step 8
Frost cookies and decorate.
- Separate icing into bowls (we used two colors) and add food coloring as desired. Then frost cookies in a thin layer, smoothing to all sides of the cookies.
- Immediately add candy eyeballs to the middle of the cookies.
- Use a scissors to clip off the very tip of the bag holding the melted chocolate. Then carefully draw the hair and lips to the Frankenstein cookies. Add chocolate sprinkles on top of the “hair” as desired.
Step 9
Let cookies set. Let the cookies set completely before storing. The frosting and chocolate will harden but not enough to stack them.
Store cookies in an airtight container at room temperature for 2–3 days, or freeze undecorated cookies and decorate them fresh before serving.


Reasons we prefer buttery icing over royal icing:
I’ll be honest—I’ve never been a fan of royal icing for cookies. You know the kind: hard as cement, overly sweet, and the type you usually see on grocery store bakery cookies. Give me a soft, buttery, spreadable icing any day, and I’m a happy camper!
While royal icing gives cookies a crisp, polished finish perfect for detailed designs, we love regular icing for so many reasons, including those listed below!
- It stays soft and spreadable, making every bite rich and tender.
- Whips up in minutes without needing precise consistency.
- Perfect for quick spreading on cookies without piping skills.
- The buttery flavor adds richness that royal icing lacks.
- Little ones can help without worrying about stiff, tricky icing.

Recipe FAQs:
Any sturdy cut-out cookie dough, like sugar cookies or shortbread, works perfectly since they hold their shape.
Not at all! Regular buttercream or powdered sugar icing works great for a softer, tastier option.
We like using gel food coloring. Green is obviously THE Frankenstein color, but purple is classic Halloween. Get creative!
Keep them in an airtight container at room temperature for 2–3 days, or freeze undecorated cookies and decorate them fresh before serving.
Other Delicious Halloween Treats:
It’s my favorite time of year – when the weather starts cooling off and we get to wear PANTS again! LOL! Plus October is my birthday month and that’s kinda fun too.

Kitchen Tools Used: (affiliate links)
xoxo ~Sue

Easy Frankenstein Cookies Recipe
Ingredients
For the cookies:
- 1 cup unsalted butter – softened to room temperature
- 1 ¼ cups granulated sugar
- 3 large eggs – at room temp
- 1 teaspoon vanilla extract
- 3 ½ cups all-purpose flour
- 2 teaspoons cream of tartar
- 1 teaspoon baking soda
- 1/2 teaspoon kosher salt
For the powdered sugar icing:
- 3 Tablespoons unsalted butter – melted
- 1/3 cup half and half
- 1 teaspoon vanilla extract
- 4 cups powdered sugar
Other:
- gel food coloring
- melting chocolate
- candy eyes and sprinkles
Instructions
- Combine wet ingredients. In the bowl of a large standing mixer, combine the softened butter and sugar. Attach paddle and run mixer on low or until butter and sugar is creamy, about 1-2 minutes. Add eggs and vanilla, and mix again until well combined.1 cup unsalted butter, 1 ¼ cups granulated sugar, 3 large eggs, 1 teaspoon vanilla extract
- Add dry ingredients. Add flour, baking soda, cream of tartar, and kosher salt. Run mixer on low to combine, scraping down sides of bowl as needed.3 ½ cups all-purpose flour, 2 teaspoons cream of tartar, 1 teaspoon baking soda, 1/2 teaspoon kosher salt
- Chill dough. Remove dough and wrap in plastic wrap. Place in refrigerator to chill for at least two hours, or overnight.
- Roll out dough. Use a baking mat or large board to roll out dough. Sprinkle a thin layer of flour on surface and place about 1/3 of cookie dough on top (keep remaining dough chilled). Roll out dough with a well-floured rolling pin to about 1/4 of inch. Use cookie cutters dipped in flour, then transfer shapes with a spatula onto a parchment-lined baking sheet. You can re-roll scraps if desired.
- Bake cookies. Bake cut-out cookies in a preheated 350-degree oven for 8-10 minutes, or until done to your liking. Let cookies sit on pans for 5-6 minutes before carefully transferring to cooling racks.
- Make icing. In a mixing bowl, combine melted butter, powdered sugar, half and half, and vanilla extract. Use a spoon to mix well until icing is thick but spreadable.To adjust icing: If icing is too thick, add additional half and half. If it’s too thin, add more powdered sugar.3 Tablespoons unsalted butter, 1/3 cup half and half, 1 teaspoon vanilla extract, 4 cups powdered sugar
- Melt chocolate. Break chocolate apart with your fingers and add to a small pan. Add a small pat of butter and melt chocolate over medium-low heat, stirring almost constantly to avoid burning. Pour chocolate into a small baggie and add a clip to secure.melting chocolate
- Frost cookies and decorate.1. Separate icing into bowls (we used two colors) and add food coloring as desired. Then frost cookies in a thin layer, smoothing to all sides of the cookies. 2. Immediately add candy eyeballs to the middle of the cookies.3. Use a scissors to clip off the very tip of the bag holding the melted chocolate. Then carefully draw the hair and lips to the Frankenstein cookies. Add chocolate sprinkles on top of the “hair” as desired.gel food coloring, candy eyes and sprinkles
- Let cookies set. Let the cookies set completely before storing. The frosting and chocolate will harden but not enough to stack.
Notes
- Store cookies in an airtight container at room temperature for 2–3 days, or freeze undecorated cookies and decorate them fresh before serving.
- Prefer chocolate over these classic cut-out sugar cookies? Try our Chocolate Cut-Out Cookies next! You can even get creative with other shapes like bats, ghosts, pumpkins, etc.
So fun for the kids to make!
So true!