Crusty Sourdough Bread
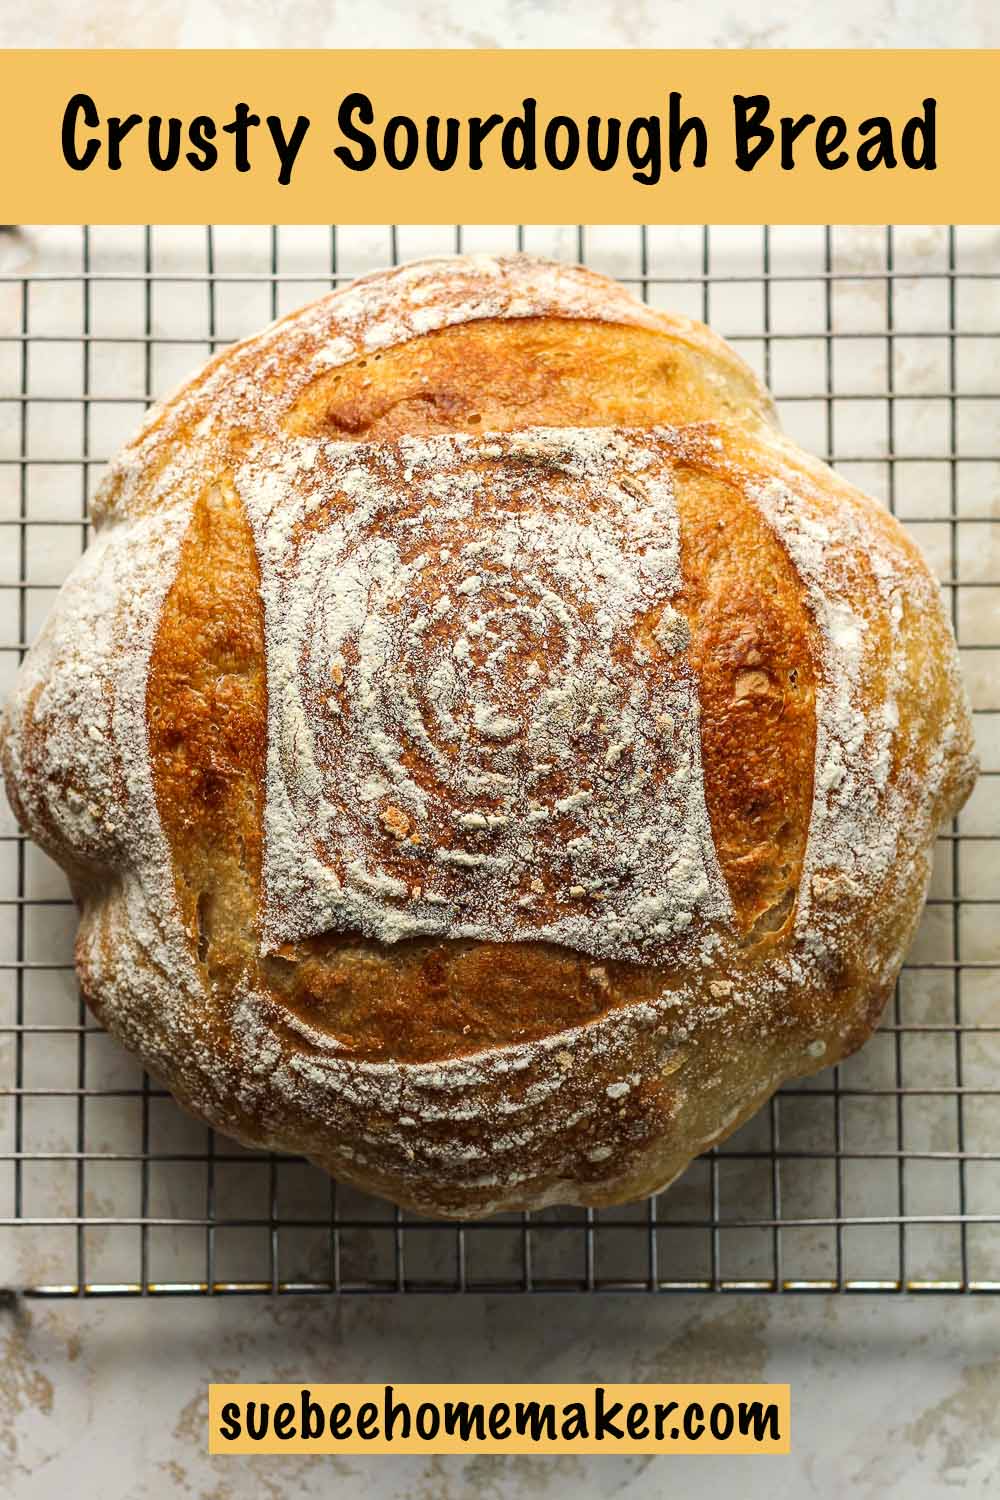
Crusty Sourdough Bread boasts a golden, crackling exterior that gives way to a chewy, tangy interior. Naturally leavened and slow-fermented, it delivers a rustic appearance and hearty bite perfect for any table!
The Crusty Loaf
I’ve been hearing from our youngest son about needing a crusty loaf in the sourdough collection. Which is why I’m finally sharing this – a simple loaf that I’ve made several times. While we love a fully loaded Jalapeño Cheddar Sourdough Bread, we also enjoy a simple recipe too.
My sourdough baking journey began in 2020 (like so many of you) and it is still my favorite type of bread to eat. We especially like the strong, tangy taste that can is further developed by placing the dough in the refrigerator for about 24 hours.
Why This Recipe Works:
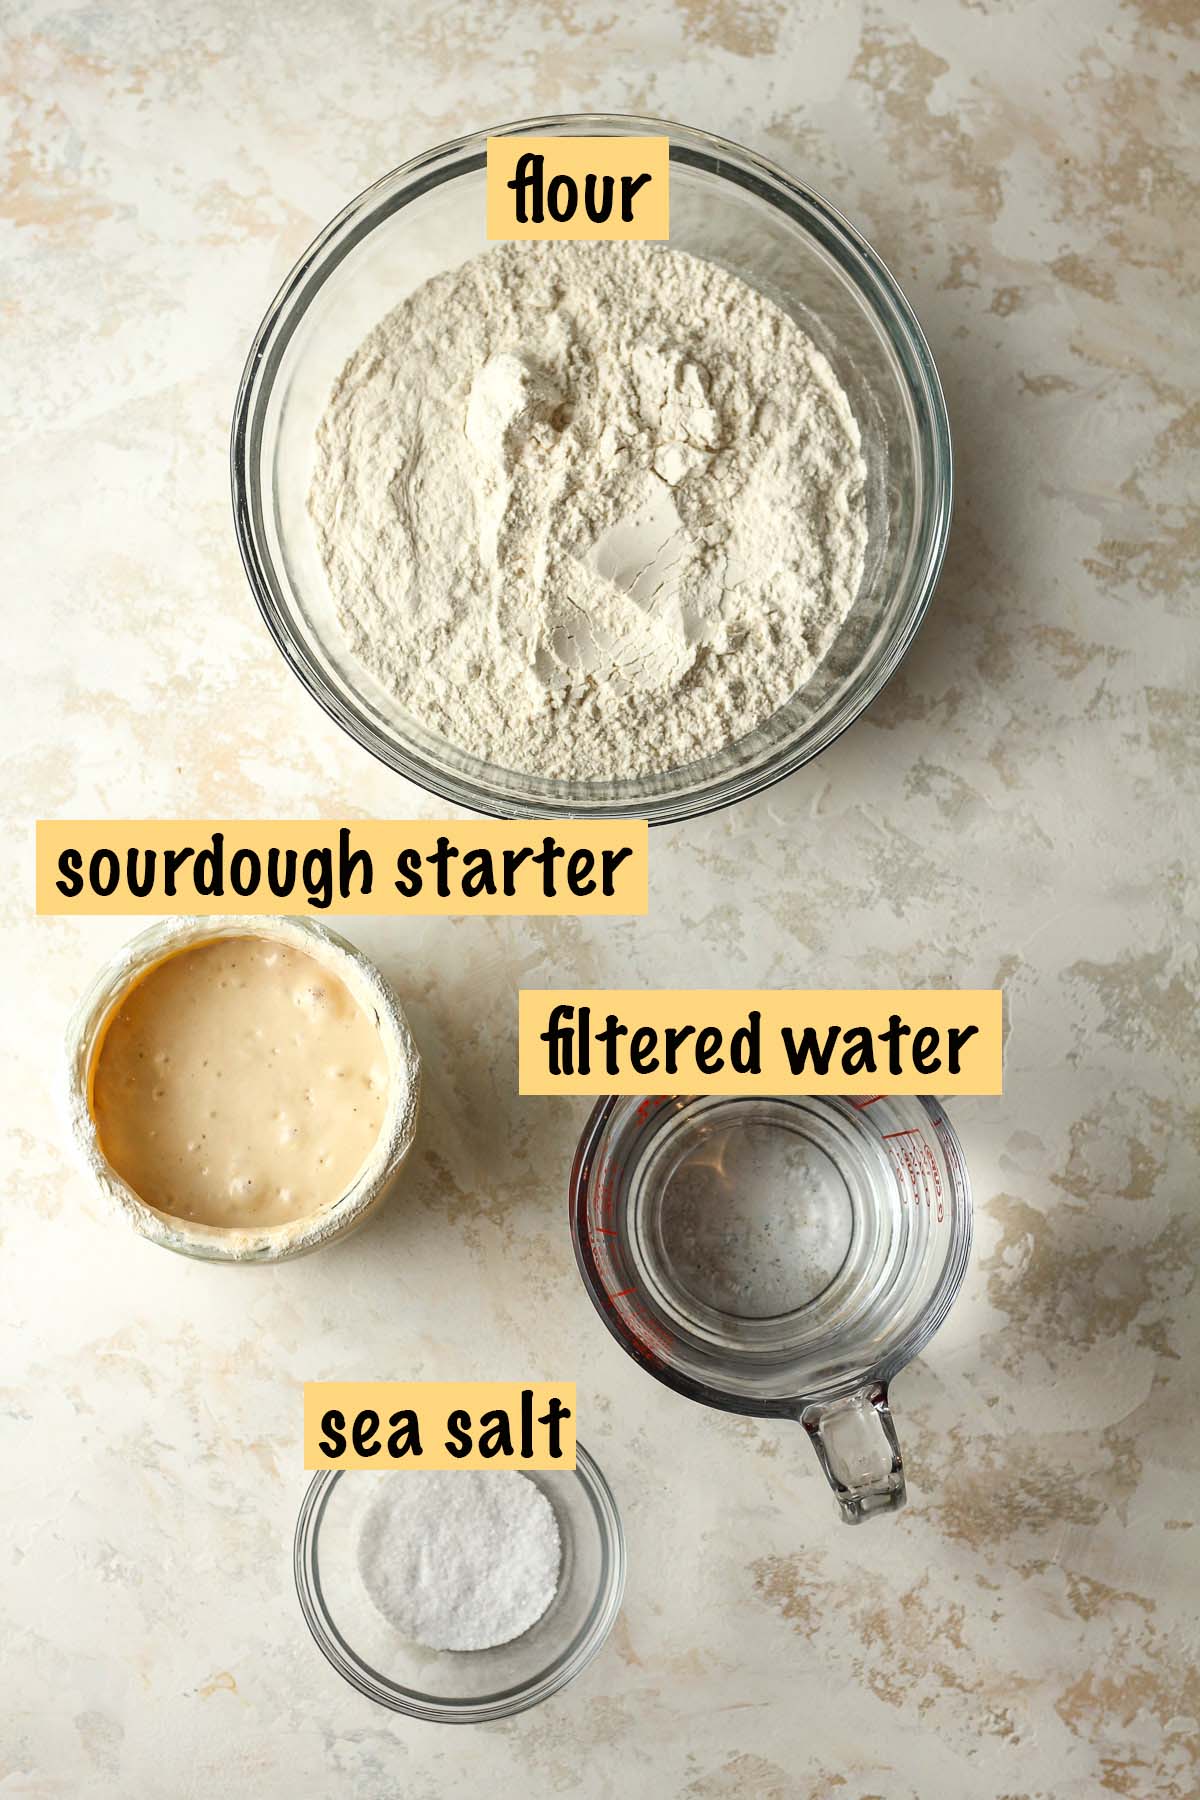
- SIMPLE INGREDIENTS – This recipe requires just four simple ingredients, including an active, bubbly starter. If you need a tutorial, head to my Sourdough Starter Basics post for all the information you need!
- TANGY SOURDOUGH – By doing a cold fermentation, we’re adding a super tangy taste to the bread. It’s so good!
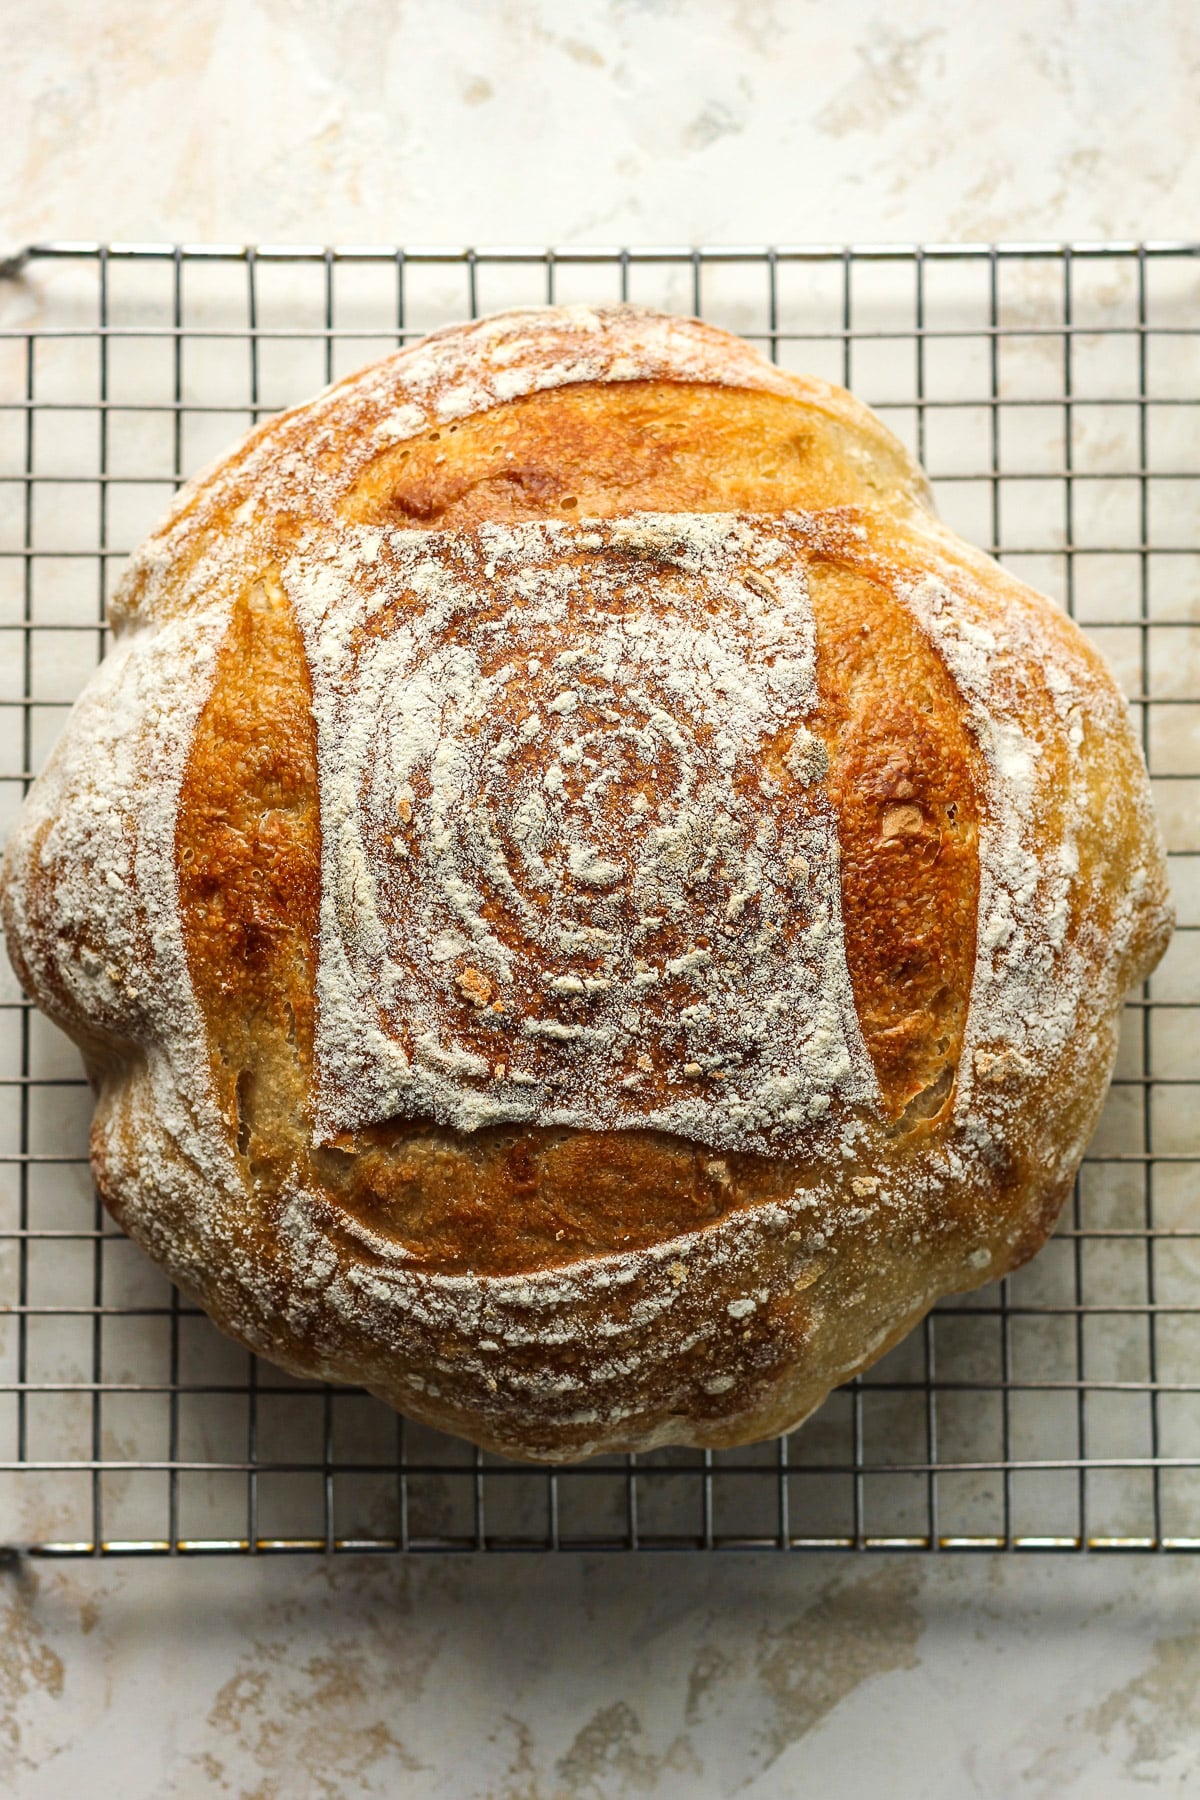
- CRUSTY LOAF – We love that crusty loaf – crispy edges and a soft interior with plenty of flavor.
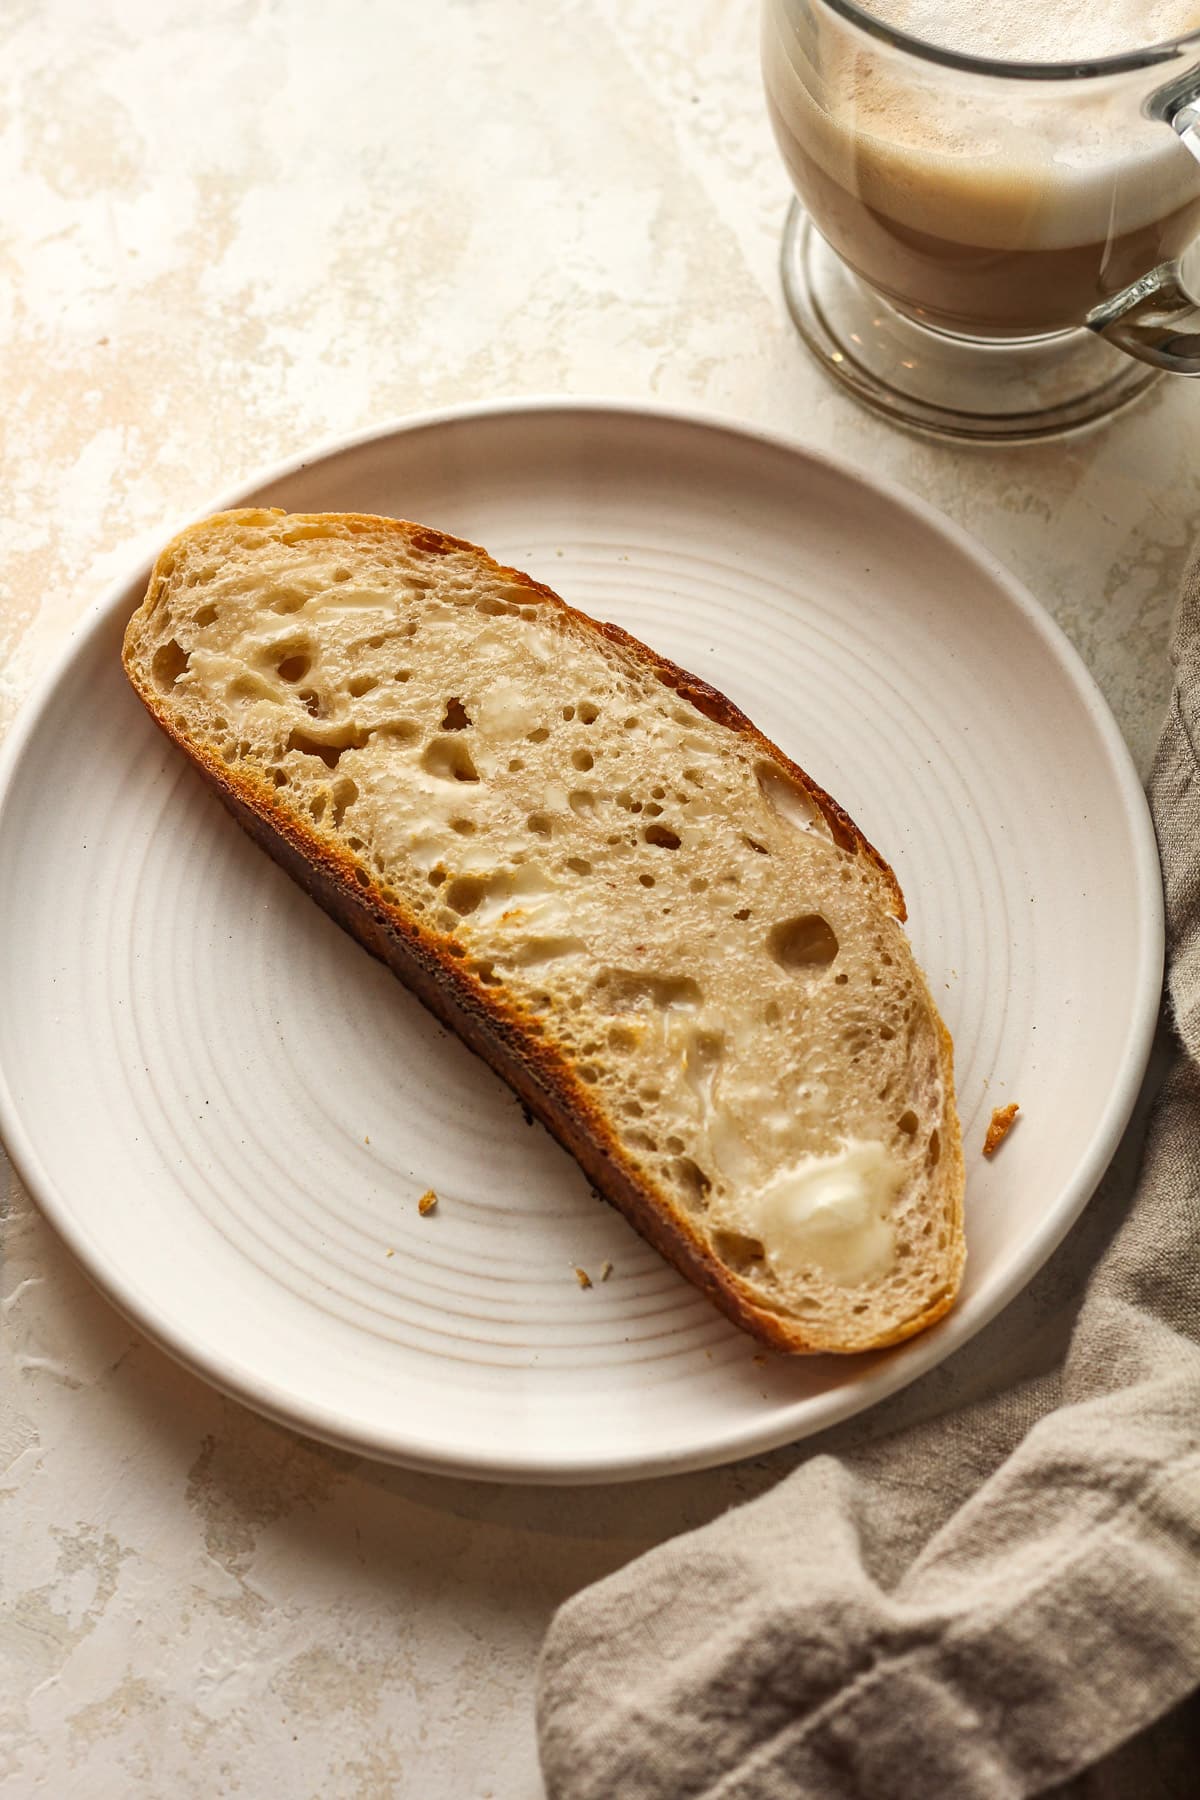
- GREAT FOR SANDWICHES – This bread makes the ultimate sandwich. Gimme a grilled cheese, a ham and cheese panini, or a scrambled egg sammie.
What You’ll Need:
- Bubbly Starter – The starter is THE most important part of sourdough bread making. It takes a little time, but you will be rewarded over and over again with an active bubbly starter.
- Filtered Water – Use filtered water, either out of your refrigerator filter system or use bottled water. The water should either be at room temperature or slightly warmed before adding it to the sourdough process.
- Flour – For this recipe, we’re using unbleached bread flour with a little bit of whole wheat.
- Sea Salt – I recommend using fine sea salt.
How to make Crusty Sourdough Bread:
Step 1
Carefully measure. Use a kitchen scale to measure the water and sourdough starter and add to a large bowl. Stir well with a fork. Then add the bread flour, whole wheat flour, and sea salt – and stir again.
Step 2
Mix ingredients. Then use your hands to bring the ingredients together. It will look shaggy. Cover with a damp towel and let it sit for 45 minutes. (Be sure to set a timer.) This is the AUTOLYSE.
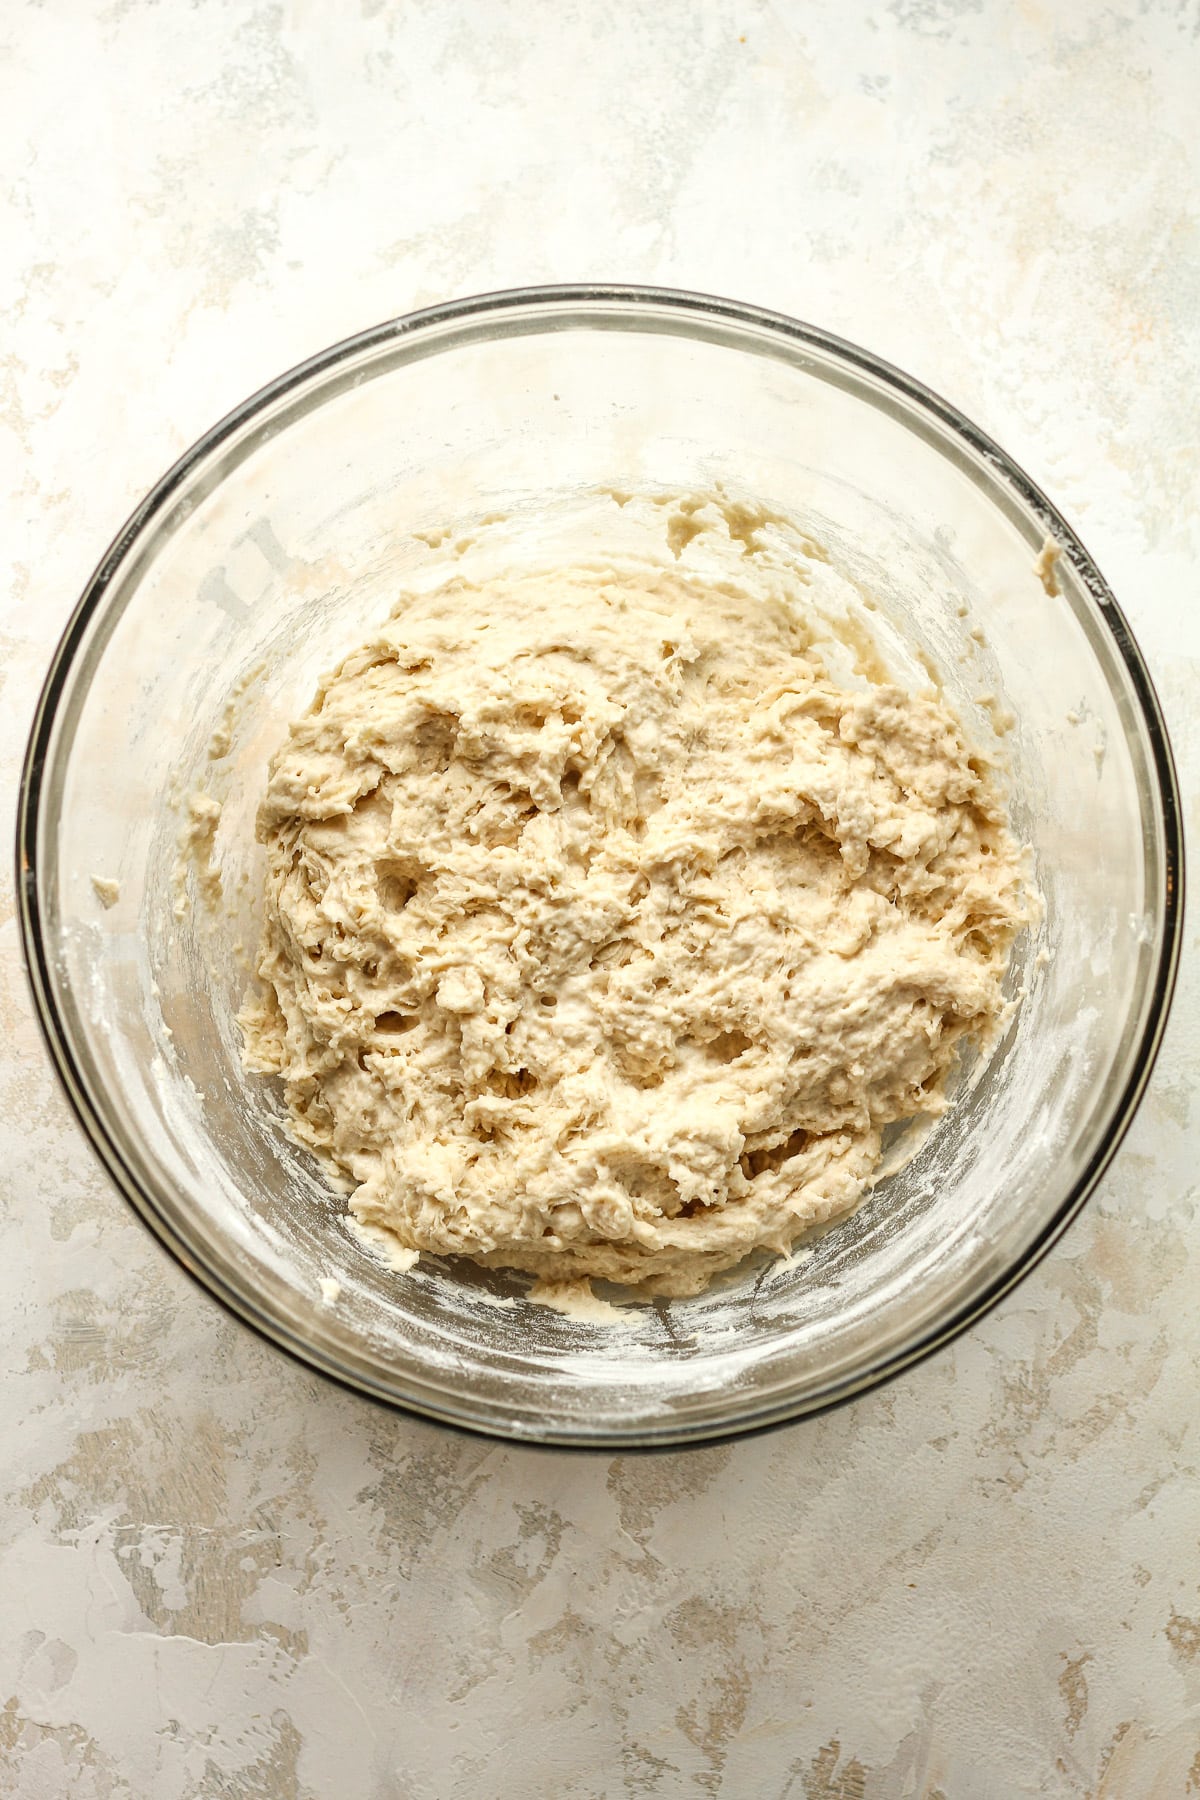
Step 3
Do stretch and folds. Then start the stretch and folds. Use your hand and lift the dough up on one side, stretching it upward, and then punch into the center of the dough. Turn the dough and repeat. Continue this process for about 30 seconds. This is the STRETCH AND FOLDS.
ADDITIONAL STRETCH AND FOLDS: I recommend doing additional sets of stretch and folds if time permits. Do these every 30 minutes for 3-4 more times to further the gluten development. A bench scraper is an excellent tool to assist with the stretch and folds.
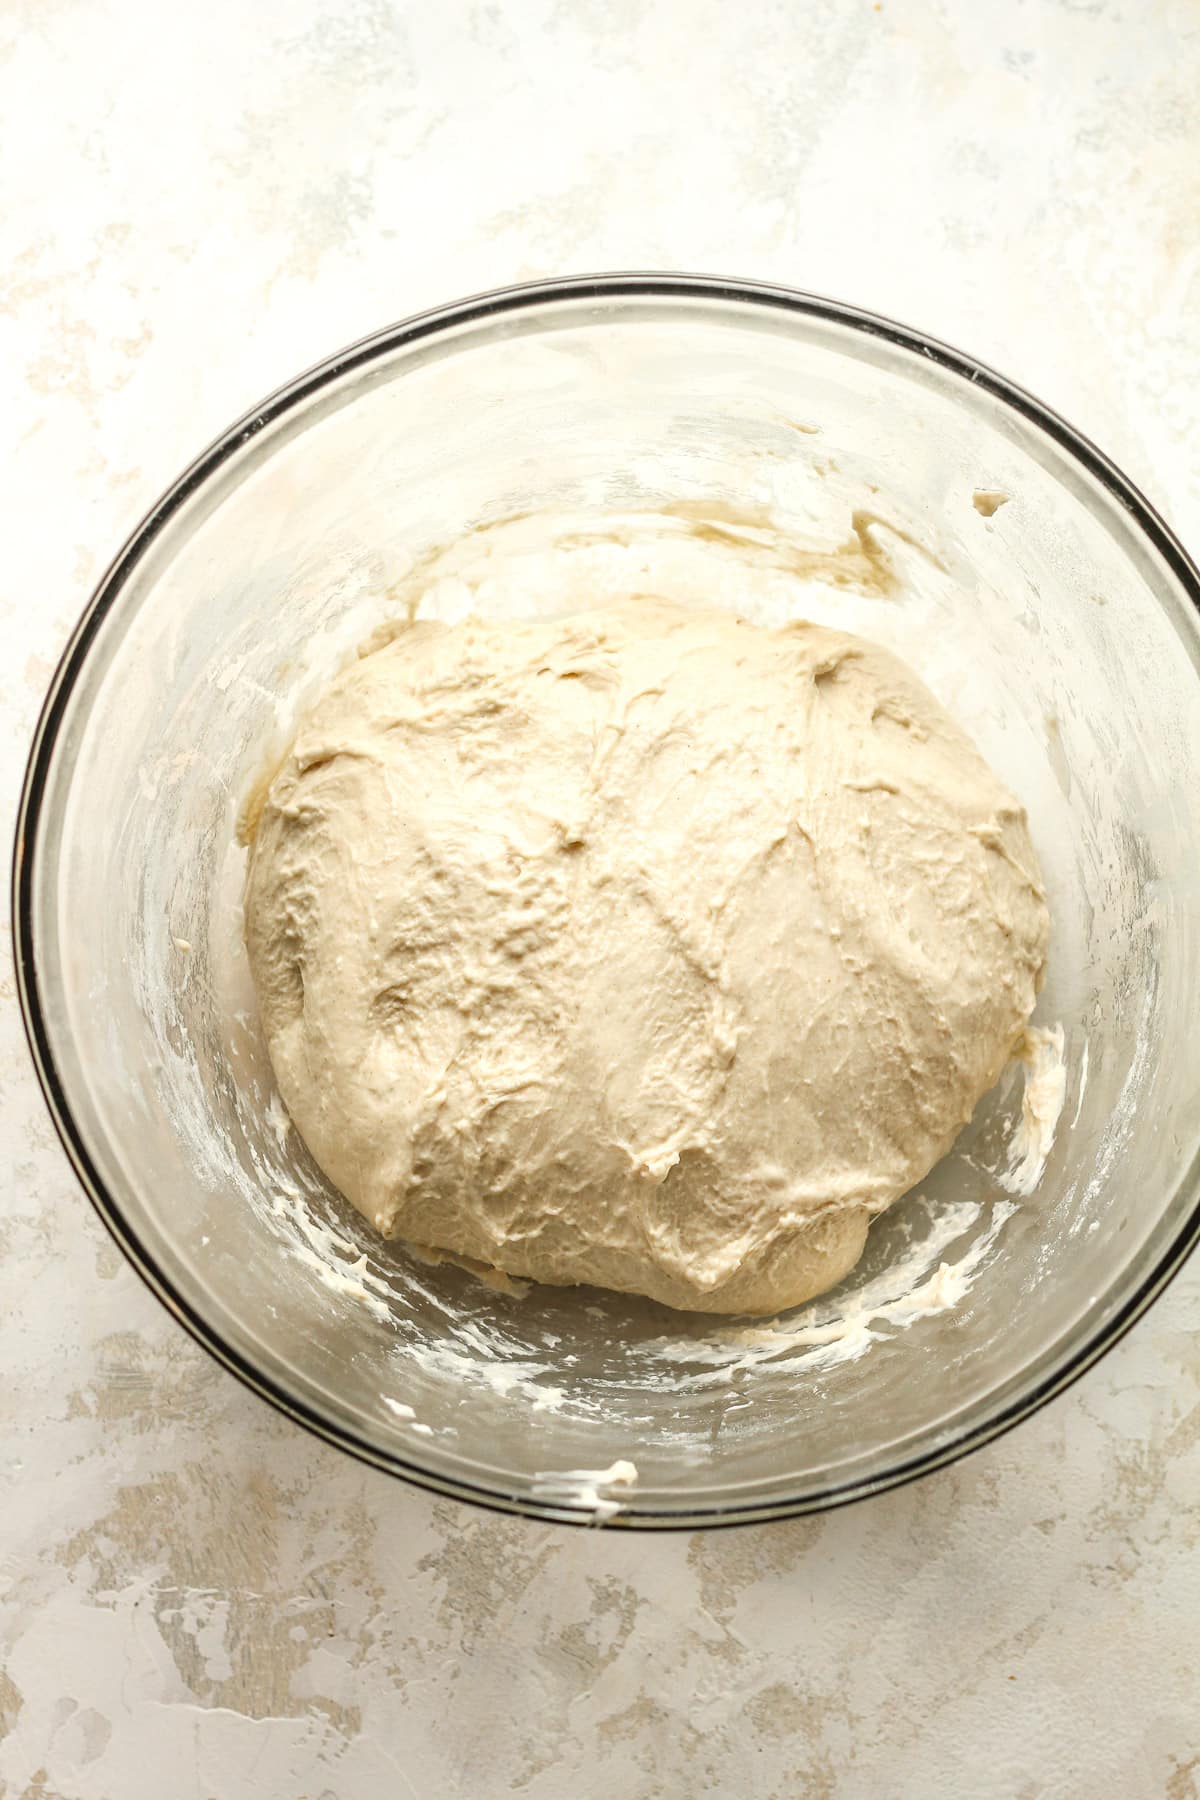
Step 4
Let rise. Let the dough rise for 8-10 hours, or overnight. It should almost double in size and appear soft on top. Small air bubbles may appear as well. This is the BULK RISE (or bulk fermentation).
Note: I recommend placing a damp towel or some plastic wrap on the dough for the overnight rise. You might also add a bit of oil to the top to keep a crust from forming on the dough overnight.
Step 5
Do cold fermentation. Add the bowl of dough to the refrigerator for 12-24 hours (keeping the towel or cling wrap on top). After the cold fermentation, set the dough out on the counter for 30 minutes before shaping.
Step 6
Form loaf. Add a light dusting of flour to a baking mat or clean surface. Remove the dough to the mat and gently form into your desired shape, usually round or oblong. Don’t punch the dough down because you don’t want to remove all the air. Let dough sit for five minutes.
Step 7
Tighten loaf. After five minutes, use your hands to pull the dough toward you, dragging it along the mat to tighten it up. Repeat in the other directions to tighten. (Make sure you don’t have too much flour on the surface when tightening the dough, so there is some needed friction necessary to tighten it.)
Step 8
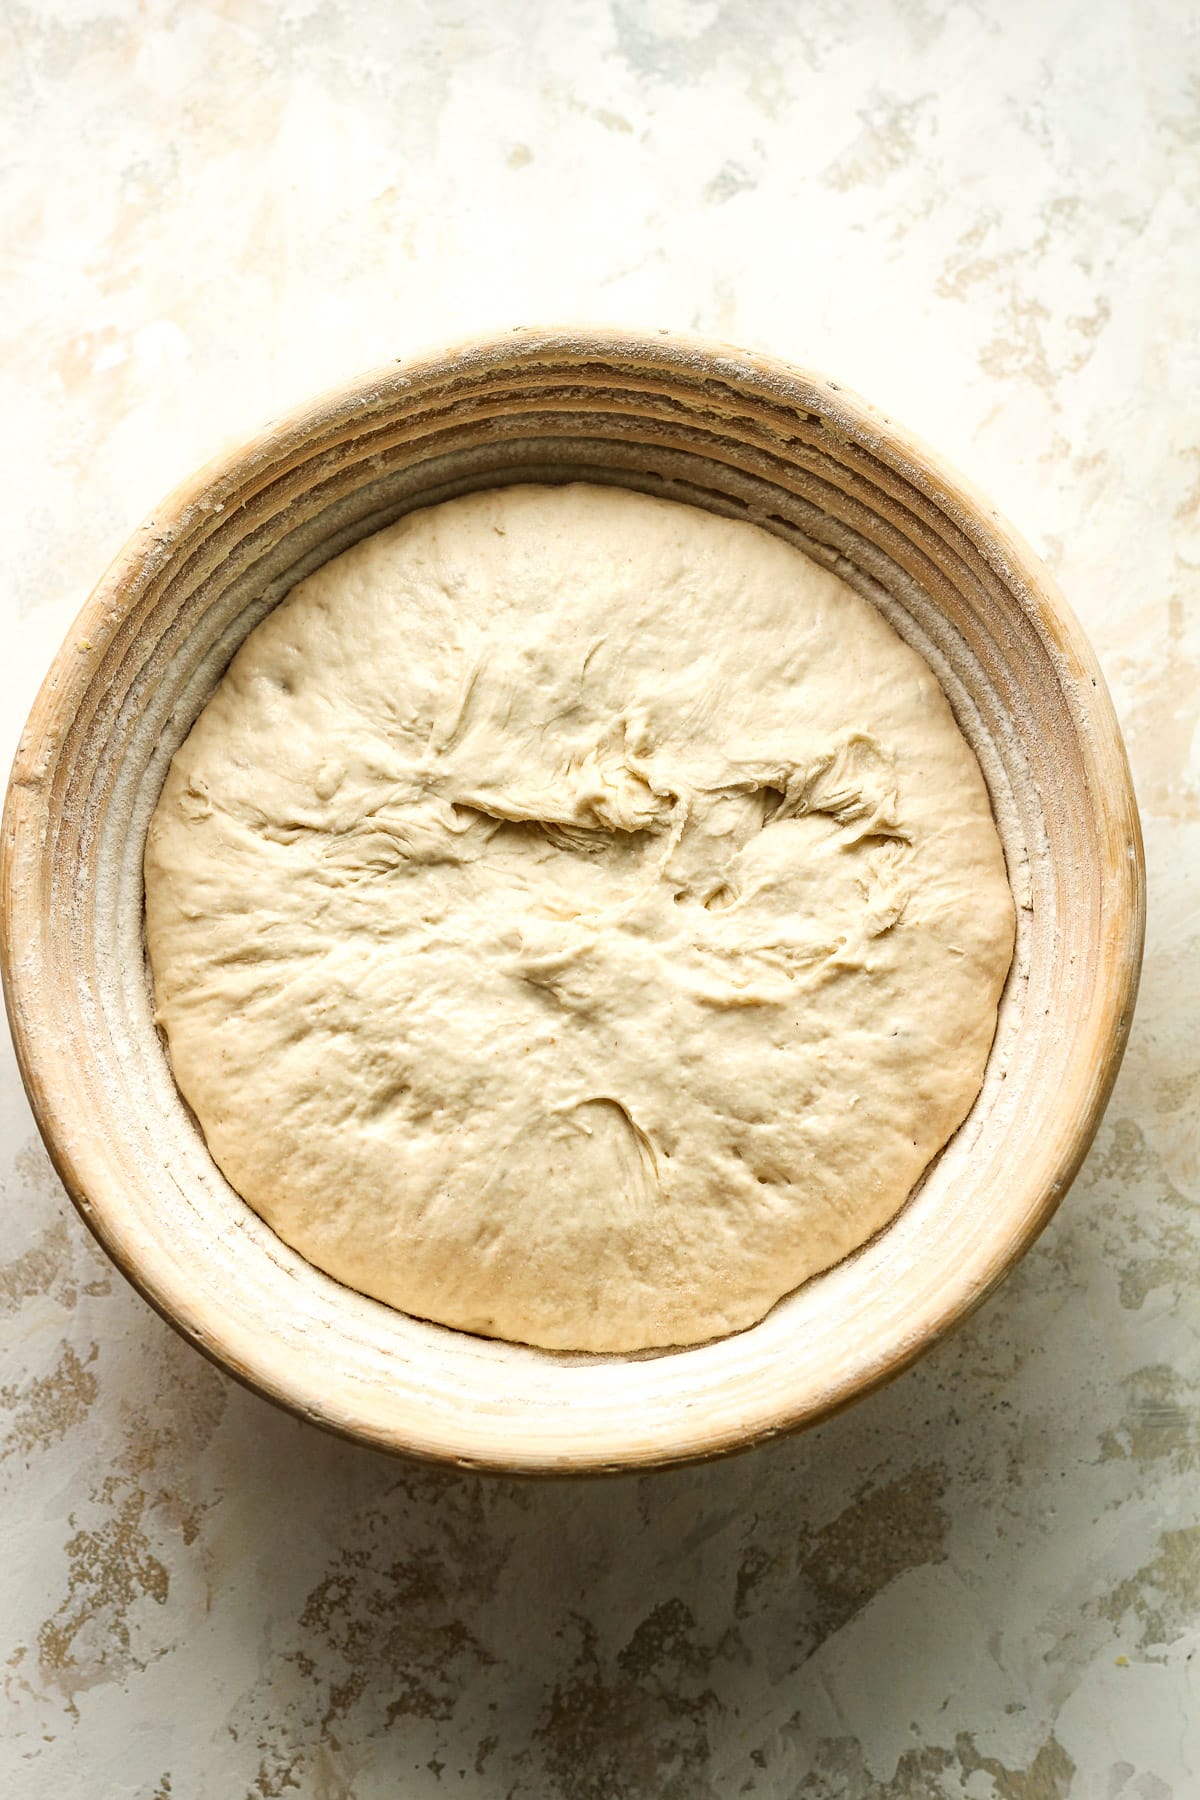
Let rise again. Place the dough, seam side up, in a bowl lined with a towel or a prepared proofing basket (pictured below). Cover with a damp towel and let it sit for about two hours. For this bread, it does not need to double again in size. This is the SECOND RISE (or final rise).
NOTE: For both the bowl or banneton basket, you’ll need to prepare them. For a bowl, add a thin tea towel dusted with rice flour (or regular flour will work in a pinch). For the basket, add some rice flour as well. The rice flour will help prevent sticking while regular flour may not do this as well.
Step 9
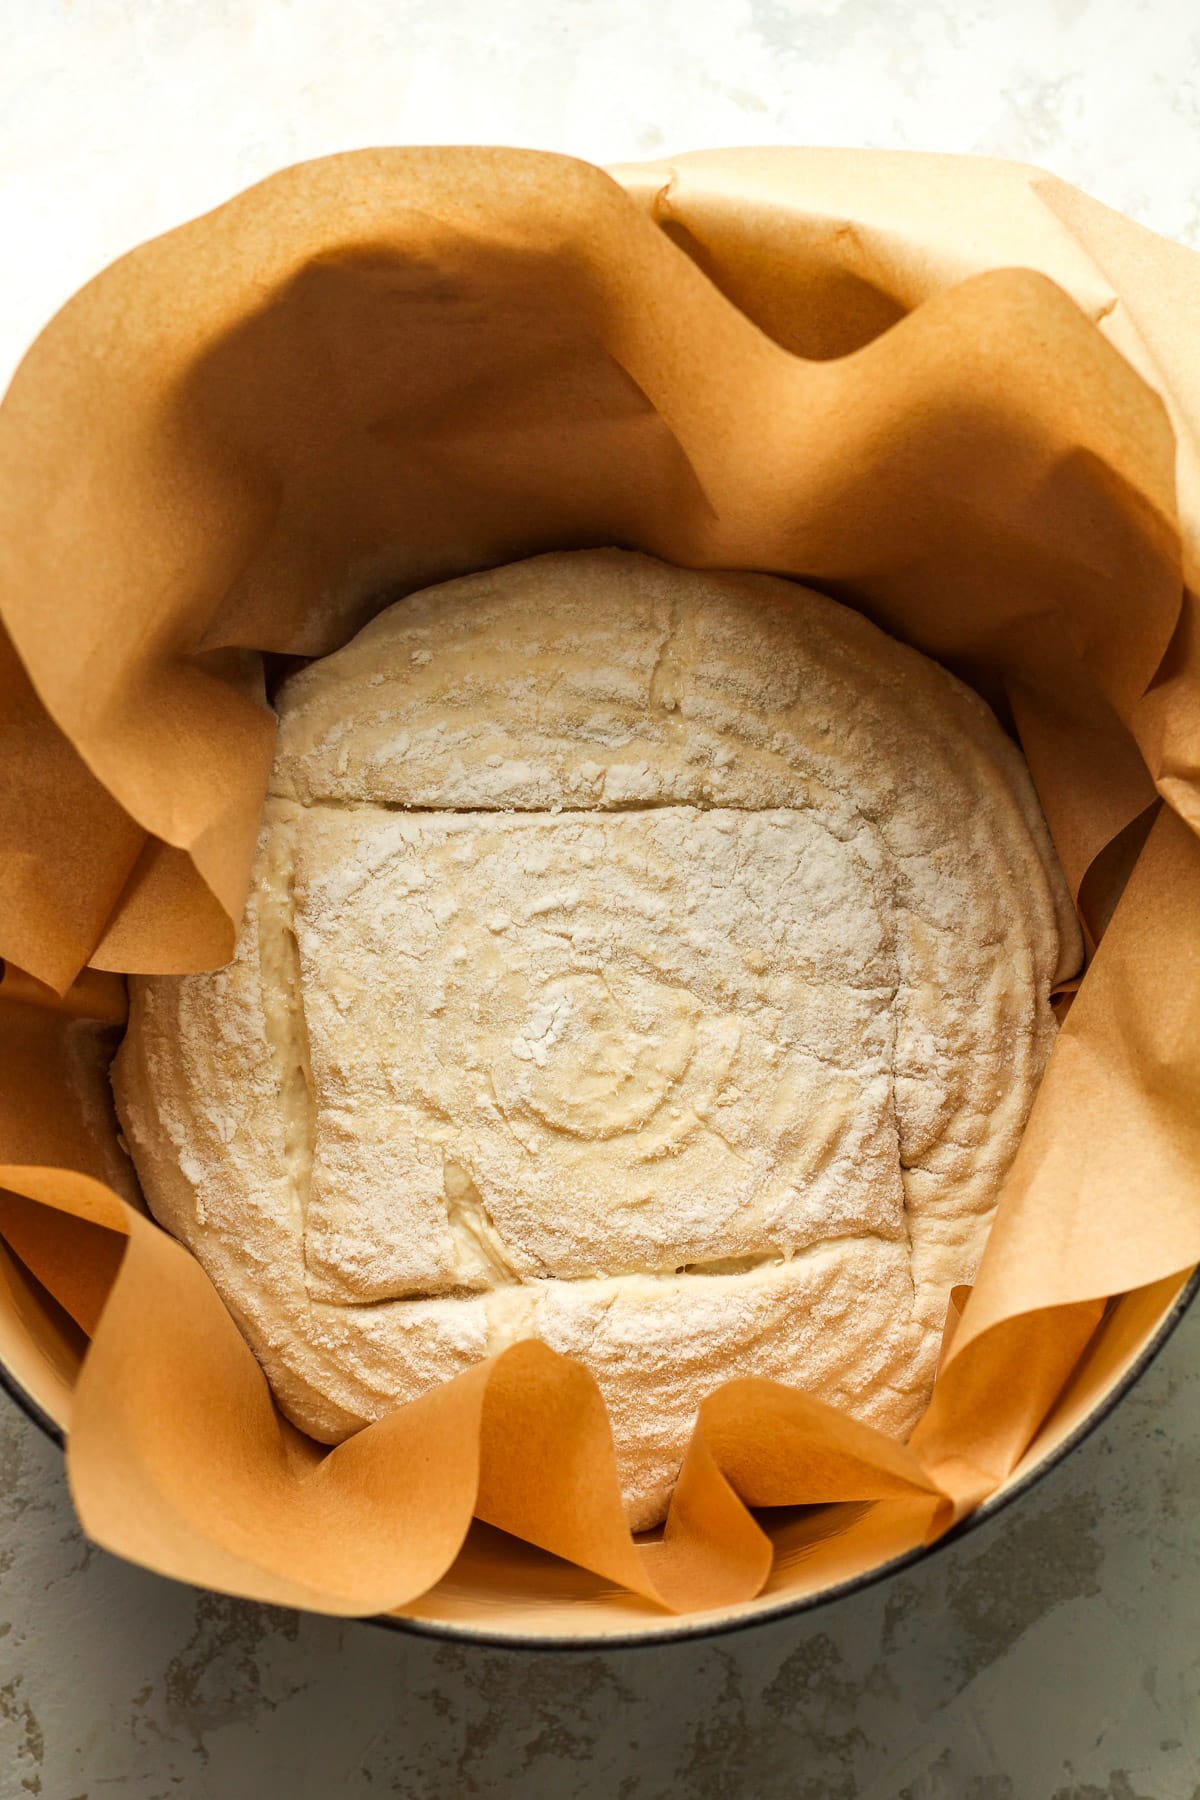
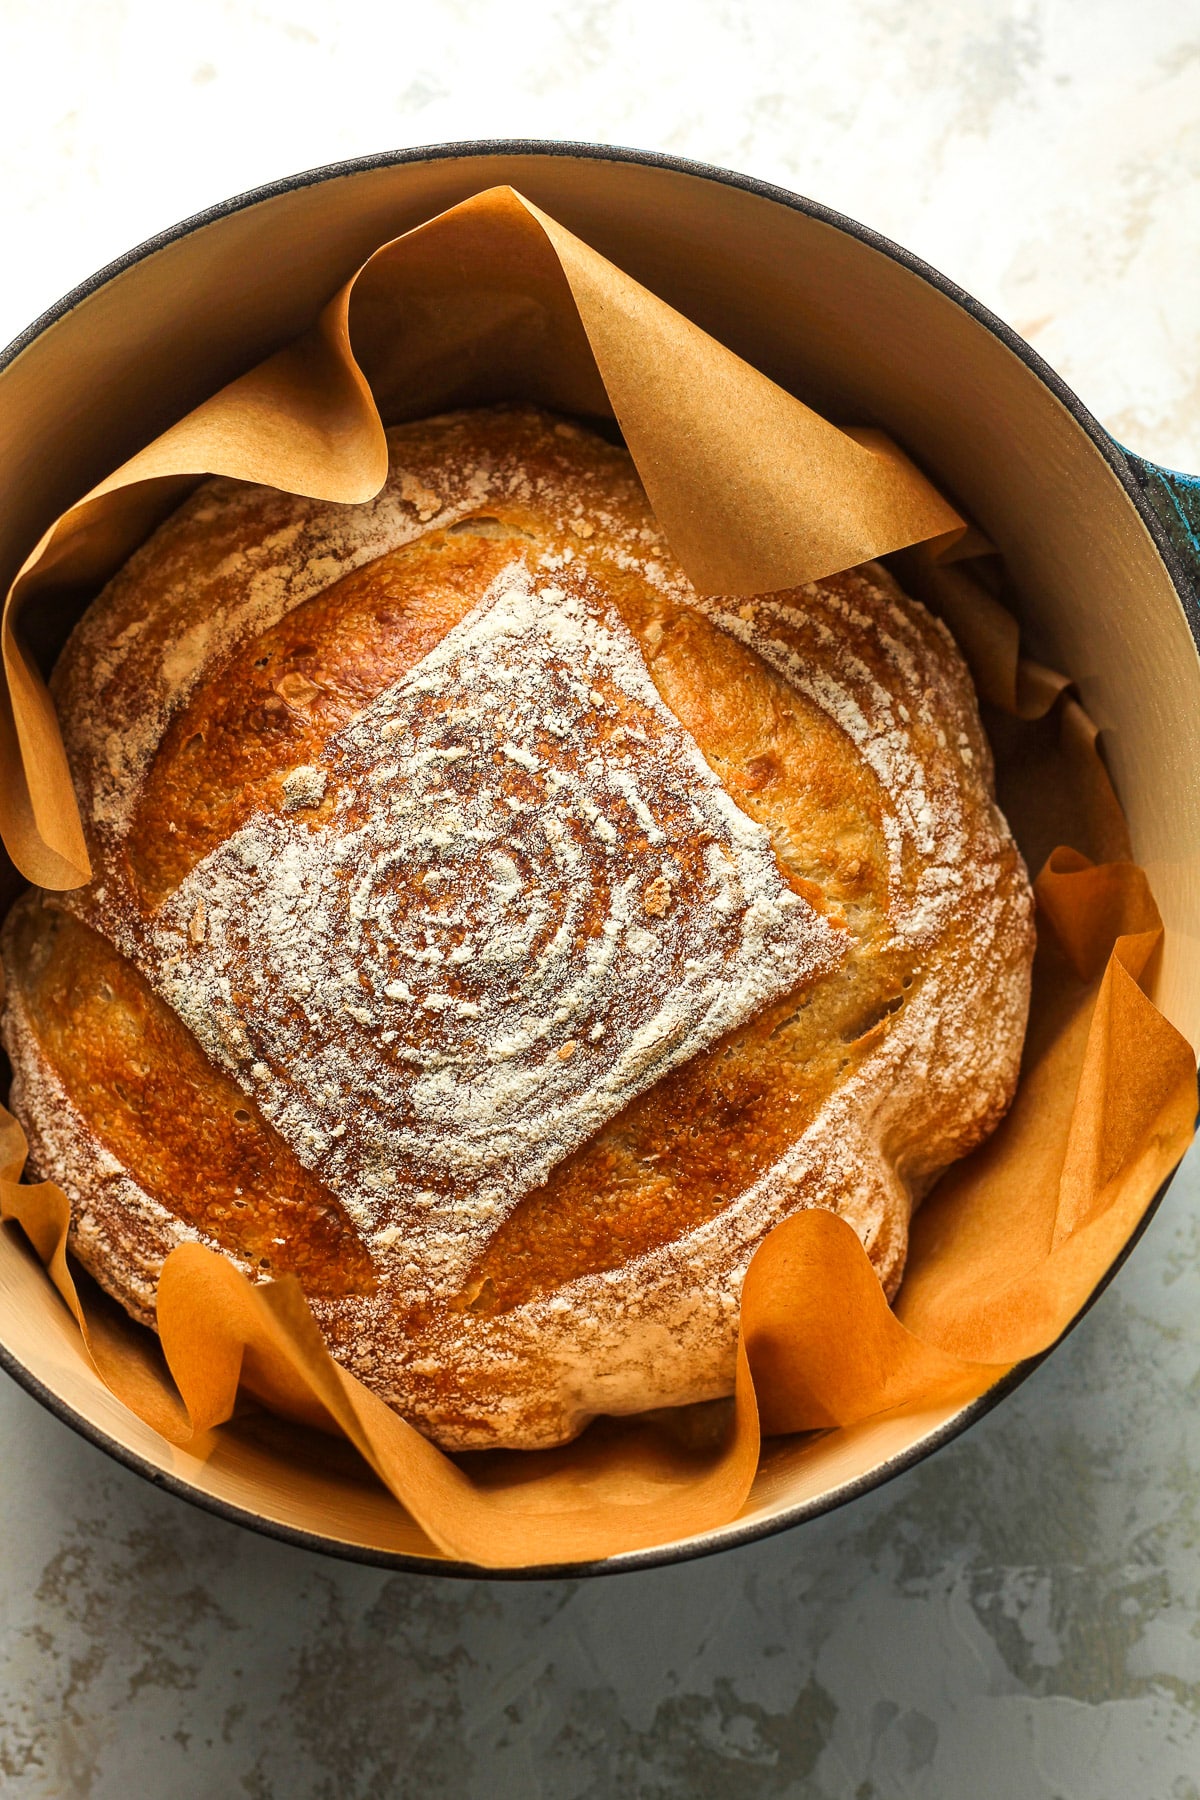
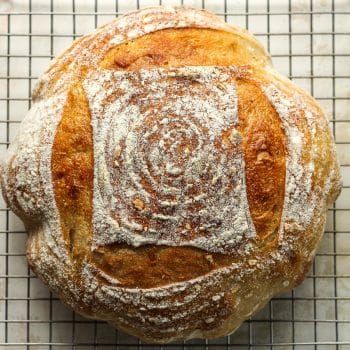
Prepare for baking. Preheat oven to 450 degrees. Carefully remove the loaf to a piece of parchment paper, smooth side up. Then take a serrated edge knife or a bread lame (linked below), and score the top of the dough a couple of times. Place the bread (including parchment paper) into a Dutch oven.
NOTE: Some people swear by heating the pot before adding the sourdough bread to it. To do this, add the pot to the oven (with lid) while it preheats. Let it heat for an additional 30 minutes and then carefully add the bread dough.
Step 10
Bake. Add the lid to the pan and bake for 20 minutes. Then remove the lid and bake an additional 30 minutes, or until bread is nice and golden on top and bottom and cooked through.
Step 11
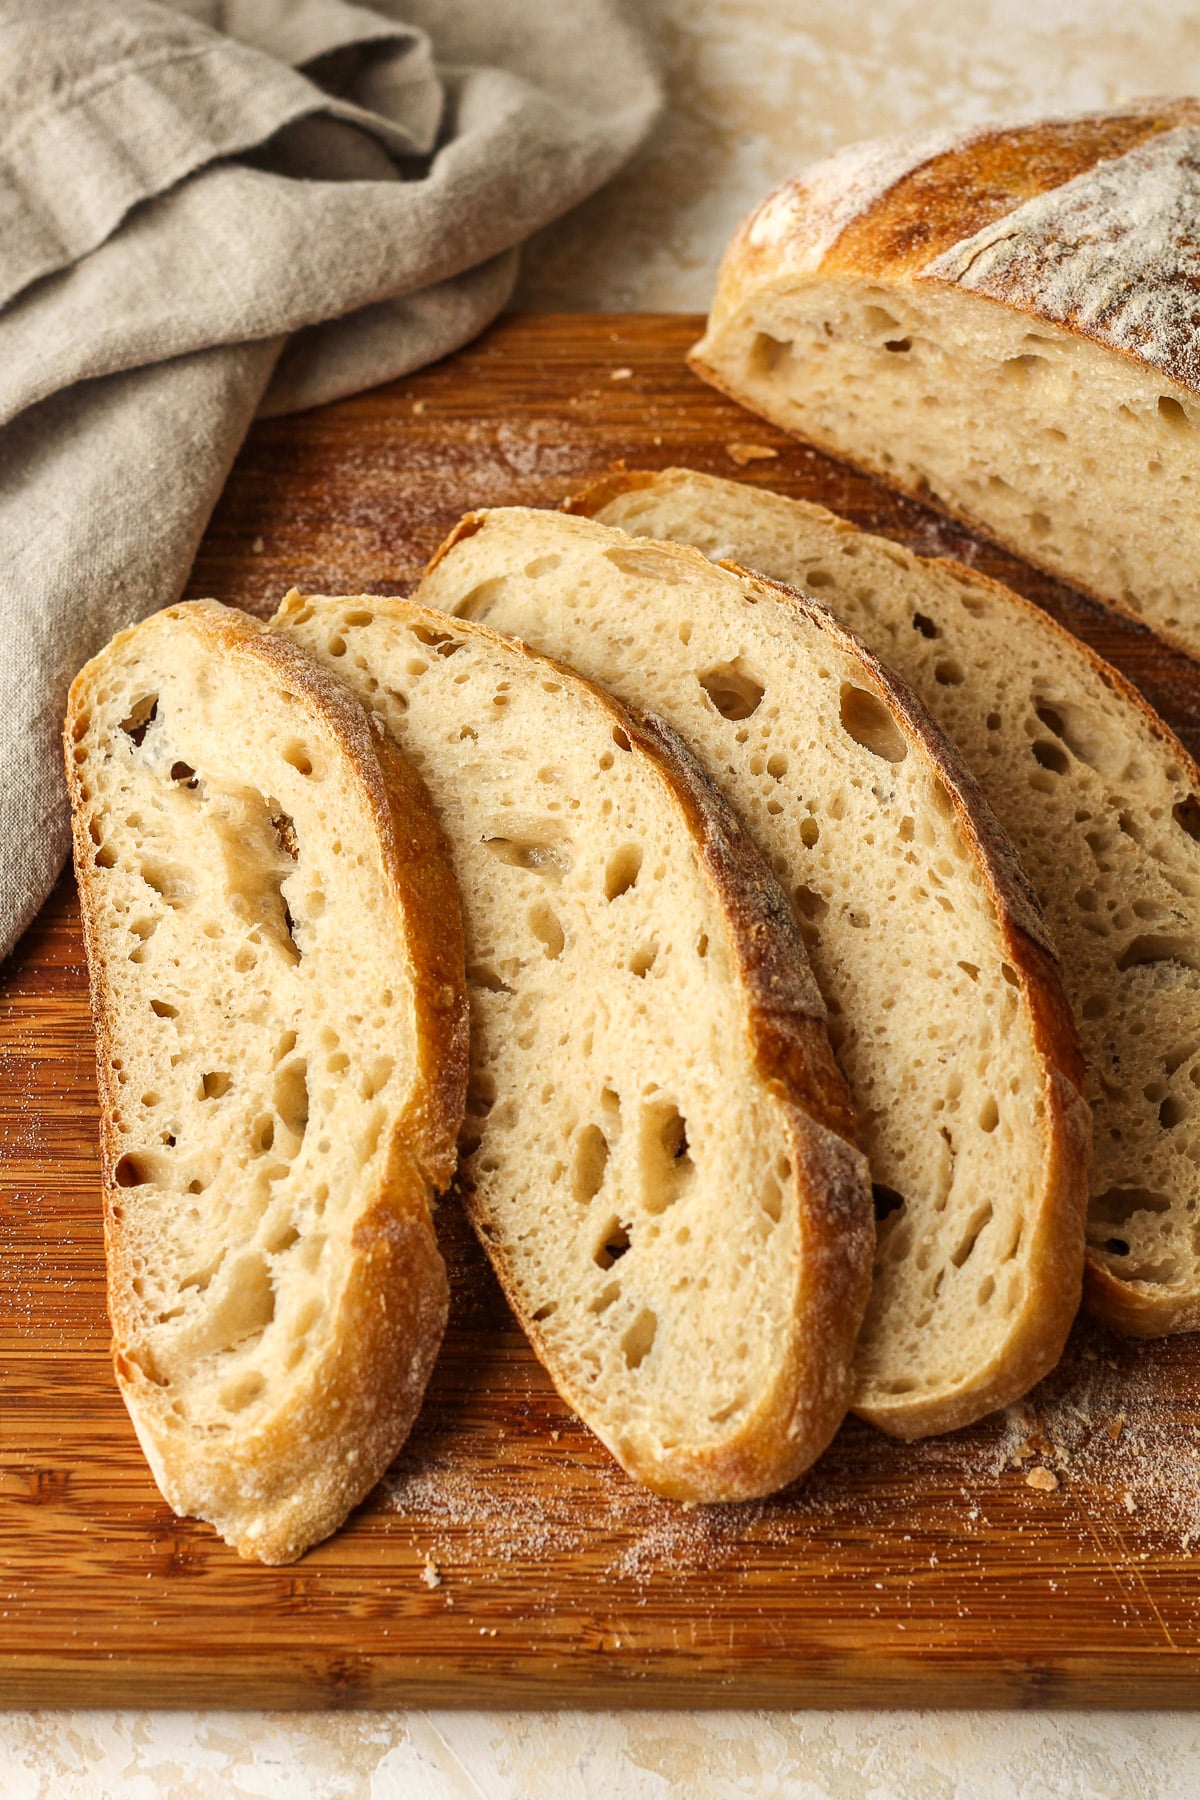
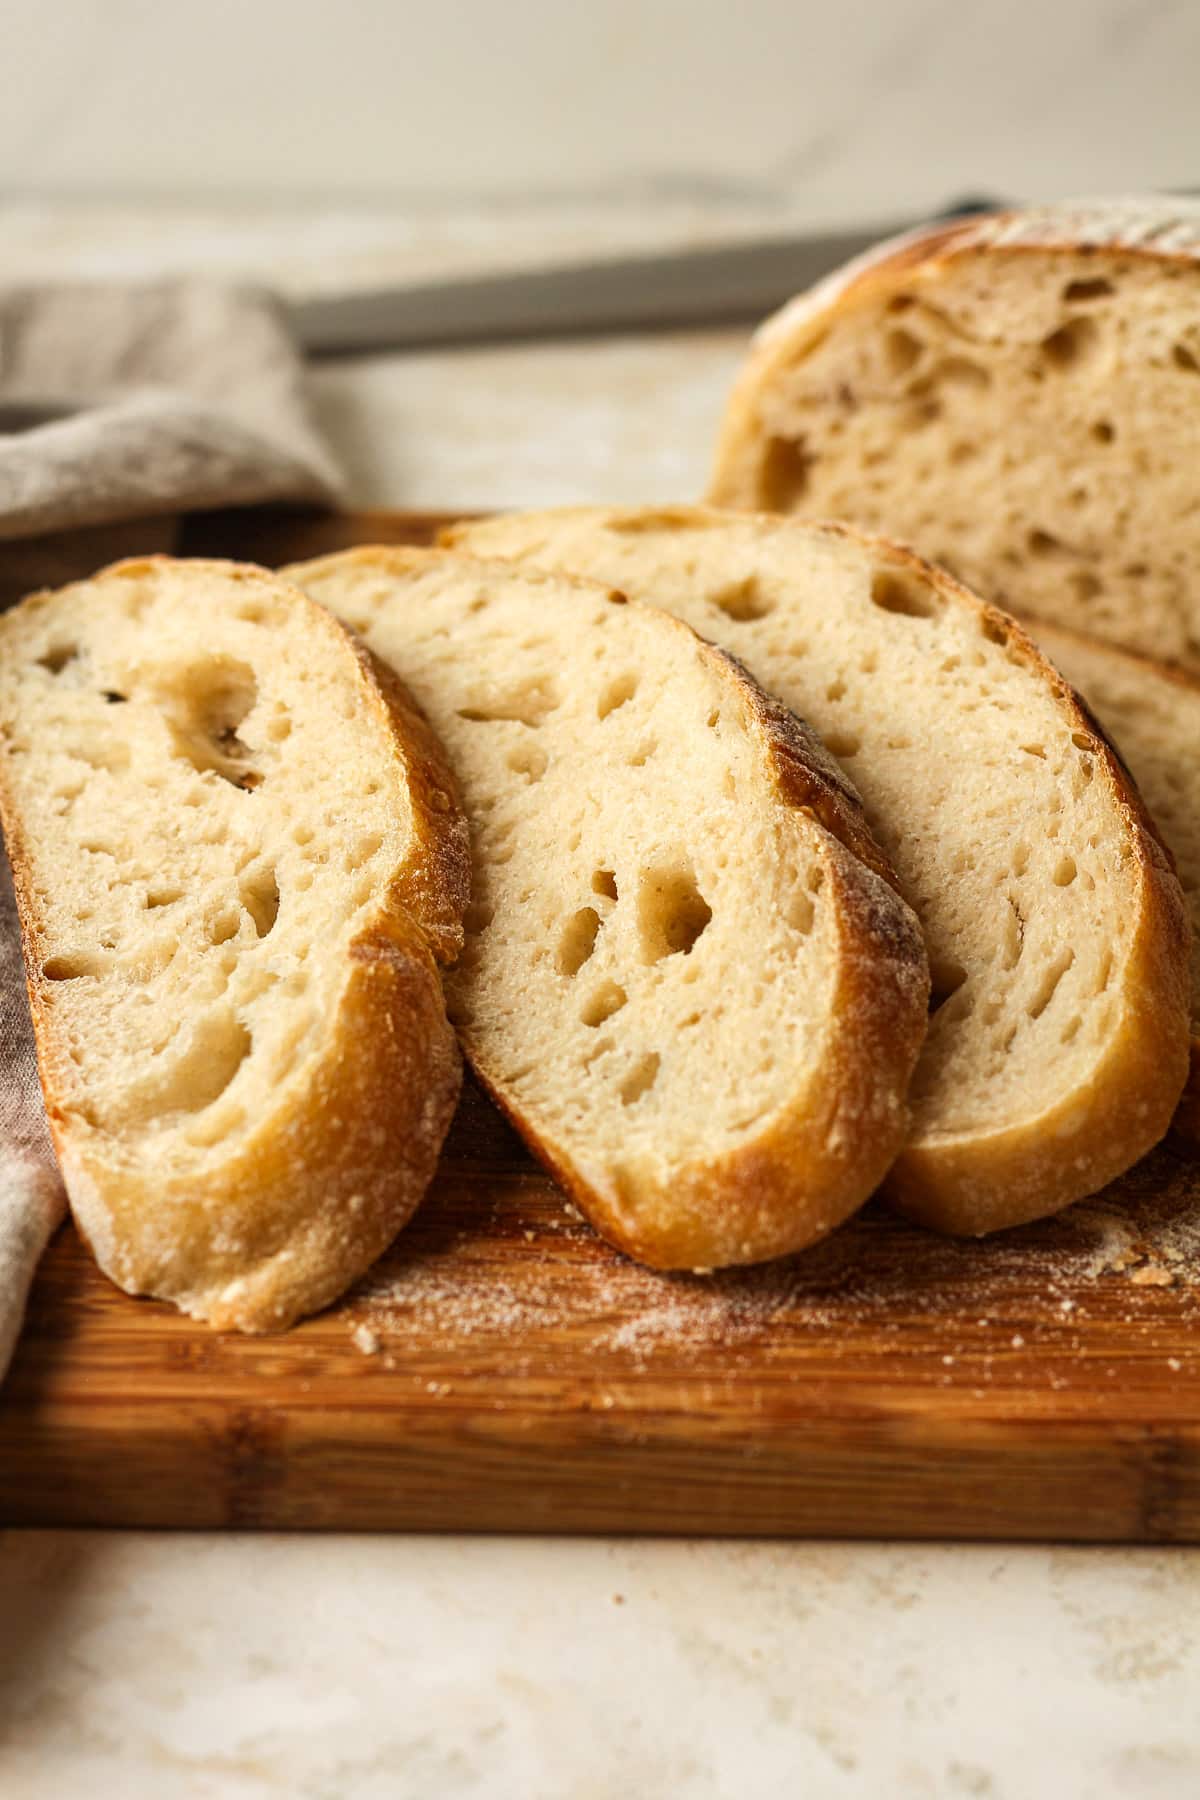
Cool. Remove pan and then use parchment paper as handles to lift the bread out of the pan. Place on a cooling rack. Let the delicous loaf COMPLETELY COOL before slicing.
Storing and Freezing:
- Store leftover bread for a day or two on the countertop.
- Freeze sourdough bread in a freezer bag. We like to wrap individual slices in cling wrap and then place in a freezer bag.
Recipe FAQs:
Sourdough is a slow-fermented bread that doesn’t require store-bought yeast to make it rise. It’s a LIVE fermented culture that creates a natural leavening agent. A starter is required to make sourdough.
Sourdough bread is NOT gluten-free, as it contains flour, but its long fermentation helps break down this gluten. It’s easier on the gut because it’s more digestible and easier for the body to absorb.
Bake with steam during the first 20 minutes—use a Dutch oven or place a tray of water in the oven. Also, bake at a high temperature (around 450°F/230°C) and let the bread cool fully on a wire rack to keep the crust crisp.
Scoring allows the bread to expand in a controlled way and helps create a beautiful crust pattern. Use a sharp razor or lame right before baking.
If your sourdough bread collapsed in the oven, it’s likely a combination of over-proofing, weak structure, or shaping issues.
If you feed your sourdough often, save the discard and make our Sourdough Discard Crackers! You’ll
Don’t toss your sourdough discard—it’s packed with flavor and can add a tangy depth to so many recipes. Use it in our Sourdough Discard Crackers, pancakes, muffins, pizza, and more! Not only does it cut down on waste, but it also makes everyday favorites even more delicious.
Other Delicious Sourdough Recipes:
xoxo ~Sue
Crusty Sourdough Bread
Ingredients
- 75 grams active sourdough starter
- 375 grams warm filtered water
- 480 grams unbleached bread flour
- 20 grams unbleached whole wheat flour
- 10 grams fine sea salt
Instructions
- Carefully measure. Use a kitchen scale to measure the water and sourdough starter and add to a large bowl. Stir well with a fork. Then add the bread flour, whole wheat flour, and sea salt – and stir again.75 grams active sourdough starter, 375 grams warm filtered water, 480 grams unbleached bread flour, 20 grams unbleached whole wheat flour, 10 grams fine sea salt
- Mix ingredients. Then use your hands to bring the ingredients together. It will look shaggy. Cover with a damp towel and let it sit for 45 minutes. (Be sure to set a timer.) This is the AUTOLYSE.
- Do stretch and folds. Then start the stretch and folds. Use your hand and lift the dough up on one side, stretching it upward, and then punch into the center of the dough. Turn the dough and repeat. Continue this process for about 30 seconds. This is the STRETCH AND FOLDS.
- ADDITIONAL STRETCH AND FOLDS: I recommend doing additional sets of stretch and folds if time permits. Do these every 30 minutes for 3-4 more times to further the gluten development. A bench scraper is an excellent tool to assist with the stretch and folds.
- Let rise. Let the dough rise for 8-10 hours, or overnight. It should almost double in size and appear soft on top. Small air bubbles may appear as well. This is the BULK RISE (or bulk fermentation). Note: I recommend placing a damp towel or some plastic wrap on the dough for the overnight rise. You might also add a bit of oil to the top to keep a crust from forming on the dough overnight.
- Do cold fermentation. Add the bowl of dough to the refrigerator for 12-24 hours (keeping the towel or cling wrap on top). After the cold fermentation, set the dough out on the counter for 30 minutes before shaping.
- Form loaf. Add a light dusting of flour to a baking mat or clean surface. Remove the dough to the mat and gently form into your desired shape, usually round or oblong. Don’t punch the dough down because you don’t want to remove all the air. Let dough sit for five minutes.
- Tighten loaf. After five minutes, use your hands to pull the dough toward you, dragging it along the mat to tighten it up. Repeat in the other directions to tighten. (Make sure you don’t have too much flour on the surface when tightening the dough, so there is some needed friction necessary to tighten it.)
- Let rise again. Place the dough, seam side up, in a bowl lined with a towel or a prepared proofing basket (pictured below). Cover with a damp towel and let it sit for about two hours. For this bread, it does not need to double again in size. This is the SECOND RISE (or final rise).NOTE: For both the bowl or banneton basket, you’ll need to prepare them. For a bowl, add a thin tea towel dusted with rice flour (or regular flour will work in a pinch). For the basket, add some rice flour as well. The rice flour will help prevent sticking while regular flour may not do this as well.
- Prepare for baking. Preheat oven to 450 degrees. Carefully remove the loaf to a piece of parchment paper, smooth side up. Then take a serrated edge knife or a bread lame (linked below), and score the top of the dough a couple of times. Place the bread (including parchment paper) into a Dutch oven.NOTE: Some people swear by heating the pot before adding the sourdough bread to it. To do this, add the pot to the oven (with lid) while it preheats. Let it heat for an additional 30 minutes and then carefully add the bread dough.
- Bake. Add the lid to the pan and bake for 20 minutes. Then remove the lid and bake an additional 30 minutes, or until bread is nice and golden on top and bottom and cooked through.
- Cool. Remove pan and then use parchment paper as handles to lift the bread out of the pan. Place on a cooling rack. Let the delicous loaf COMPLETELY COOL before slicing.
Notes
- Adding a cold fermentation to this process, we’re adding a tangy flavor to the sourdough bread. So good!
- Store leftover bread for a day or two on the countertop.
- Freeze sourdough bread in a freezer bag. We like to wrap individual slices in cling wrap and then place in a freezer bag.
- This bread makes the ultimate avocado toast, breakfast sandwich, or grilled cheese!
I love the sour taste of this sourdough!
Yes!
Can I leave out the cold fermentation like the jalapeño cheddar loaf? Would it change the consistency of the loaf?
Yes, you can skip this step if you’d like. The taste may not be as sour but will still be delicious!