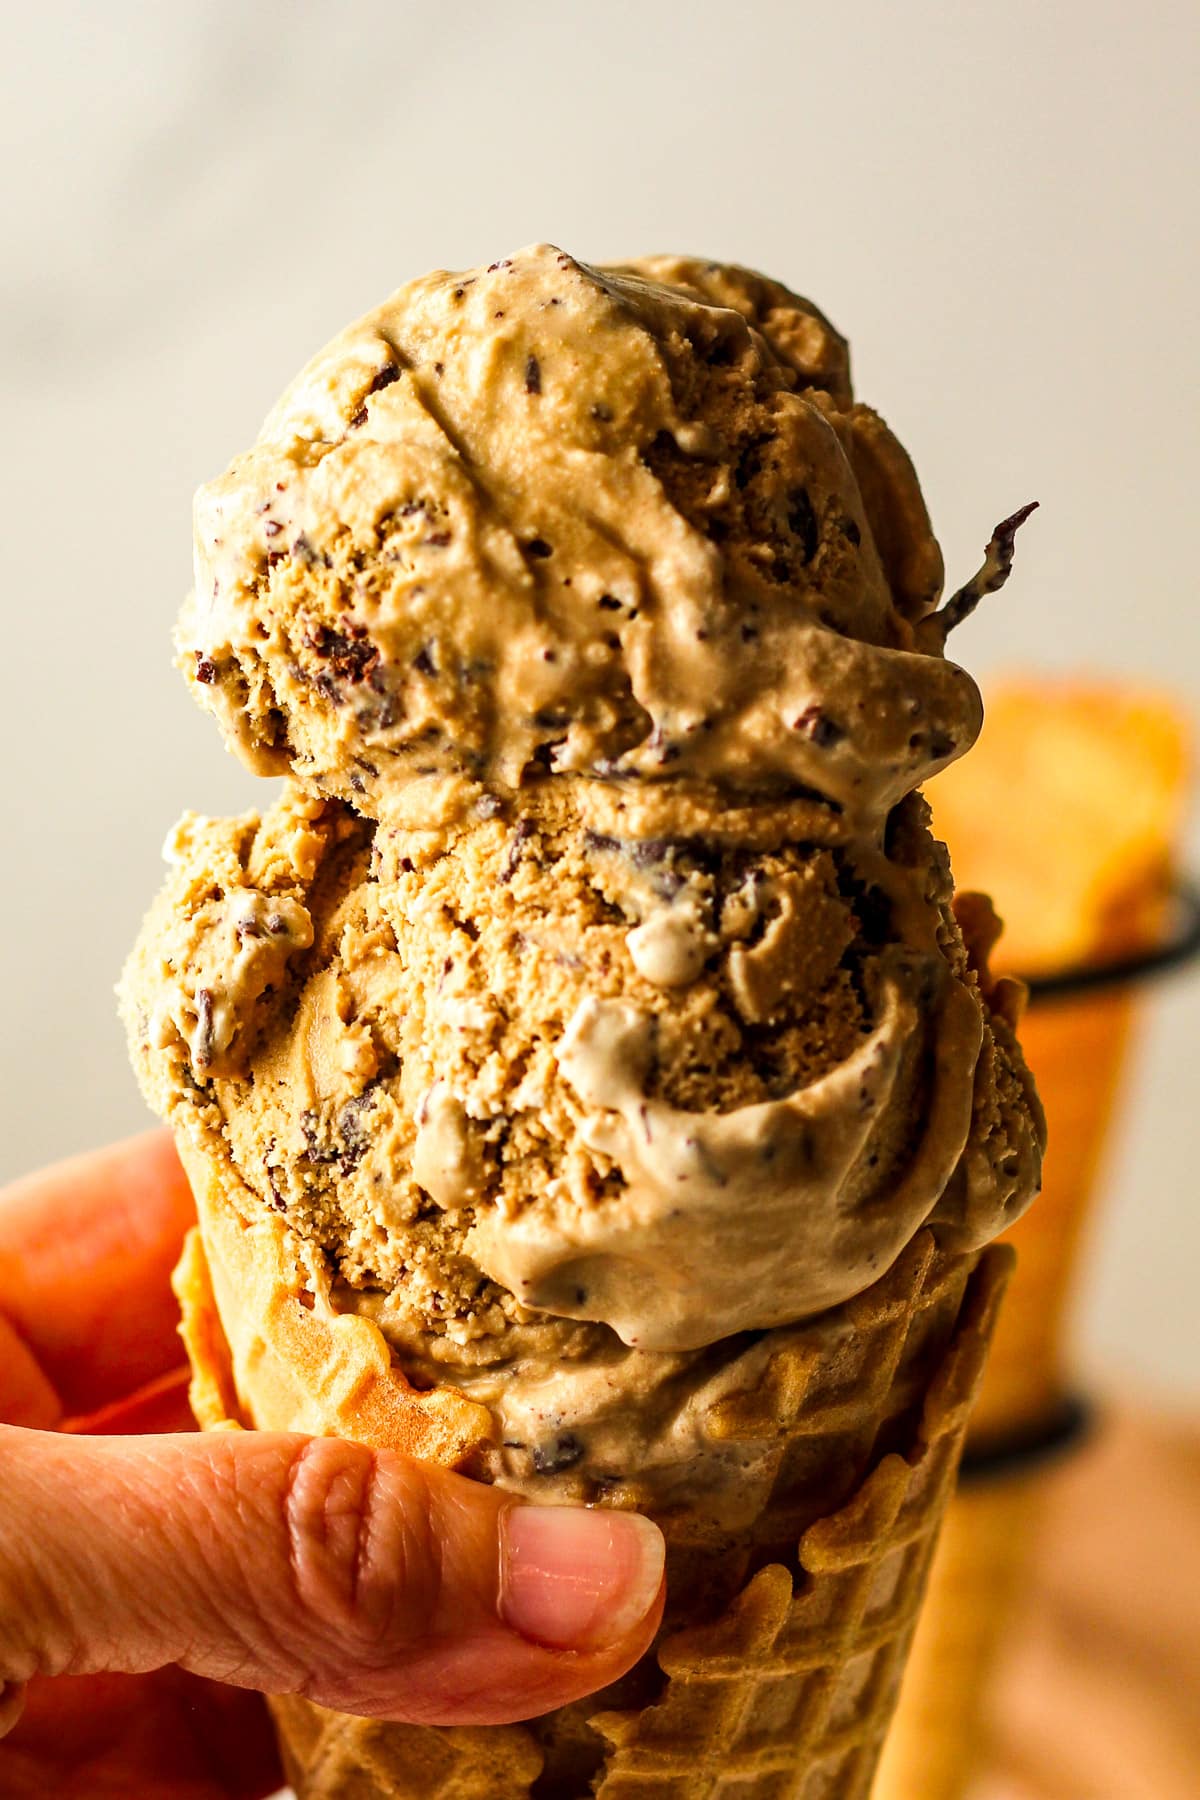
Espresso Stracciatella Ice Cream
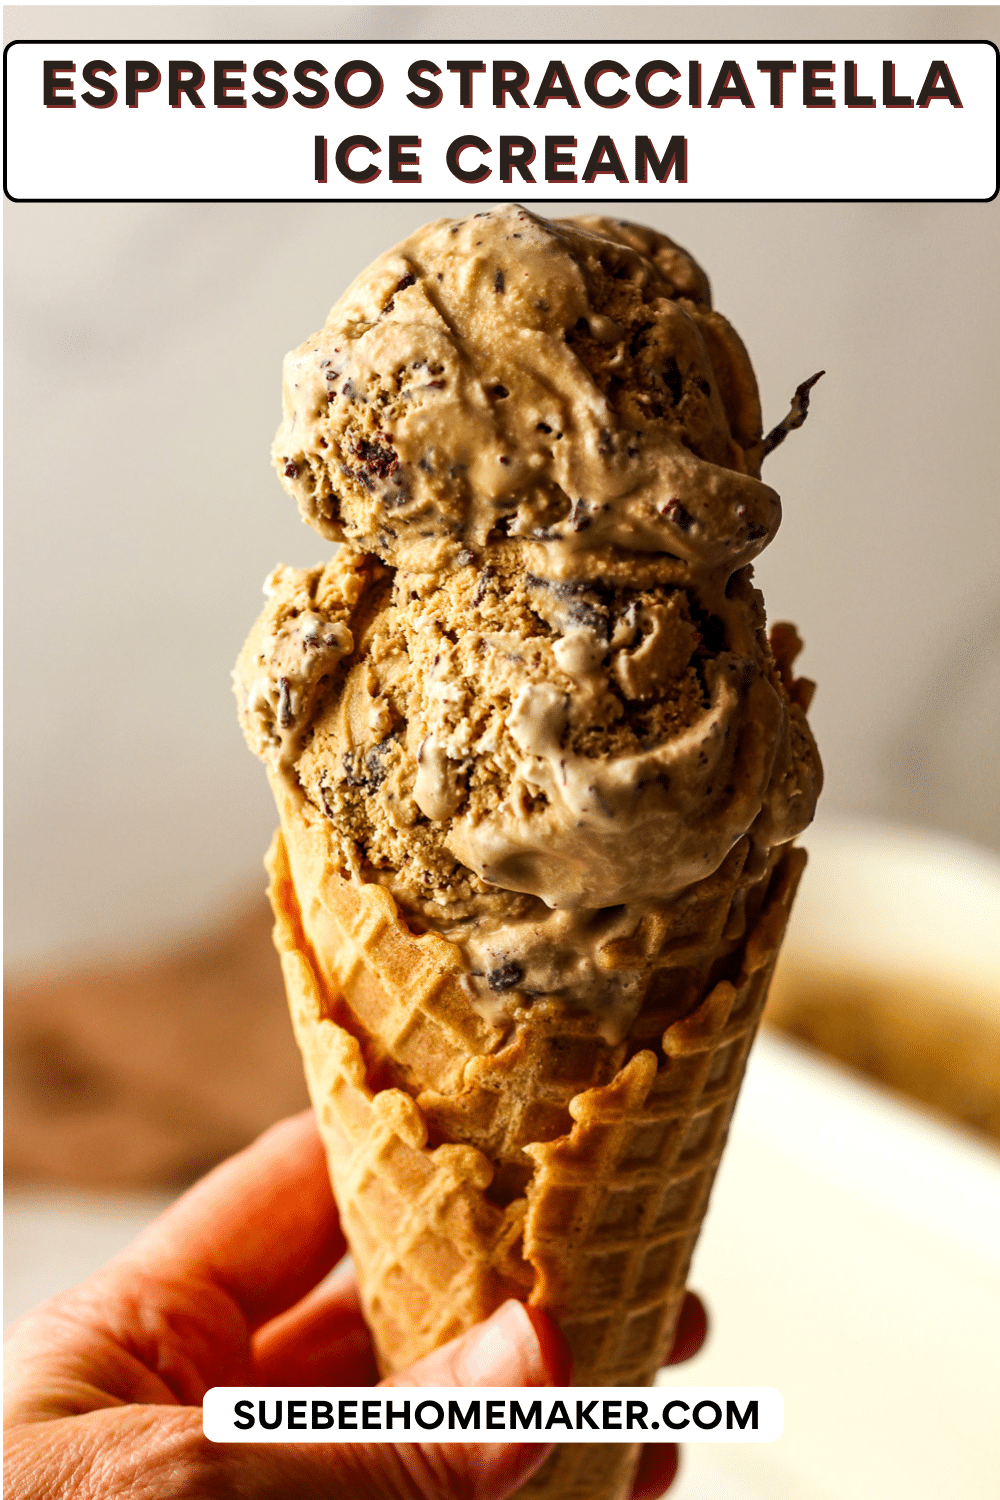
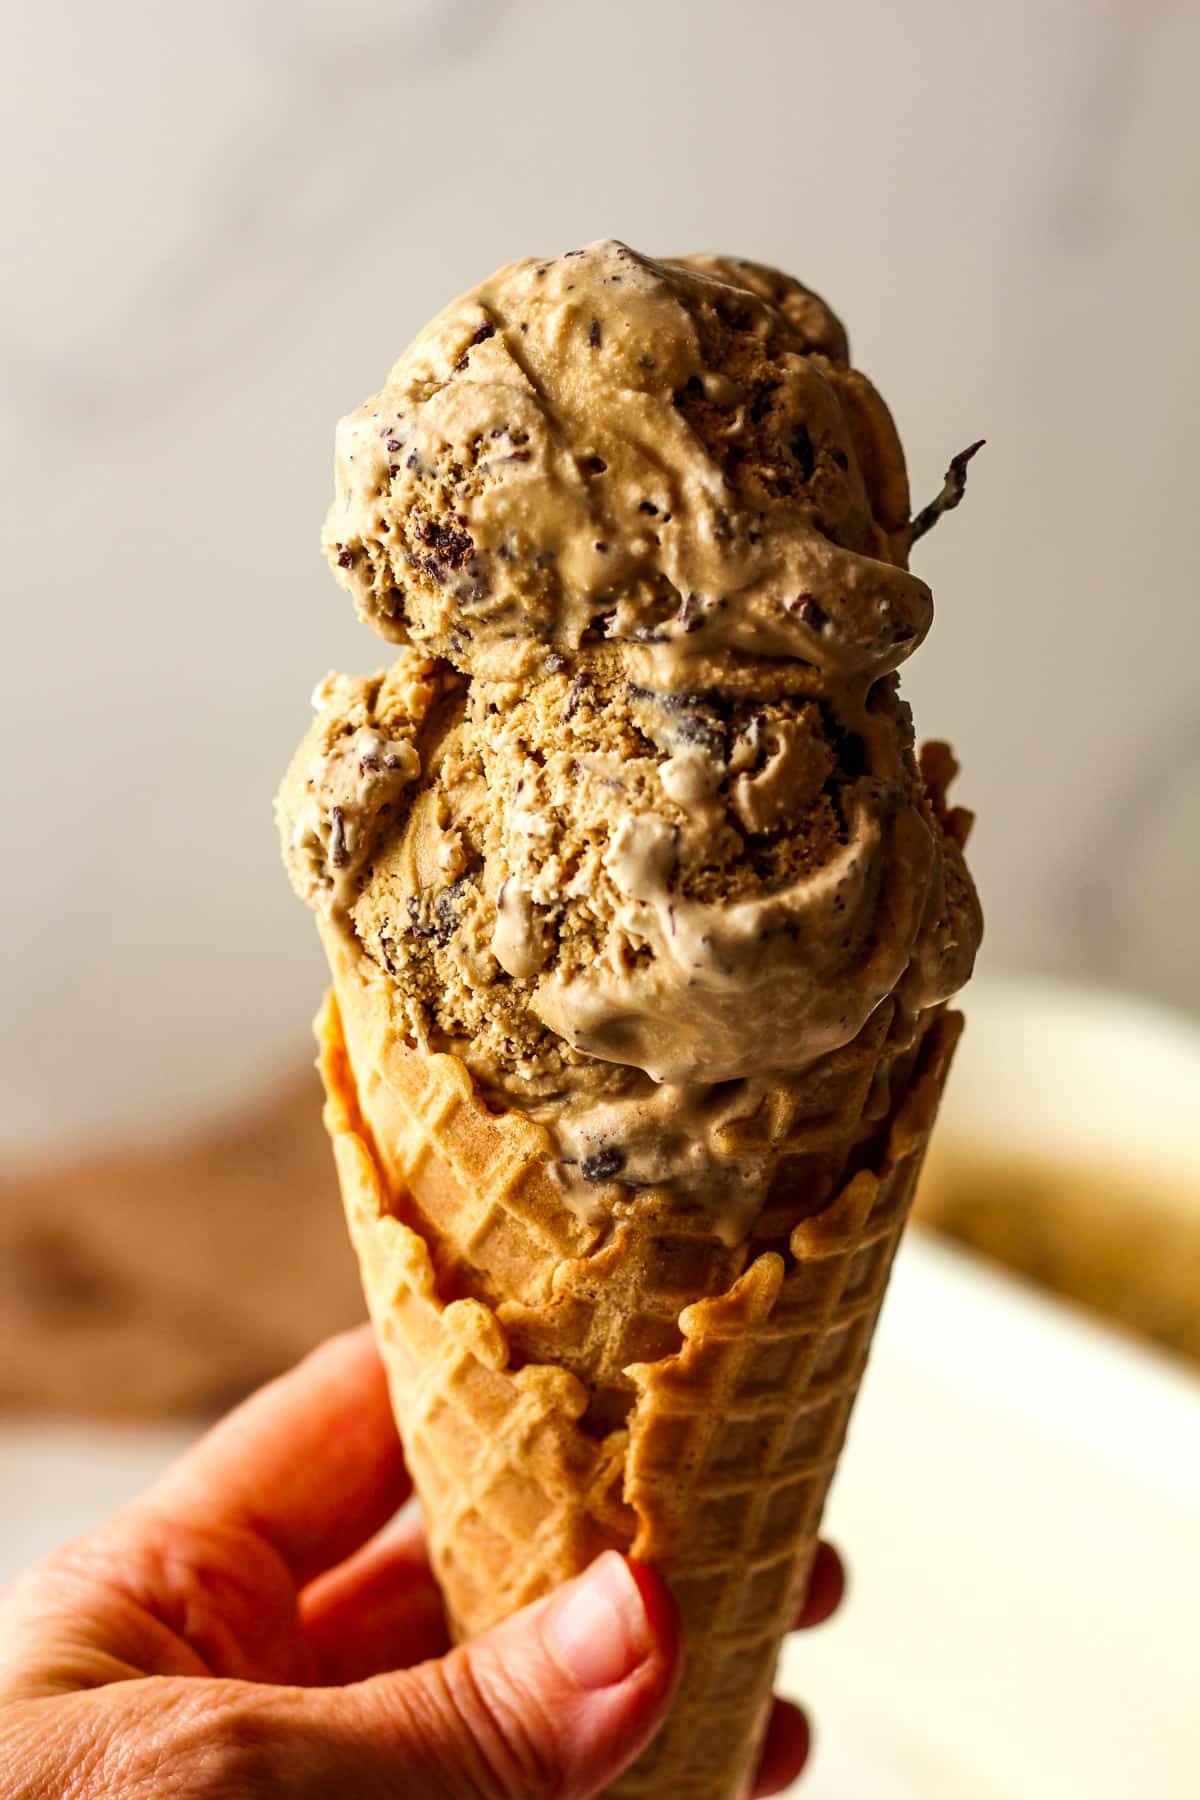
This Espresso Stracciatella Ice Cream is a rich and creamy dream – bold espresso ice cream swirled with delicate shards of dark chocolate for the most indulgent and sophisticated frozen treat. It’s the perfect grown-up dessert for coffee and chocolate lovers that is surprisingly simple to make right in your own kitchen!
Espresso Chip Ice Cream
Coffee lover here! So it just makes sense that I’d make yet another type of coffee ice cream to share with all of you, right?
We recently stopped at Ben and Jerry’s for a scoop of ice cream and I of course chose an espresso variety. It was unbelievable as always, but now that I’ve stocked the freezer with our espresso stracciatella, I can eat a few bites throughout the day – as often as I want!
I’ve currently got three flavors to snack on at the moment. Wow, I love this job! 😀
Why This Recipe Works:
- Rich and creamy custard base – whole milk, heavy cream, and egg yolks create the most luxuriously smooth and velvety ice cream that is miles above anything you’ll find in the grocery store freezer
- Bold espresso flavor – espresso powder infuses every bite with a deep, rich coffee flavor that is sophisticated, complex, and completely irresistible
- Dark chocolate stracciatella – melted dark chocolate drizzled into the churning ice cream creates those signature delicate chocolate shards that add a beautiful crunch and indulgent chocolate flavor in every single bite
- Simple and elegant – just a handful of quality ingredients come together to create a truly stunning dessert that looks and tastes like something straight from an Italian gelateria
What You’ll Need:
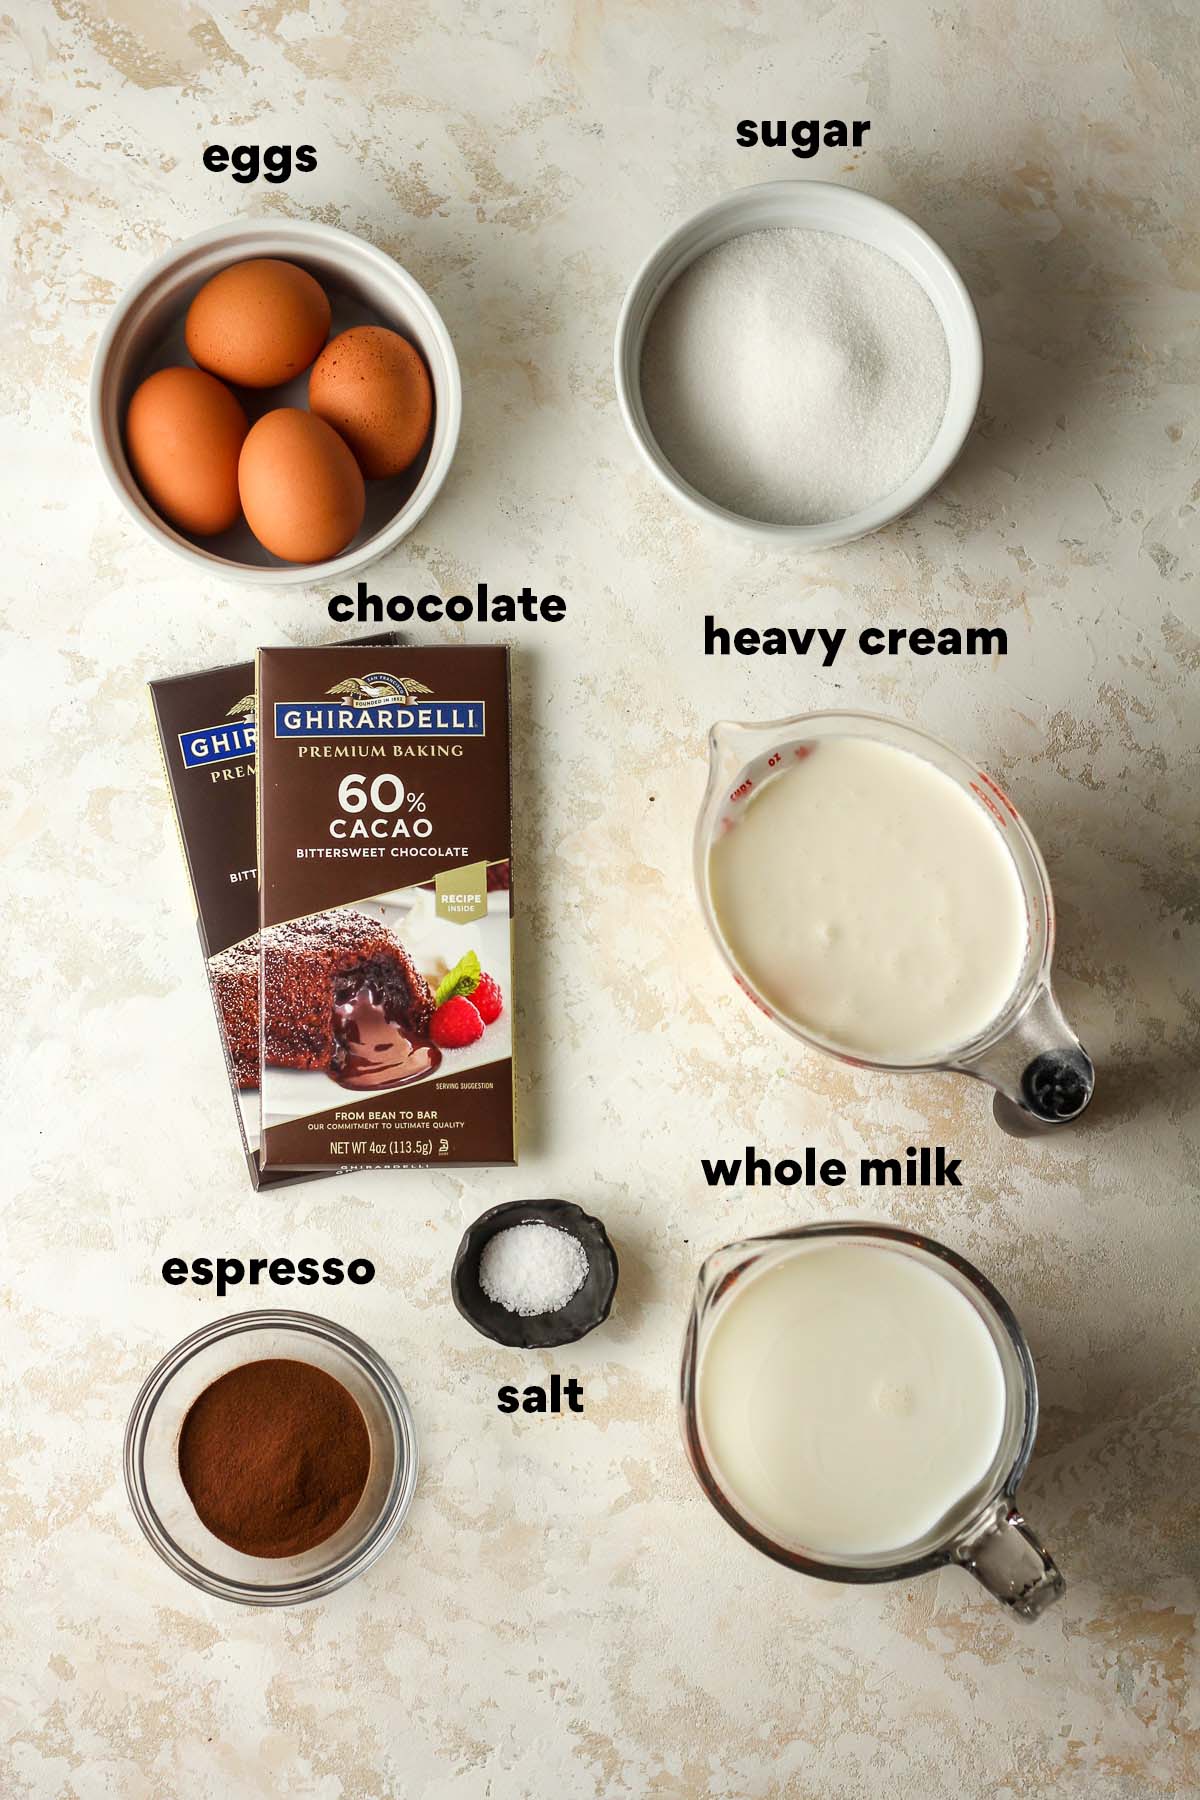
- eggs
- sugar
- whole milk
- heavy cream
- espresso powder
- salt
- vanilla
- chocolate
How to make Homemade Espresso Stracciatella Ice Cream:
Step 1
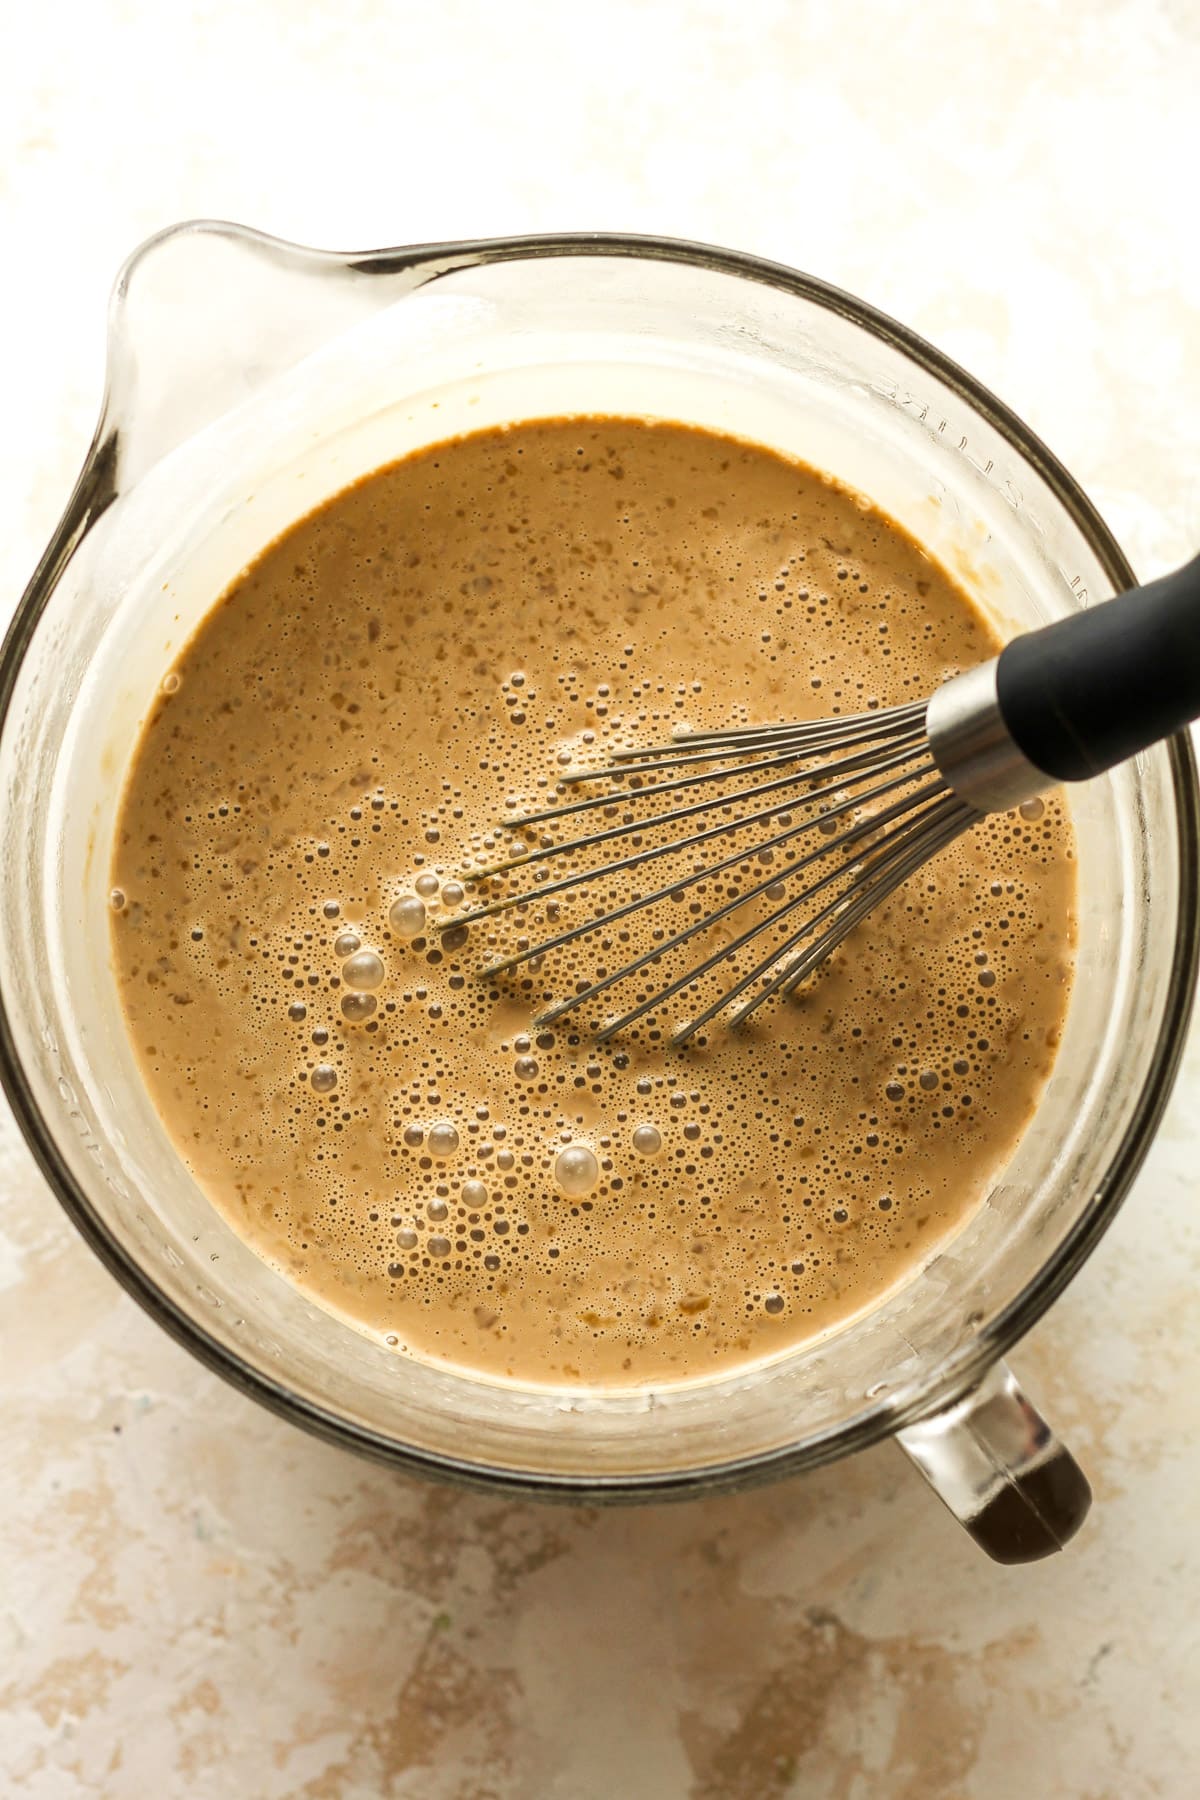
Temper the eggs. Combine the egg yolks and 1/4 cup of sugar in a mixing bowl. To a saucepan, combine the whole milk and heavy cream. Heat over medium heat to a temperature of 165 degrees F – using a digital thermometer. (Do not boil.)
When the milk is hot, drizzle about one cup of it into the eggs/sugar mixture, whisking constantly. Then pour the egg mixture back into the pan plus the remaining sugar and espresso powder. Heat mixture back to 165 degrees, whisking frequently.

Step 2
Strain. Pass the tempered egg mixture through a fine-mesh sieve or cheesecloth into another bowl to remove any potential lumps or bits, resulting in a smoother ice cream base. This step helps achieve a silky texture and eliminates any undesirable elements from the tempered eggs before incorporating them into the ice cream recipe
NOTE: While it’s not required to strain every homemade ice cream recipe, I normally do it in order to get the smoothest consistency.
Step 3
Combine base ingredients. In a large measuring cup or bowl, combine the tempered egg mixture, vanilla extract, and salt. Whisk until well combined.
Step 4
Chill. Place the liquid ice cream mixture in your refrigerator and chill for AT LEAST 3-4 hours, or until very cold.
Step 5
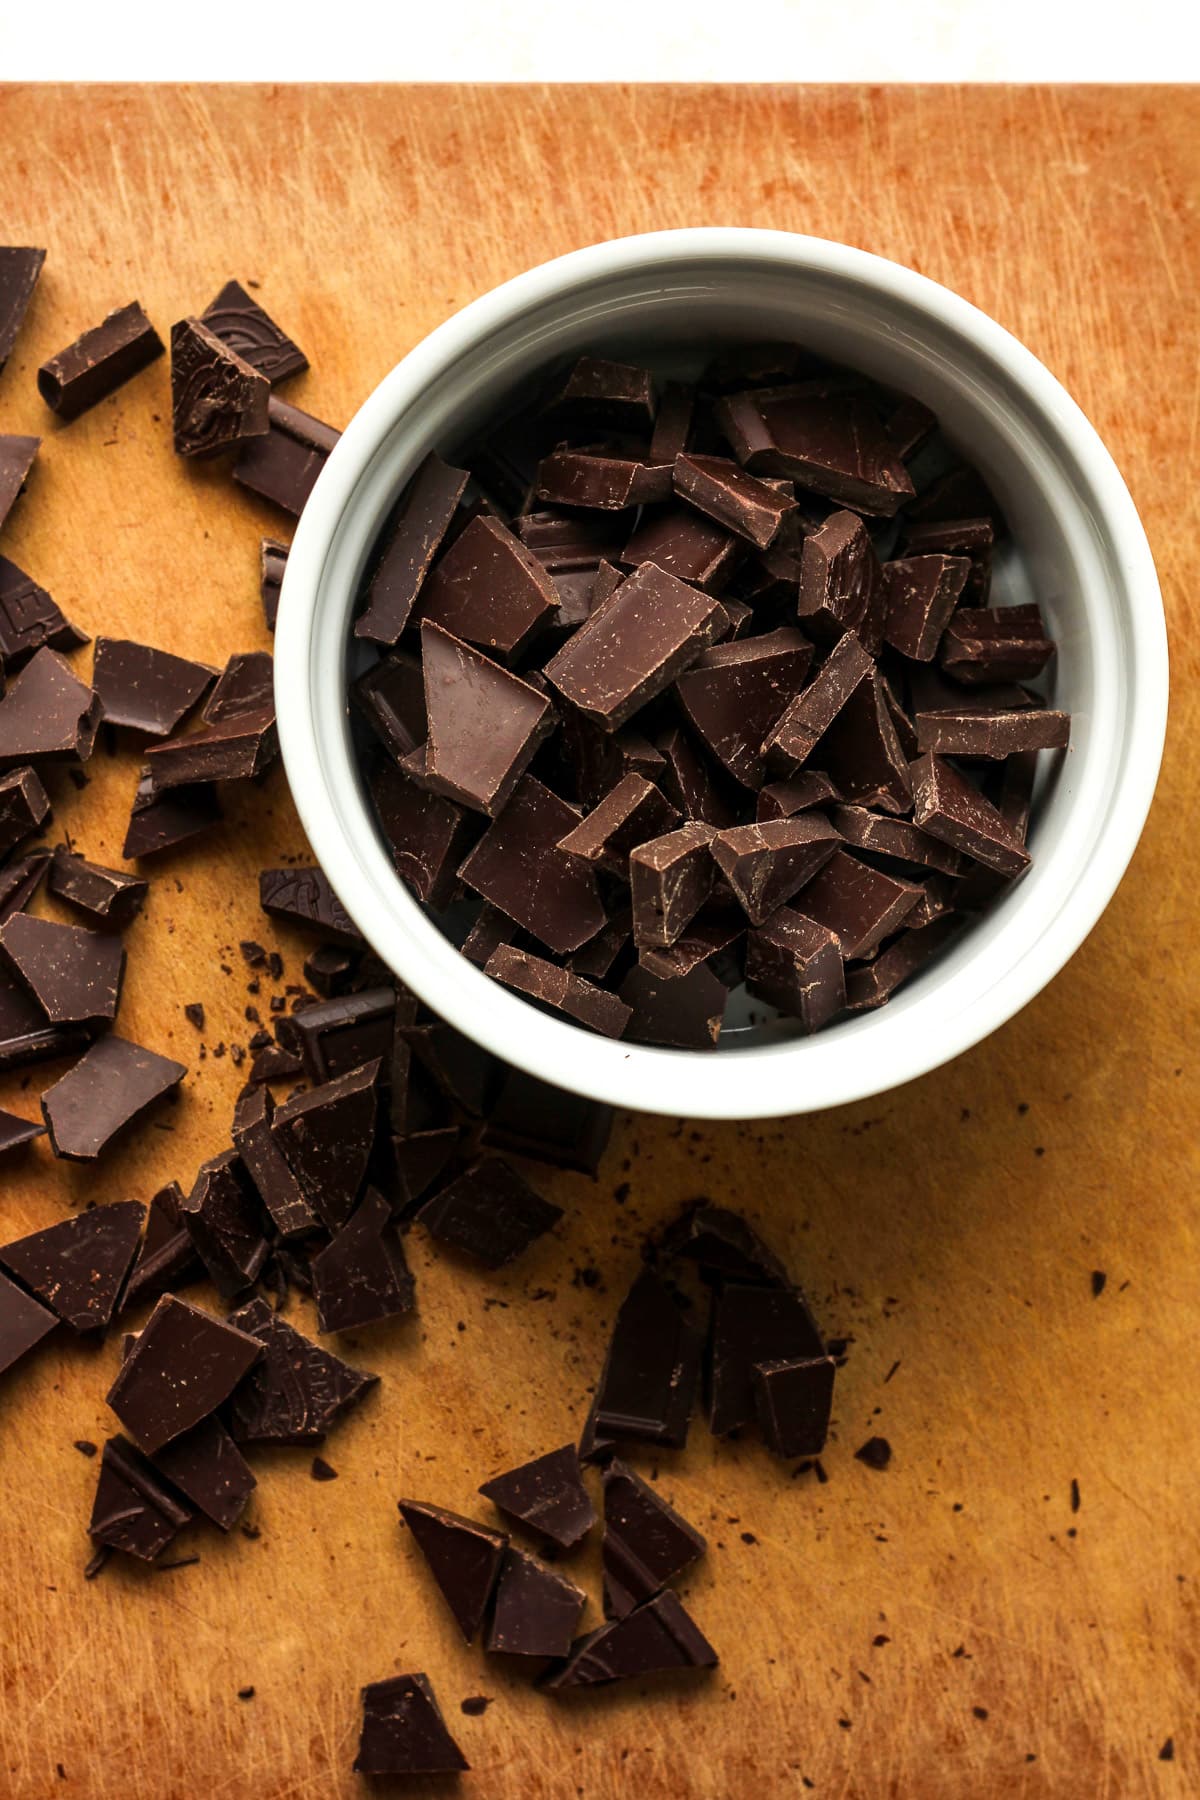
Prep chocolate. Right before churning the ice cream, combine chopped chocolate and two teaspoons of butter in a saucepan. Heat over medium-low heat until melted, stirring frequently.
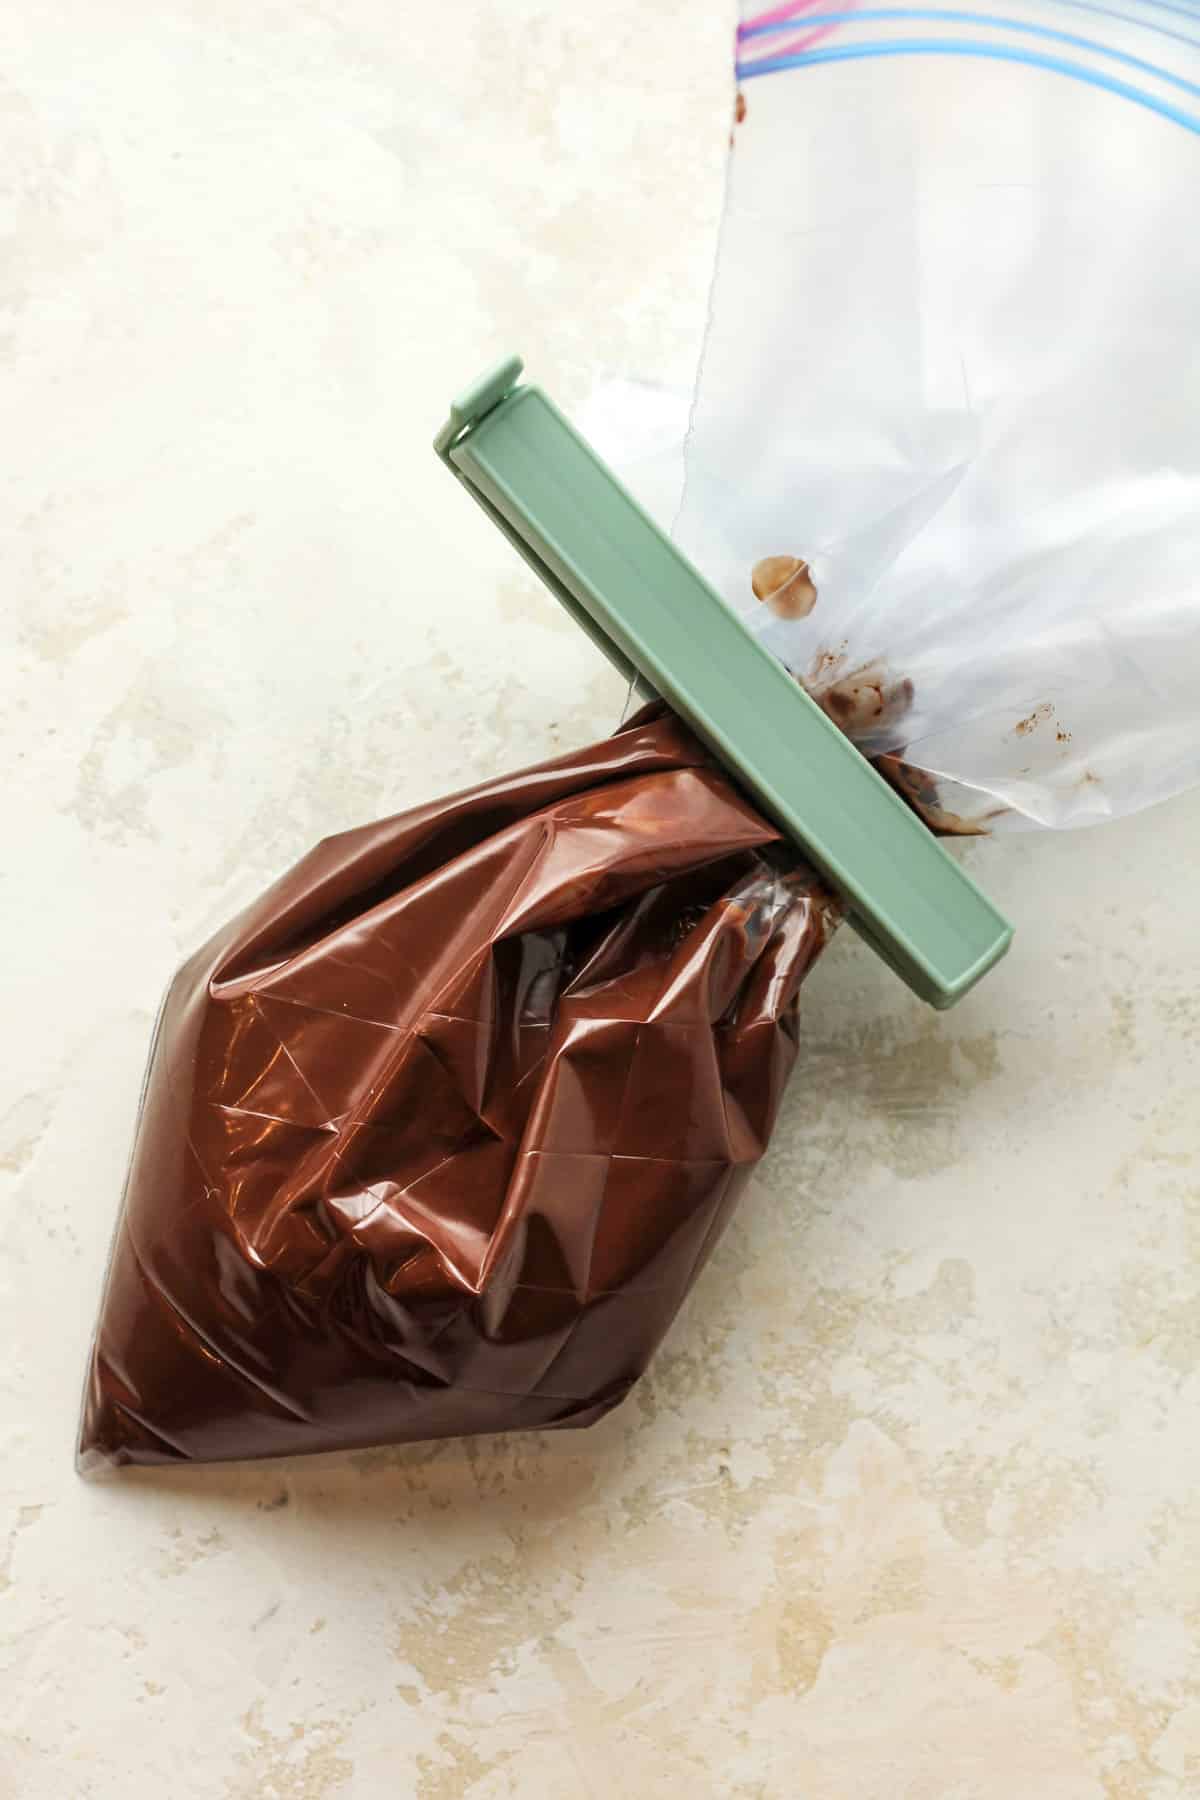
Pour chocolate mixture into a small bag. (I place the bag in a drinking glass to make it easier.) Secure end with a clip and then place in a glass of warm water until ready to use. This will keep the chocolate melty.
Step 6
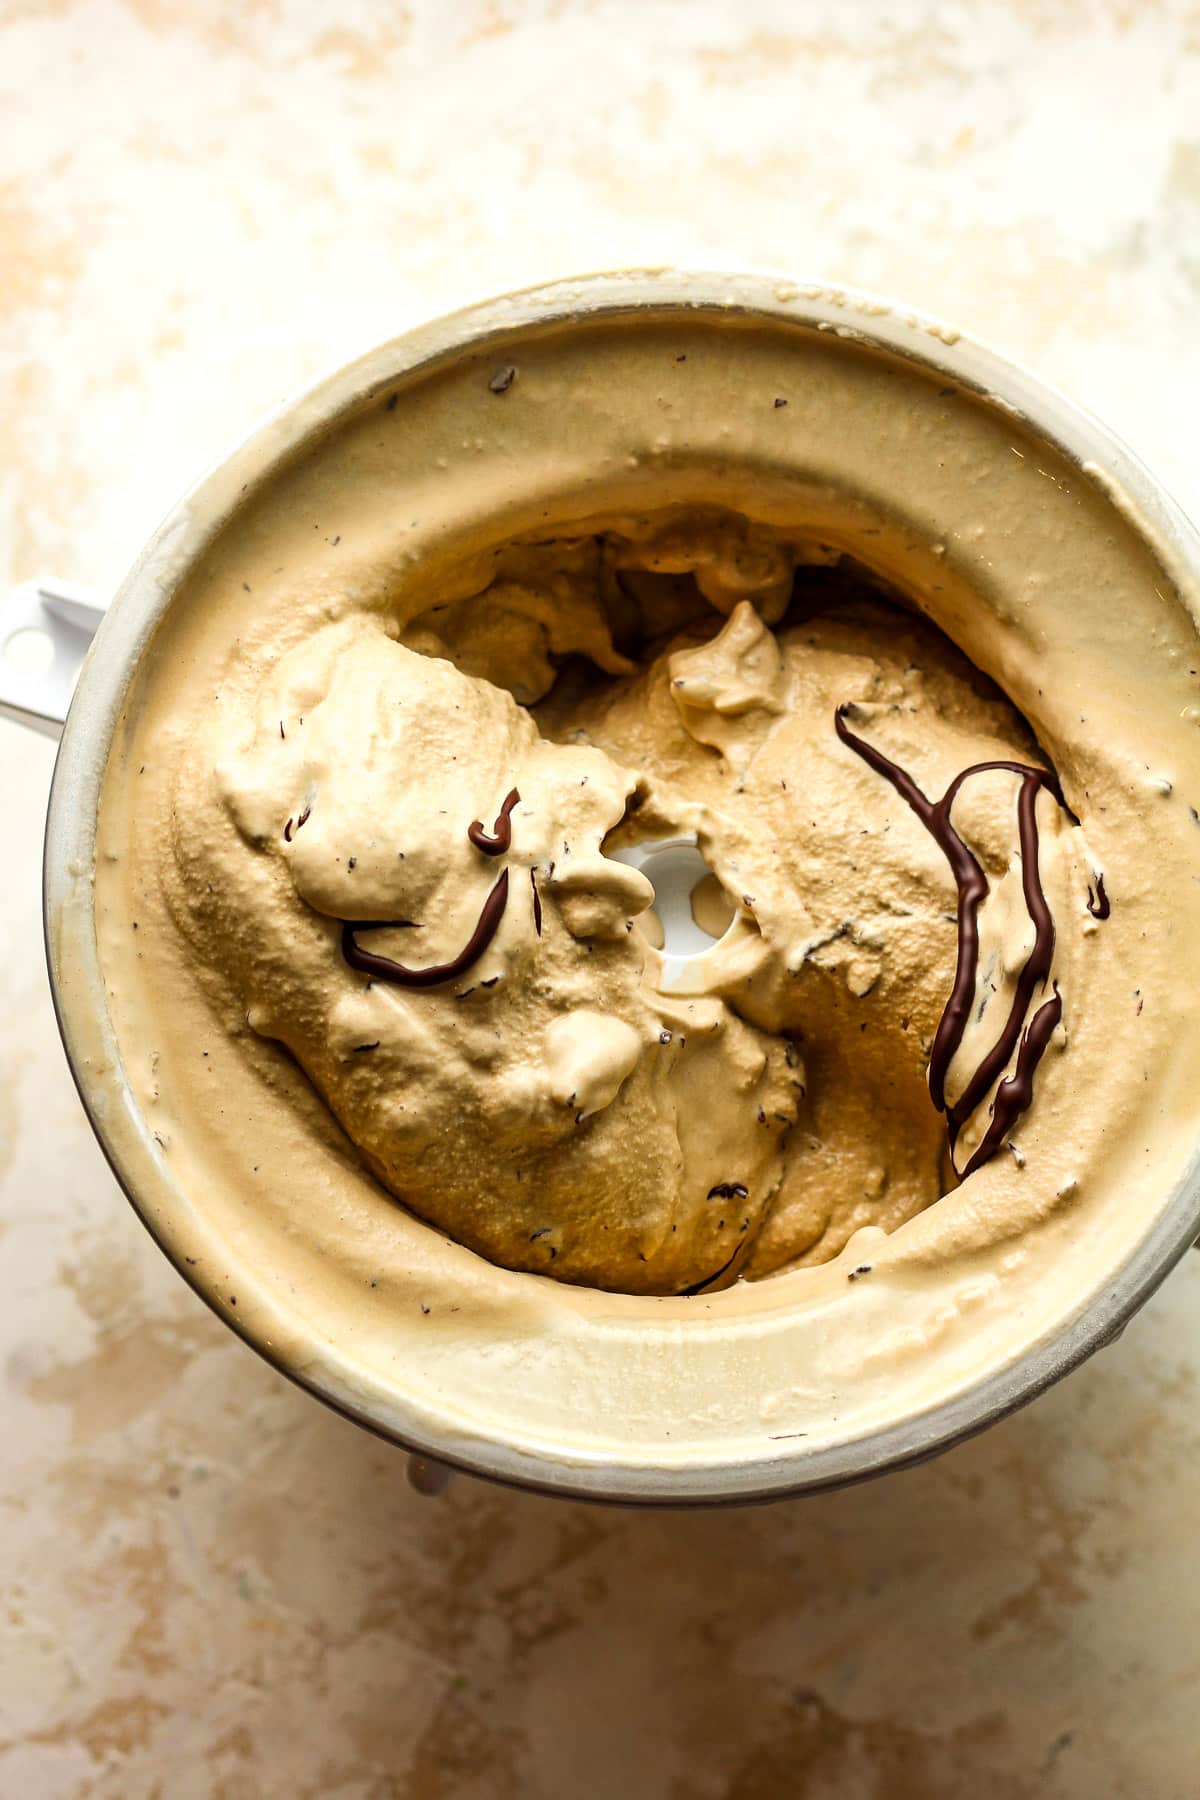
Churn ice cream. Start your 2-quart ice cream churner (I use a KitchenAid Attachment with a stand mixer – linked below.) and pour the chilled ice cream mixture into the bowl (the attachment) while it’s running. Churn the ice cream until it becomes thick and creamy.
You’ll see the ice cream thicken and rise toward the top of the bowl. The mixer may slow down slightly. (This should take 25-35 minutes or so.)
Step 7
Drizzle chocolate. During the last few minutes of churning, snip a small opening in the corner of the bag and slowly drizzle the melted chocolate in a thin, steady stream directly into the churning ice cream. The cold ice cream instantly sets the chocolate into those beautiful, delicate shards – and that is exactly what you are going for!
Step 8
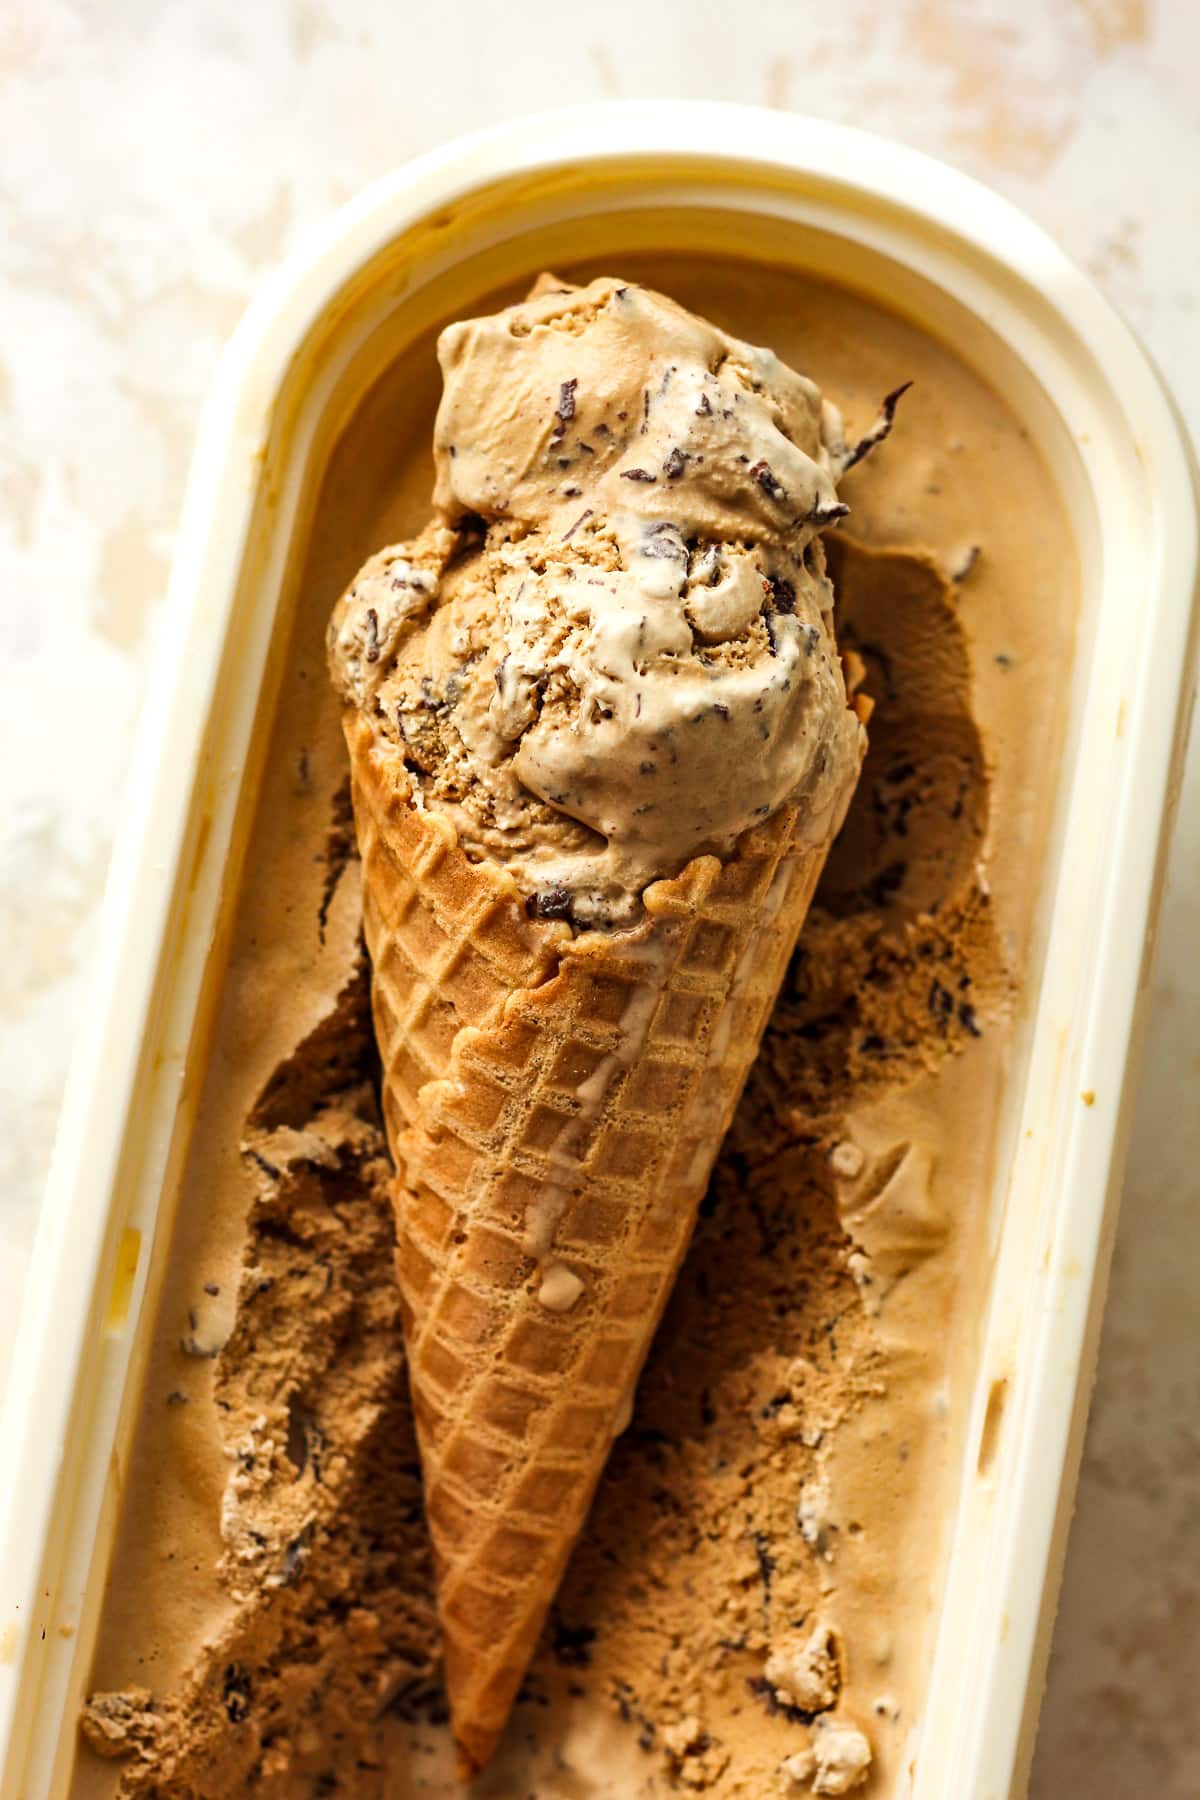
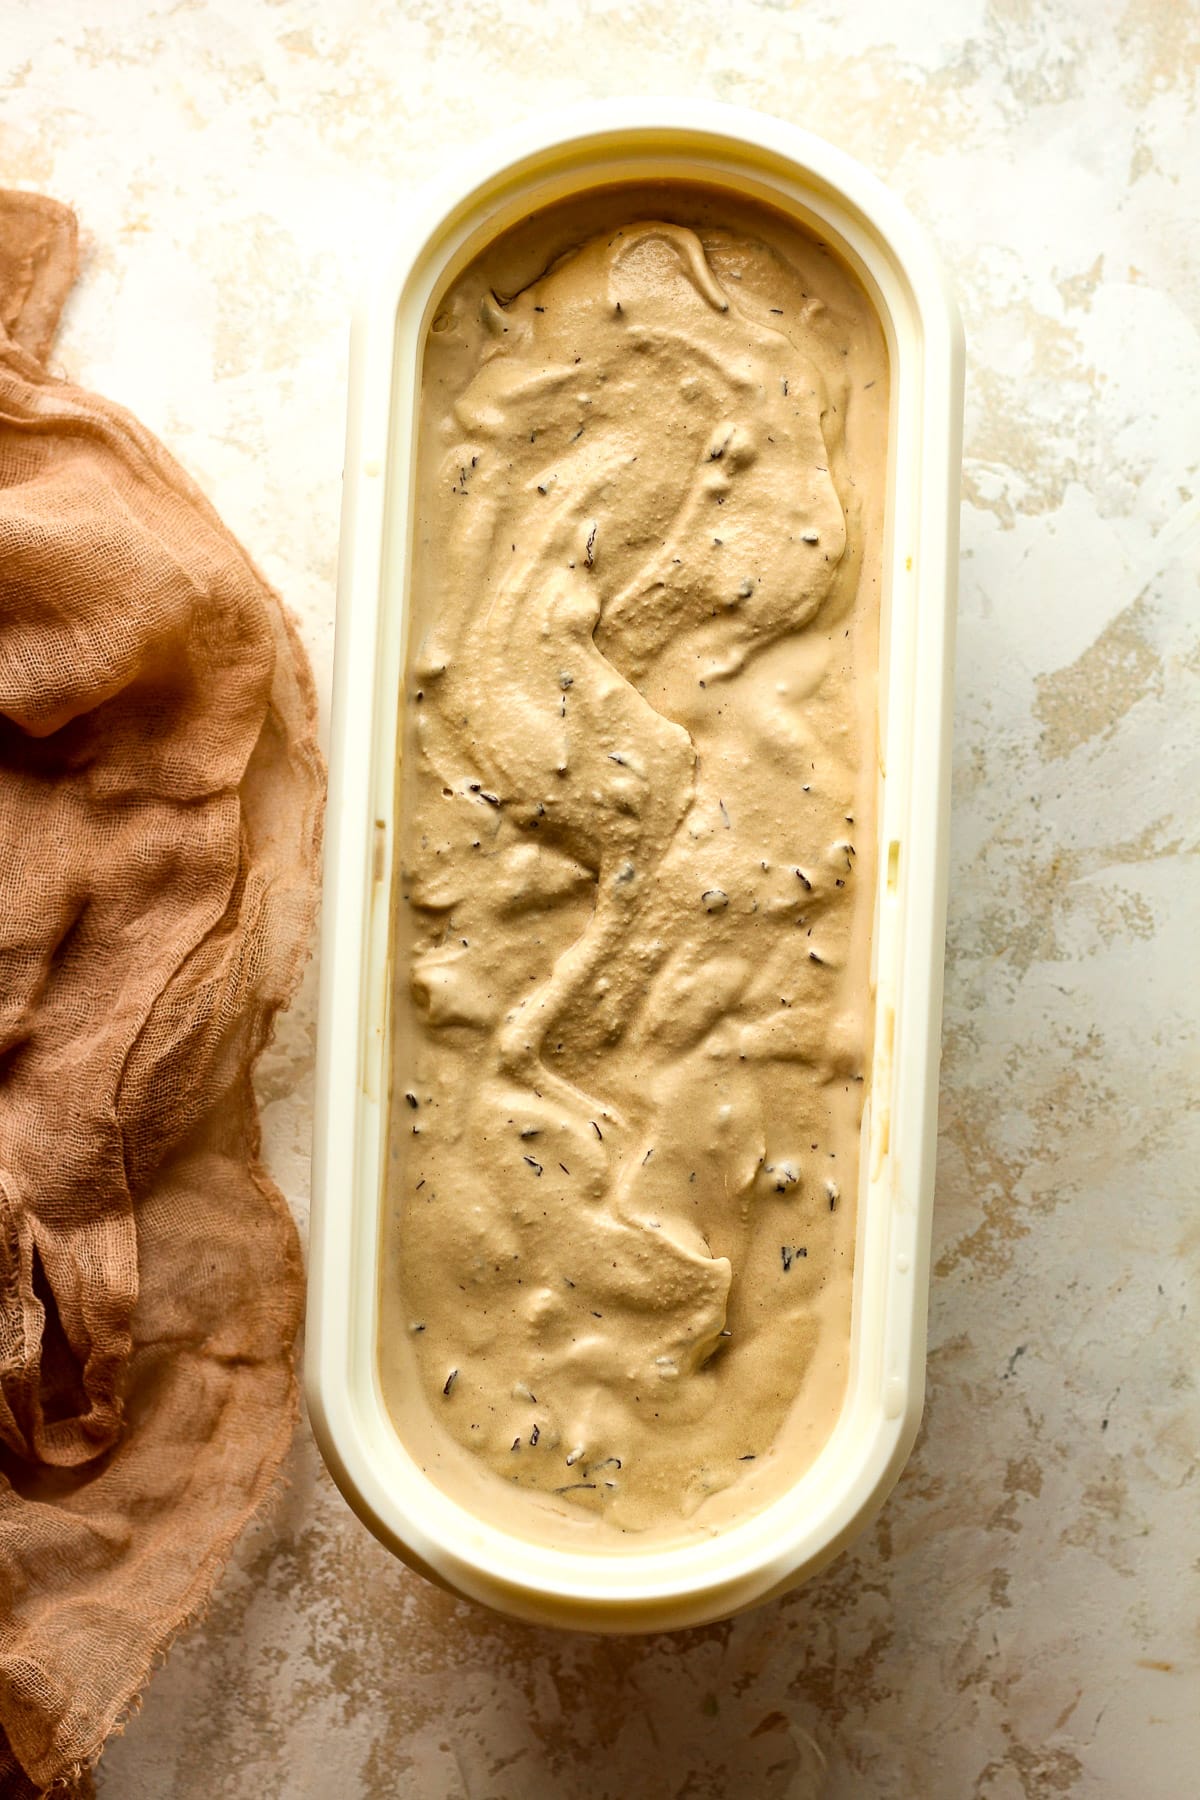
Add to a freezer-safe container (or a loaf pan). Add the churned ice cream into an ice cream container, spreading evenly to all sides.
Step 9
Freeze. Place the airtight container in the freezer to set up further. Initially, the ice cream will be very soft so freezing it for a couple of hours helps firm it up.
Step 10
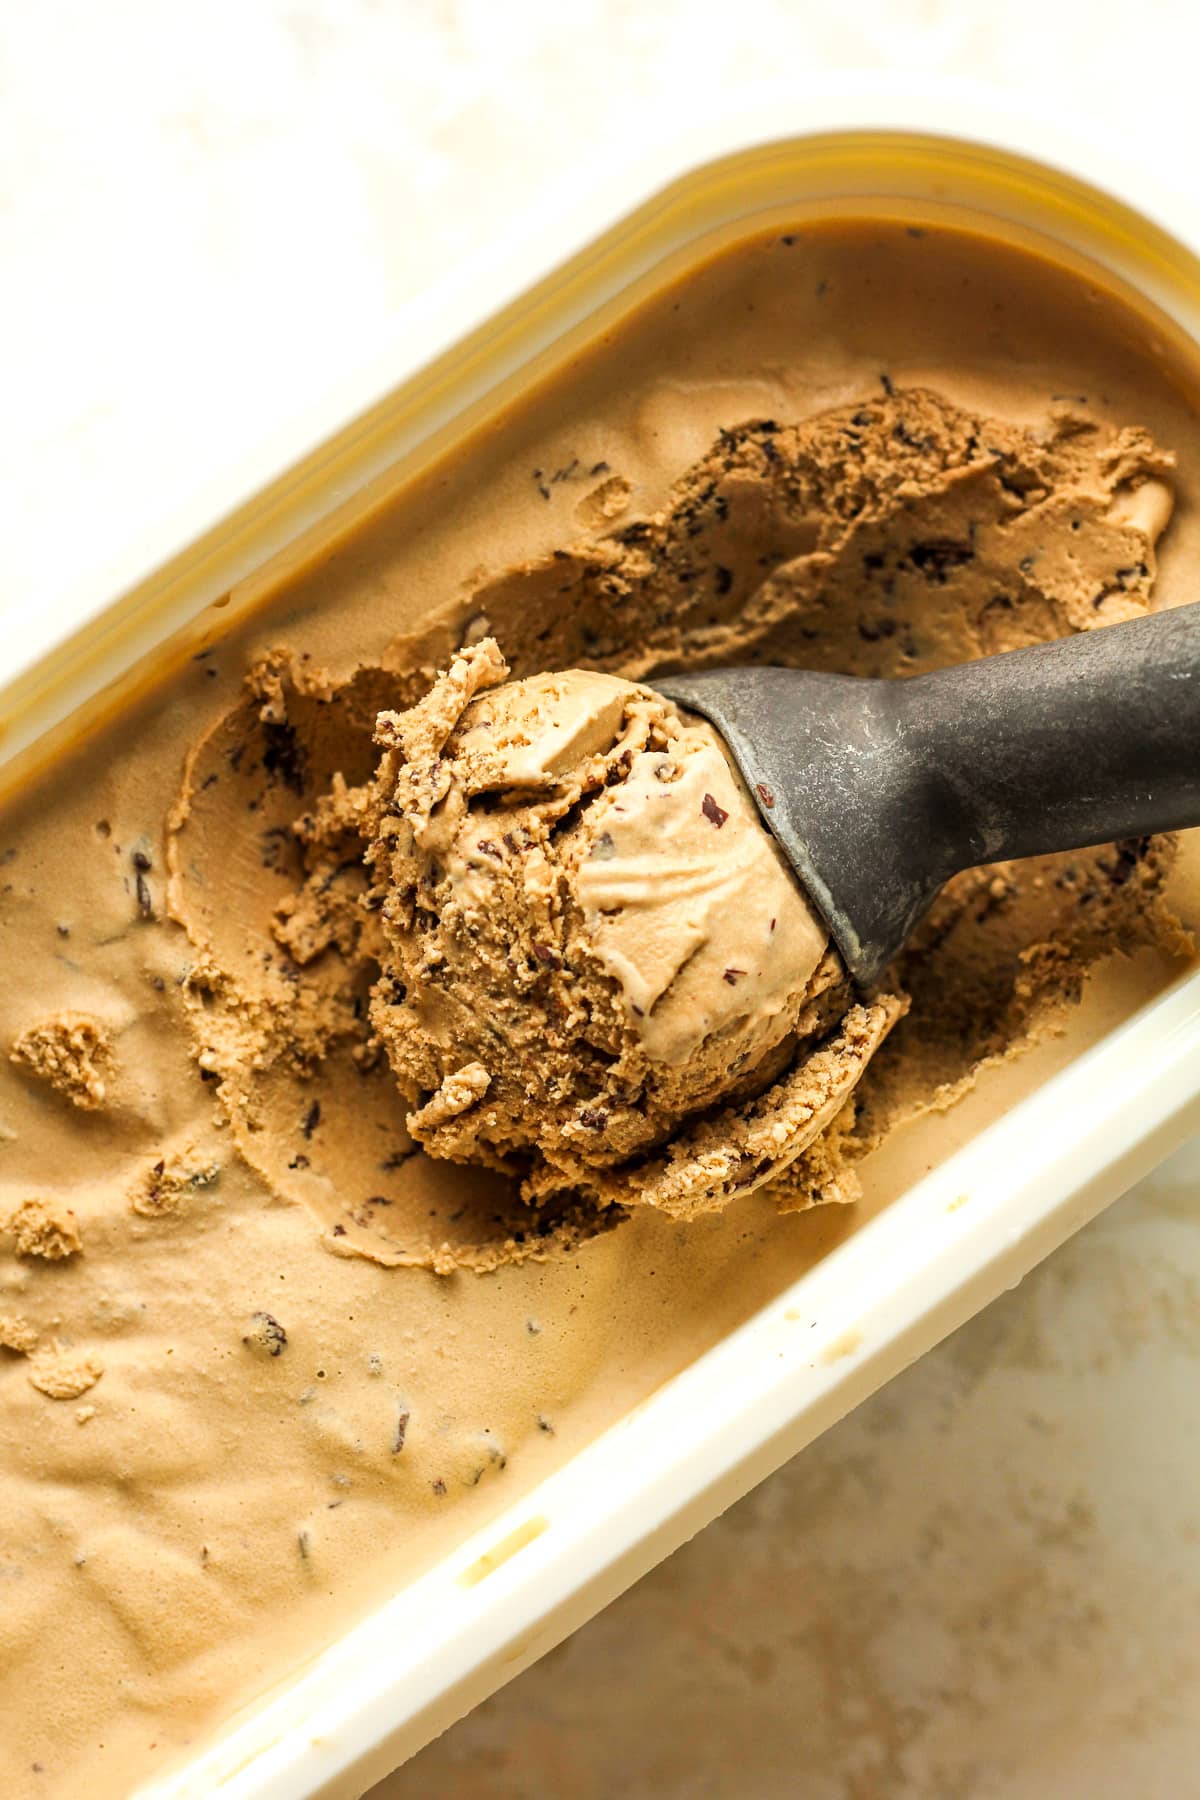
Serve. Add scoops of espresso stracciatella ice cream to cones or individual serving bowls or cones.
Recipe FAQs:
Stracciatella is a classic Italian ice cream style where melted chocolate is drizzled into churning ice cream, creating thin, delicate chocolate shards throughout. The word stracciatella actually means “little rags” in Italian – a nod to those beautiful irregular chocolate pieces scattered throughout every scoop!
Yes – an ice cream maker is needed to churn this recipe properly and create that smooth, creamy texture. A KitchenAid ice cream attachment works beautifully and is a great investment if you love making homemade ice cream!
Espresso powder is finely ground, dehydrated espresso that dissolves completely into the custard base. You can find it in most grocery stores near the coffee or baking aisle. In a pinch, instant coffee granules work as a substitute – just use a little more since they are slightly less intense.
The egg yolks are what create that rich, creamy, custard-style ice cream base. They add fat, richness, and a silky smooth texture that sets this ice cream apart from a simple no-churn version. Don’t skip them!
Melt the dark chocolate and let it cool slightly, then drizzle it slowly into the churning ice cream in a thin stream during the last few minutes of churning. The cold ice cream instantly sets the chocolate into those signature thin, delicate shards!
Yes, milk chocolate creates a sweeter, creamier stracciatella that pairs beautifully with the bold espresso flavor. Semi-sweet chocolate is also a great middle ground if you prefer something between dark and milk!
Other Delicious Ice Cream Recipes:
We love ice cream and it’s hard to choose our favorite! That’s why we enjoy them all.
Or try any one of our KitchenAid Ice Cream Recipes!
Kitchen Tools Used: (affiliate links)
xoxo ~Sue

Espresso Stracciatella Ice Cream
Ingredients
- 2 cups whole milk
- 2 cups heavy cream
- 4 large egg yolks
- 1 cup granulated sugar
- 2 Tablespoons espresso powder
- 1 Tablespoon vanilla extract
- pinch of salt
- 6 oz. dark chocolate
Instructions
- Temper the eggs. Combine the egg yolks and 1/4 cup of sugar in a mixing bowl. To a saucepan, combine the whole milk and heavy cream. Heat over medium heat to a temperature of 165 degrees F – using a digital thermometer. (Do not boil.) When the milk is hot, drizzle about one cup of it into the eggs/sugar mixture, whisking constantly. Then pour the egg mixture back into the pan plus the remaining sugar and espresso powder. Heat mixture back to 165 degrees, whisking frequently. 4 large egg yolks, 1 cup granulated sugar, 2 cups whole milk, 2 cups heavy cream, 2 Tablespoons espresso powder
- Strain. Pass the tempered egg mixture through a fine-mesh sieve or cheesecloth into another bowl to remove any potential lumps or bits, resulting in a smoother ice cream base. This step helps achieve a silky texture and eliminates any undesirable elements from the tempered eggs before incorporating them into the ice cream recipeNOTE: While it’s not required to strain every homemade ice cream recipe, I normally do it in order to get the smoothest consistency.
- Combine base ingredients. In a large measuring cup or bowl, combine the tempered egg mixture, vanilla extract, and salt. Whisk until well combined.1 Tablespoon vanilla extract, pinch of salt
- Chill. Place the liquid ice cream mixture in your refrigerator and chill for AT LEAST 3-4 hours, or until very cold.
- Prep chocolate. Right before churning the ice cream, combine chopped chocolate and two teaspoons of butter in a saucepan. Heat over medium-low heat until melted, stirring frequently.Pour chocolate mixture into a small bag. (I place the bag in a drinking glass to make it easier.) Secure end with a clip and then place in a glass of warm water until ready to use. This will keep the chocolate melty.6 oz. dark chocolate
- Churn ice cream. Start your 2-quart ice cream churner (I use a KitchenAid Attachment with a stand mixer – linked below.) and pour the chilled ice cream mixture into the bowl (the attachment) while it’s running. Churn the ice cream until it becomes thick and creamy.You’ll see the ice cream thicken and rise toward the top of the bowl. The mixer may slow down slightly. (This should take 25-35 minutes or so.)
- Drizzle chocolate. During the last few minutes of churning, snip a small opening in the corner of the bag and slowly drizzle the melted chocolate in a thin, steady stream directly into the churning ice cream. The cold ice cream instantly sets the chocolate into those beautiful, delicate shards – and that is exactly what you are going for!
- Add to a freezer-safe container (or a loaf pan). Add the churned ice cream into an ice cream container, spreading evenly to all sides.
- Freeze. Place the airtight container in the freezer to set up further. Initially, the ice cream will be very soft so freezing it for a couple of hours helps firm it up.
- Serve. Add scoops of espresso stracciatella ice cream to cones or individual serving bowls or cones.
Notes
Tips for making homemade ice cream using a KitchenAid Attachment:
- Pre-Freeze the Bowl Properly – Freeze the bowl for at least 15 hours (or overnight) to ensure it’s cold enough to churn ice cream properly. If the bowl isn’t fully frozen, the mixture won’t thicken properly.
- Chill Your Ingredients – Make sure your ice cream base is completely chilled before pouring it into the frozen bowl. This helps it freeze faster and develop a smooth texture.
- Start the Mixer First – Always turn on the mixer before adding the ice cream base. This prevents the liquid from freezing instantly to the sides of the bowl, which can hinder churning.
- Don’t Overfill the Bowl – The ice cream will expand as it freezes, so only fill the bowl about two-thirds full to allow room for expansion.
- Store Immediately – The ice cream will be soft-serve consistency when it’s done. For a firmer texture, transfer it to an airtight container and freeze for at least 2–4 hours before serving.
My two favorite flavors! So delicious!