Cranberry Walnut Sourdough Bread Recipe
Cranberry Walnut Sourdough Bread is a chewy bread filled with cranberries and walnuts. This sourdough makes a delicious toast with butter and jam and the perfect peanut butter and jelly sandwich!
Servings 12 slices
Calories 224kcal
Ingredients
- 75 grams bubbly sourdough starter
- 350 grams filtered water - slightly warmed
- 250 grams bread flour
- 250 grams all-purpose flour
- 10 grams fine sea salt
- 100 grams lower-sugar Craisins
- 75 grams walnuts - chopped
- 1 teaspoon cinnamon
- warm water - to coat fillings
Instructions
- Carefully measure out the water and sourdough starter in a mixing bowl, and stir well with a fork. Add the bread flour, all-purpose flour, and fine sea salt - and stir again.75 grams bubbly sourdough starter, 350 grams filtered water, 250 grams bread flour, 250 grams all-purpose flour, 10 grams fine sea salt
- Then use your hands to bring the ingredients together. It will look shaggy. Cover with a damp towel and let it sit for 45 minutes. (Be sure to set a timer.) This is the AUTOLYSE.
- Meanwhile, soak the Craisins and walnuts in some warm water. Let it soak during the autolyse and then drain well.
- After 45 minutes, add the Craisins, walnuts, and cinnamon. Then start the stretch and folds. Use your hand and lift the dough up on one side, stretching it upward, and then punch into the center of the dough. Turn the dough and repeat. Continue this process for about 30 seconds. This is the STRETCH AND FOLDS.100 grams lower-sugar Craisins, 75 grams walnuts, 1 teaspoon cinnamon
- You’ll want to try to get most of the add-ins to the center of the dough during this process. Form the dough into a smooth’ish ball, and place towel back in the bowl.
- ADDITIONAL STRETCH AND FOLDS: I recommend doing additional stretch and folds if time permits. Do these every 30 minutes for 3-4 more times to further develop the gluten structure.
- Let the dough rise for 6-8 hours, or overnight. It should almost double in size and appear soft on top. Small air bubbles may appear as well. This is the BULK RISE.
- Note: I recommend placing a damp towel on the dough for the overnight rise. You might also add a bit of oil to the top to keep a crust from forming on the dough overnight.
- Add a light dusting of flour to a baking mat or clean surface. Remove the dough to the mat and gently form into your desired shape, usually round or oblong. Don’t punch the dough down because you don’t want to remove all the air. Let dough sit for five minutes.
- After five minutes, use your hands to pull the dough toward you, dragging it along the mat to tighten it up. Repeat in the other directions to tighten. (Make sure you don’t have too much flour on the surface when tightening the dough, so there is some needed friction necessary to tighten it.)
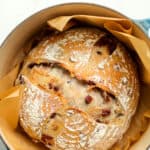
- Place the dough, seam side up, in a bowl lined with a towel or a prepared banneton basket (pictured below). Cover with a damp towel and let it sit for about 2-4 hours. For this bread, it does not need to double again in size. This is the SECOND RISE.
- NOTE: For both the bowl or banneton basket, you’ll need to prepare them. For a bowl, add a thin tea towel dusted with rice flour (or regular flour will work in a pinch). For the basket, add some rice flour as well. The rice flour will help prevent sticking while regular flour may not do this as well.
- Prepare for baking. Preheat oven to 450 degrees. Carefully remove the loaf to a piece of parchment paper, smooth side up. Then take a serrated edge knife or a bread lame (linked below), and score the bread a couple of times. Place the bread (including parchment paper) into a dutch oven.
- Bake. Add the lid to the pan and bake for 20 minutes. Then remove the lid and bake an additional 30-35 minutes, or until bread is nice and golden on top and bottom.
- Cool. Remove pan and then use parchment paper as handles to lift the bread out of the pan. Place on a cooling rack. Let the bread COMPLETELY COOL before slicing.
Notes
Make your own sourdough starter at home with just a few simple ingredients using Sourdough Starter Basics. In just over a week’s time and a little bit of patience, you’ll be ready to use your active starter to make the best sourdough bread! Join us on our sourdough journey!
Nutrition
Calories: 224kcal | Carbohydrates: 40g | Protein: 6g | Fat: 5g | Saturated Fat: 1g | Polyunsaturated Fat: 3g | Monounsaturated Fat: 1g | Sodium: 326mg | Potassium: 76mg | Fiber: 2g | Sugar: 6g | Vitamin A: 2IU | Vitamin C: 1mg | Calcium: 16mg | Iron: 1mg