Sourdough Sandwich Bread
Sourdough Sandwich Bread uses a bubbly sourdough starter to create the best everyday sandwich bread. After reading my sourdough baking tips, you'll soon be on your way to amazing avocado toast, sandwiches, paninis, or just plain bread with butter!
Servings 22 slices (2 loafs)
Calories 194kcal
Ingredients
- 200 grams active bubbly sourdough starter
- 600 grams warm filtered water
- 30 grams granulated sugar
- 40 grams oil
- 800 grams bread flour
- 200 grams all-purpose flour
- 20 grams fine sea salt
Instructions
- ** It's important to measure the ingredients for this recipe in grams. The kitchen scale I use is linked in the recipe. **
- Use a kitchen scale to measure the water and sourdough starter and add to a large bowl. Stir well with a fork. Add the remaining ingredients in the order listed - sugar, oil, bread flour, all-purpose flour, and sea salt. Stir again.600 grams warm filtered water, 200 grams active bubbly sourdough starter, 30 grams granulated sugar, 40 grams oil, 800 grams bread flour, 200 grams all-purpose flour, 20 grams fine sea salt
- Then use your hands to bring everything together. The dough will look scraggy. Cover with a damp towel, and set a timer for 30 minutes. This is the AUTOLYSE.
- Do a stretch and folding of the dough for about one minute, rotating the bowl as you do the folds. Place the dough seam-side down in the bowl, and cover with the towel again.
- ADDITIONAL STRETCH AND FOLDS: I recommend doing additional stretch and folds if time permits. Do these every 30 minutes for 3-4 more times to further develop the gluten structure.
- Leave the dough set on the counter-top for 6-8 hours, or overnight depending on several factors. The dough should double in size. This is the BULK RISE (or bulk fermentation).
- If you'd like, set the dough in the refrigerator for up to 24 hours. This will add to the "sour" taste of the dough.
- To avoid getting a crusty layer on the dough during the bulk rise, make sure the bowl is large and the towel is damp. You can also add a light coating of oil over the top of the dough, especially if you are letting it sit out overnight.
- Dust your counter or a baking mat with a light amount of flour. Move your dough from the bowl to the counter and form into your desired shape. Don't punch down, but pull the outsides inward to form shape. Let the dough sit for five minutes.
- Pull the dough towards you and away, trying to get the dough to be as tight as possible.
- Place the dough into two bread loafs, and cover with a damp towel. Let the dough rise until nearly doubled in size. The time this takes may vary greatly. This is the SECOND RISE (or final rise).
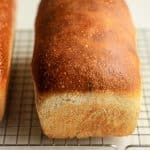
- Bake. When the dough is risen, preheat the oven to 400 degrees. Bake on the center rack for 40 - 45 minutes. If the top is getting too dark, cover with foil. Transfer bread to a wire rack to cool completely before slicing.
Notes
Expert Tips
- Make sure your starter is ready. If you store your starter in the refrigerator between use, make sure it’s active and ready to go before baking with it. I often feed it 2-3 times before using it after resting (i.e. sleeping in the refrigerator). You can test this with a float test. (See definition below.)
- Be flexible. If you’re bulk rise is taking longer than normal, or the starter isn’t as bubbly as you’d like it, be flexible. You can add time to either of these, and still make delicious bread. Many factors will come in to play as to when your sourdough is ready. In the summer months, the humidity and heat will make the process shorter. In the winter months, the process may be longer.
- Measure carefully and then adjust as needed. Make sure you use a digital scale to measure your ingredients in grams. This is important. Even with measuring carefully, you MAY need to adjust slightly. When your hands are on the dough doing stretches and folds, you will come to feel if more water/more flour is needed to make the dough pliable and soft. This comes with practice.
- Practice. Like I said above, as you practice making this bread and enjoying the bounties, you’ll learn all the little nuances to the sourdough process. Practice makes perfect!
- Let the bread cool. One of the biggest mistakes you can make is to slice the bread immediately after coming out of the oven. If you do this, it will be doughy tasting. Let the bread completely cool before slicing!
Nutrition
Calories: 194kcal | Carbohydrates: 36g | Protein: 6g | Fat: 3g | Saturated Fat: 1g | Polyunsaturated Fat: 1g | Monounsaturated Fat: 1g | Trans Fat: 1g | Sodium: 353mg | Potassium: 46mg | Fiber: 1g | Sugar: 1g | Vitamin A: 1IU | Calcium: 7mg | Iron: 1mg