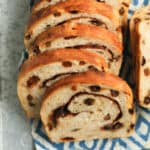
Cinnamon Raisin Sourdough Bread
Adding cinnamon and raisins to sourdough bread takes your everyday loaf up a notch. Cinnamon Raisin Sourdough Bread makes the best toast, especially when you add a pat of butter or a slathering of jam!
Servings 10 slices
Calories 243kcal
Ingredients
- 75 grams bubbly active sourdough starter
- 350 grams filtered water
- 480 grams bread flour
- 35 grams whole wheat flour
- 10 grams fine sea salt
- 120 grams raisins
- 50 grams brown sugar
- 5 grams cinnamon
Instructions
- Measure the ingredients. Combine filtered water and bubbly, active sourdough starter in a mixing bowl and stir well with a fork. Then add the bread flour, whole wheat flour, and sea salt – and stir again.75 grams bubbly active sourdough starter, 350 grams filtered water, 480 grams bread flour, 35 grams whole wheat flour, 10 grams fine sea salt
- Then use your hands to bring the ingredients together. The dough will look shaggy. Cover with a damp towel and let it sit for 45 minutes. THIS IS THE AUTOLYSE.
- Soak raisins. Soak the raisin in some warm water for about an hour. Drain the liquid off.
- Add raisins. After the autolyse, add the raisins and start the stretch and folds. Use your hand and lift the dough up on one side, stretching it upward, and then punch into the center of the dough. Turn the dough and repeat, trying to keep the raisins in the center of the dough. Continue this process for about one minute. This is the STRETCH AND FOLDS. Form the dough into a smooth ball, and place damp towel back on the bowl.120 grams raisins
- ADDITIONAL STRETCH AND FOLDS: I recommend doing additional stretch and folds if time permits. Do these every 30 minutes for 3-4 more times to further develop the gluten structure.
- Let rise. Let the dough rise for 6-8 hours, or overnight if needed. (This time can be adjusted as needed.) It should almost double in size and appear soft on top. Small air bubbles may appear as well. THIS IS THE BULK RISE.** If leaving the dough out overnight, you’ll want to rub a bit of oil on top of the dough to prevent a crust from forming on top. Otherwise, you’ll want to make sure the towel is damp and doesn’t dry out.
- Add brown sugar and cinnamon. Remove the dough from the bowl to a slightly floured baking mat. Let it rest for five minutes. Then use your hands to flatten into a rectangle. Spread the sugar and cinnamon mixture over the top, leaving some room on the edges. Then roll it up so that it fits nicely into a loaf pan.50 grams brown sugar, 5 grams cinnamon
- Place the dough into a sprayed loaf pan. Cover with a damp towel and let the dough rise again until it rises just above the rim of the pan. This may take anywhere from 2-6 hours or so. THIS IS THE SECOND RISE.
- NOTE: After you shape your sourdough loaf, you can place it in the refrigerator for 8–10 hours (or even longer). The cold slows the yeast way down, which lets the dough ferment gently and build deeper flavor without over‑proofing. When you’re ready to bake, take the loaf out, let it finish rising at room temperature until it looks slightly puffy again, then bake as usual. It’s an easy way to fit sourdough into your schedule and make it taste even better.
- Bake bread. Bake bread in a preheated 400 degree oven. for 40-45 minutes, or until golden brown on to and cooked through. If you want to check for doneness, insert a digital thermometer into the center; the bread should register between 195-200°F when it’s fully baked.Remove from oven and brush the top with butter.
- Let cool. Let the bread COMPLETELY cool before slicing, about an hour or longer.
A bubbly, active sourdough starter is the engine that makes your bread rise, so you want it at its peak before mixing your dough. When it’s ready, it should look light and airy, with lots of visible bubbles and a slightly domed top. It should also smell pleasantly tangy and feel loose and lively when you stir it. Using your starter at this stage gives your dough the strength, flavor, and fermentation power it needs for a great loaf.
Notes
- If your starter is rather small, you'll need to bulk it up so that you have enough to bake with and some to keep. (Because my rule of thumb is to NEVER RUN OUT OF STARTER!)
- Don’t skip the step of soaking the raisins. Soaking the raisins will allow them to stay nice and plump and hydrated, and thus preventing them from drying out during the baking process.
- Be sure to mix the raisins into the dough as much as possible. Don't worry too much if the raisins look to be clumped up in the dough at first. They'll disperse nicely as you work with the dough later on.
- One of the biggest mistakes you can make is to slice the bread immediately after coming out of the oven. If you do this, it will be doughy tasting. Let the bread completely cool before slicing!
Nutrition
Calories: 243kcal | Carbohydrates: 52g | Protein: 7g | Fat: 1g | Saturated Fat: 1g | Polyunsaturated Fat: 1g | Monounsaturated Fat: 1g | Sodium: 395mg | Potassium: 164mg | Fiber: 3g | Sugar: 5g | Vitamin A: 3IU | Vitamin C: 1mg | Calcium: 22mg | Iron: 1mg