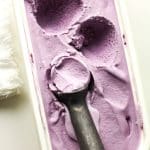
Blueberry Ice Cream Recipe
This homemade blueberry ice cream is rich, creamy, and bursting with fresh blueberry flavor in every scoop. Made with real blueberries and a simple custard base, it's the perfect summertime treat for any ice cream lover.
Servings 8 1-cup servings
Calories 461kcal
Ingredients
For the blueberries:
- 2 pints blueberries - or 24 ounces
- 1/2 cup granulated sugar - divided
- 1/2 large lemon - freshly squeezed
The remaining:
- 4 large egg yolks
- 3/4 cup granulated sugar
- 2 cups whole milk
- 2 cups heavy cream
- 1 Tablespoon vanilla extract
- a pinch of salt
Instructions
NOTE: I recently adapted this recipe to leave out the blueberry pulp. This recipe now includes only the blueberry juice - but the pulp can be added if you prefer it!
- If using KitchenAid attachment, place the bowl into the freezer a full day in advance (or at least 15 hours) before churning.
- Temper the eggs. Combine the egg yolks and 1/4 cup of sugar in a mixing bowl. Add the whole milk and heavy cream to a saucepan and heat over medium heat to a temperature of 165 degrees F. (Do not boil.) When the dairy is hot, drizzle about one cup of it into the eggs/sugar mixture, whisking constantly. Then pour the egg mixture back into the pan, plus another 1/2 cup sugar, and heat to 165 degrees F. The mixture should be thick and easily coat the back of a spoon.4 large egg yolks, 3/4 cup granulated sugar, 2 cups whole milk, 2 cups heavy cream
- Cook blueberries. In a medium saucepan, combine the blueberries, the freshly squeezed lemon, and 1/2 cup of granulated sugar. Cook on medium heat, and use a potato masher to smash the blueberries open while cooking. This process will take about 20 minutes.2 pints blueberries, 1/2 large lemon, 1/2 cup granulated sugar
- Strain the blueberries. Pour the cooked blueberries into a fine-mesh strainer set over a bowl, reserving all of the juices. Use the back of a spoon to gently press and stir the berries, extracting as much juice as possible. Let the blueberry juice cool.
- Combine ice cream ingredients. In a large measuring bowl, combine the cooled tempered egg mixture, the blueberry JUICE (not the berry pulp), and the vanilla extract. Mix well and refrigerate for at least four hours before churning. The mixture should be VERY COLD!Mix well and refrigerate for at least four hours before churning. The mixture should be VERY COLD!1 Tablespoon vanilla extract, a pinch of salt
- Churn. If using a KitchenAid attachment, start the mixer with the attachment so that it’s turning BEFORE you pour the liquid in. Then pour in whisked and chilled ingredients and let it churn until finished. You’ll know it’s done when the mixer starts slowing down and it rises to the top of the bowl, approximately 25-30 minutes.
- Transfer to container. Use a rubber scraper to pour the ice cream out of the bowl into a freezer-safe container, smoothing evenly to all sides.
- Freeze the ice cream until ready to serve. The ice cream will be a bit soft so it needs a couple of hours to firm up.
Video
Notes
TIPS for using KitchenAid Attachment:
- Place bowl attachment in freezer. You’ll want to be sure to store the bowl in the freezer for AT LEAST 15 hours before using. Since we have an extra freezer in our laundry room, I keep ours in there all the time. That way we can make ice cream on a whim!
- Run mixer in advance. Attach bowl to the KitchenAid mixer and add the attachments. Start mixer on the lowest setting BEFORE adding ice cream mixture. This will prevent the bowl from freezing up.
- Add liquid while mixer is running. Then carefully pour the liquid into the bowl attachment while it’s running.
- Let it slow down slightly. The ice cream is done when you see it expanding to the top of the bowl and the mixer starts to slow down.
Nutrition
Calories: 461kcal | Carbohydrates: 54g | Protein: 6g | Fat: 26g | Saturated Fat: 16g | Polyunsaturated Fat: 2g | Monounsaturated Fat: 7g | Cholesterol: 166mg | Sodium: 45mg | Potassium: 261mg | Fiber: 3g | Sugar: 48g | Vitamin A: 1161IU | Vitamin C: 15mg | Calcium: 135mg | Iron: 1mg