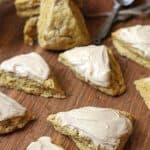
Mini Glazed Pumpkin Scones
These Mini Glazed Pumpkin Scones are crumbly, buttery, and flakey, and they remind me of fall. Perfect snack for your morning coffee!
Servings 14 mini scones
Calories 244kcal
Ingredients
For the scones:
- 2.5 cups all-purpose flour
- 1/3 cup brown sugar
- 1 Tablespoon baking powder
- 1/2 teaspoon salt
- 1 teaspoon cinnamon
- 1/2 teaspoon pumpkin pie spice
- 3/4 cup unsalted butter - COLD
- 1/4 cup pumpkin
- 1 large egg
- 1 teaspoons vanilla
- 3-4 Tablespoons half and half - or heavy cream or buttermilk
For the glaze:
- 1 Tablespoon unsalted butter - melted
- 2 Tablespoons half and half
- 1 teaspoon vanilla
- 1 cup powdered sugar - more or less, depending on consistency
Instructions
For the scones:
- Preheat oven to 375 degrees. Line a baking sheet with parchment paper.
- In a mixing bowl, combine the flour, brown sugar, baking powder, salt, cinnamon, and pumpkin pie spice.
- In another bowl, combine the pumpkin, egg, vanilla, and 3 tablespoons of half and half. (Don't add extra liquid until the end, and just IF needed.)
- Take the cold butter out of the refrigerator and slice into chunks. Using pastry cutter, cut the butter into the dry ingredients until it resembles course crumbs. You want to SEE crumbs of butter.
- Add wet ingredients to dry ingredients and stir until just combined. Don't over-mix or the scones will be tough. You may need to add additional half and half if the dough is too dry. But it should be on the dryer side verses too wet.
- Turn dough onto a floured surface. Use hands to form into a large circle and press down to about 1/2 to 3/4 inch thickness. Cut into 14 equal wedges - or any other shape you like.
- Transfer wedges to prepared baking sheet. Bake until just barely browned on top, about 15 to 17 minutes. Cool on baker's rack.
For the glaze:
- Melt the butter in medium sized bowl. Add half and half and vanilla. Then add in powdered sugar until right consistency. You want it to be thick but spreadable.
- Spread the glaze on the scones, allowing it to set before storing.
Notes
- Make sure you have everything out on your kitchen counter and ready to go, before the step where you add the butter.
- The butter should be COLD when you mix it in. I usually cube the butter and then stick it in the freezer while I'm getting everything else ready to go.
- When you mix the wet ingredients with the dry, be careful to add JUST enough so that the dough is somewhat dry. If your dough is too wet, the scone will not be crumbly. It will be more like a muffin.
- If the dough gets too wet, add more flour. If the dough is too dry and won't stay together, add more cream VERY slowly (just a few drops at a time).
- Use flour on your mat to prevent the dough from sticking to it.
- Bake the scones until they are just barely browning on top.
Nutrition
Calories: 244kcal | Carbohydrates: 31g | Protein: 3g | Fat: 11g | Saturated Fat: 7g | Cholesterol: 43mg | Sodium: 94mg | Potassium: 139mg | Sugar: 13g | Vitamin A: 545IU | Vitamin C: 0.2mg | Calcium: 57mg | Iron: 1.2mg